作者:王芃 wpcfan@gmail.com
第一节:初识Angular-CLI
第二节:登录组件的构建
第三节:建立一个待办事项应用
第四节:进化!模块化你的应用
第五节:多用户版本的待办事项应用
第六节:使用第三方样式库及模块优化用
第七节:给组件带来活力
Rx--隐藏在Angular 2.x中利剑
Redux你的Angular 2应用
第八节:查缺补漏大合集(上)
第九节:查缺补漏大合集(下)
第三节:建立一个待办事项应用
这一章我们会建立一个更复杂的待办事项应用,当然我们的登录功能也还保留,这样的话我们的应用就有了多个相对独立的功能模块。以往的web应用根据不同的功能跳转到不同的功能页面。但目前前端的趋势是开发一个SPA(Single Page Application 单页应用),所以其实我们应该把这种跳转叫视图切换:根据不同的路径显示不同的组件。那我们怎么处理这种视图切换呢?幸运的是,我们无需寻找第三方组件,Angular官方内建了自己的路由模块。
建立routing的步骤
由于我们要以路由形式显示组件,建立路由前,让我们先把src\app\app.component.html中的<app-login></app-login>删掉。
- 第一步:在
src/index.html中指定基准路径,即在<head>中加入<base href="/">,这个是指向你的index.html所在的路径,浏览器也会根据这个路径下载css,图像和js文件,所以请将这个语句放在 head 的最顶端。 - 第二步:在
src/app/app.module.ts中引入RouterModule:import { RouterModule } from '@angular/router'; - 第三步:定义和配置路由数组,我们暂时只为login来定义路由,仍然在
src/app/app.module.ts中的imports中
  imports: [
    BrowserModule,
    FormsModule,
    HttpModule,
    RouterModule.forRoot([
      {
        path: 'login',
        component: LoginComponent
      }
    ])
  ],
注意到这个形式和其他的比如BrowserModule、FormModule和HTTPModule表现形式好像不太一样,这里解释一下,forRoot其实是一个静态的工厂方法,它返回的仍然是Module,下面的是Angular API文档给出的RouterModule.forRoot的定义。
forRoot(routes: Routes, config?: ExtraOptions) : ModuleWithProviders
为什么叫forRoot呢?因为这个路由定义是应用在应用根部的,你可能猜到了还有一个工厂方法叫forChild,后面我们会详细讲。接下来我们看一下forRoot接收的参数,参数看起来是一个数组,每个数组元素是一个{path: 'xxx', component: XXXComponent}这个样子的对象。这个数组就叫做路由定义(RouteConfig)数组,每个数组元素就叫路由定义,目前我们只有一个路由定义。路由定义这个对象包括若干属性:
- path:路由器会用它来匹配路由中指定的路径和浏览器地址栏中的当前路径,如 /login 。
- component:导航到此路由时,路由器需要创建的组件,如
LoginComponent。 - redirectTo:重定向到某个path,使用场景的话,比如在用户输入不存在的路径时重定向到首页。
- pathMatch:路径的字符匹配策略
- children:子路由数组
运行一下,我们会发现出错了
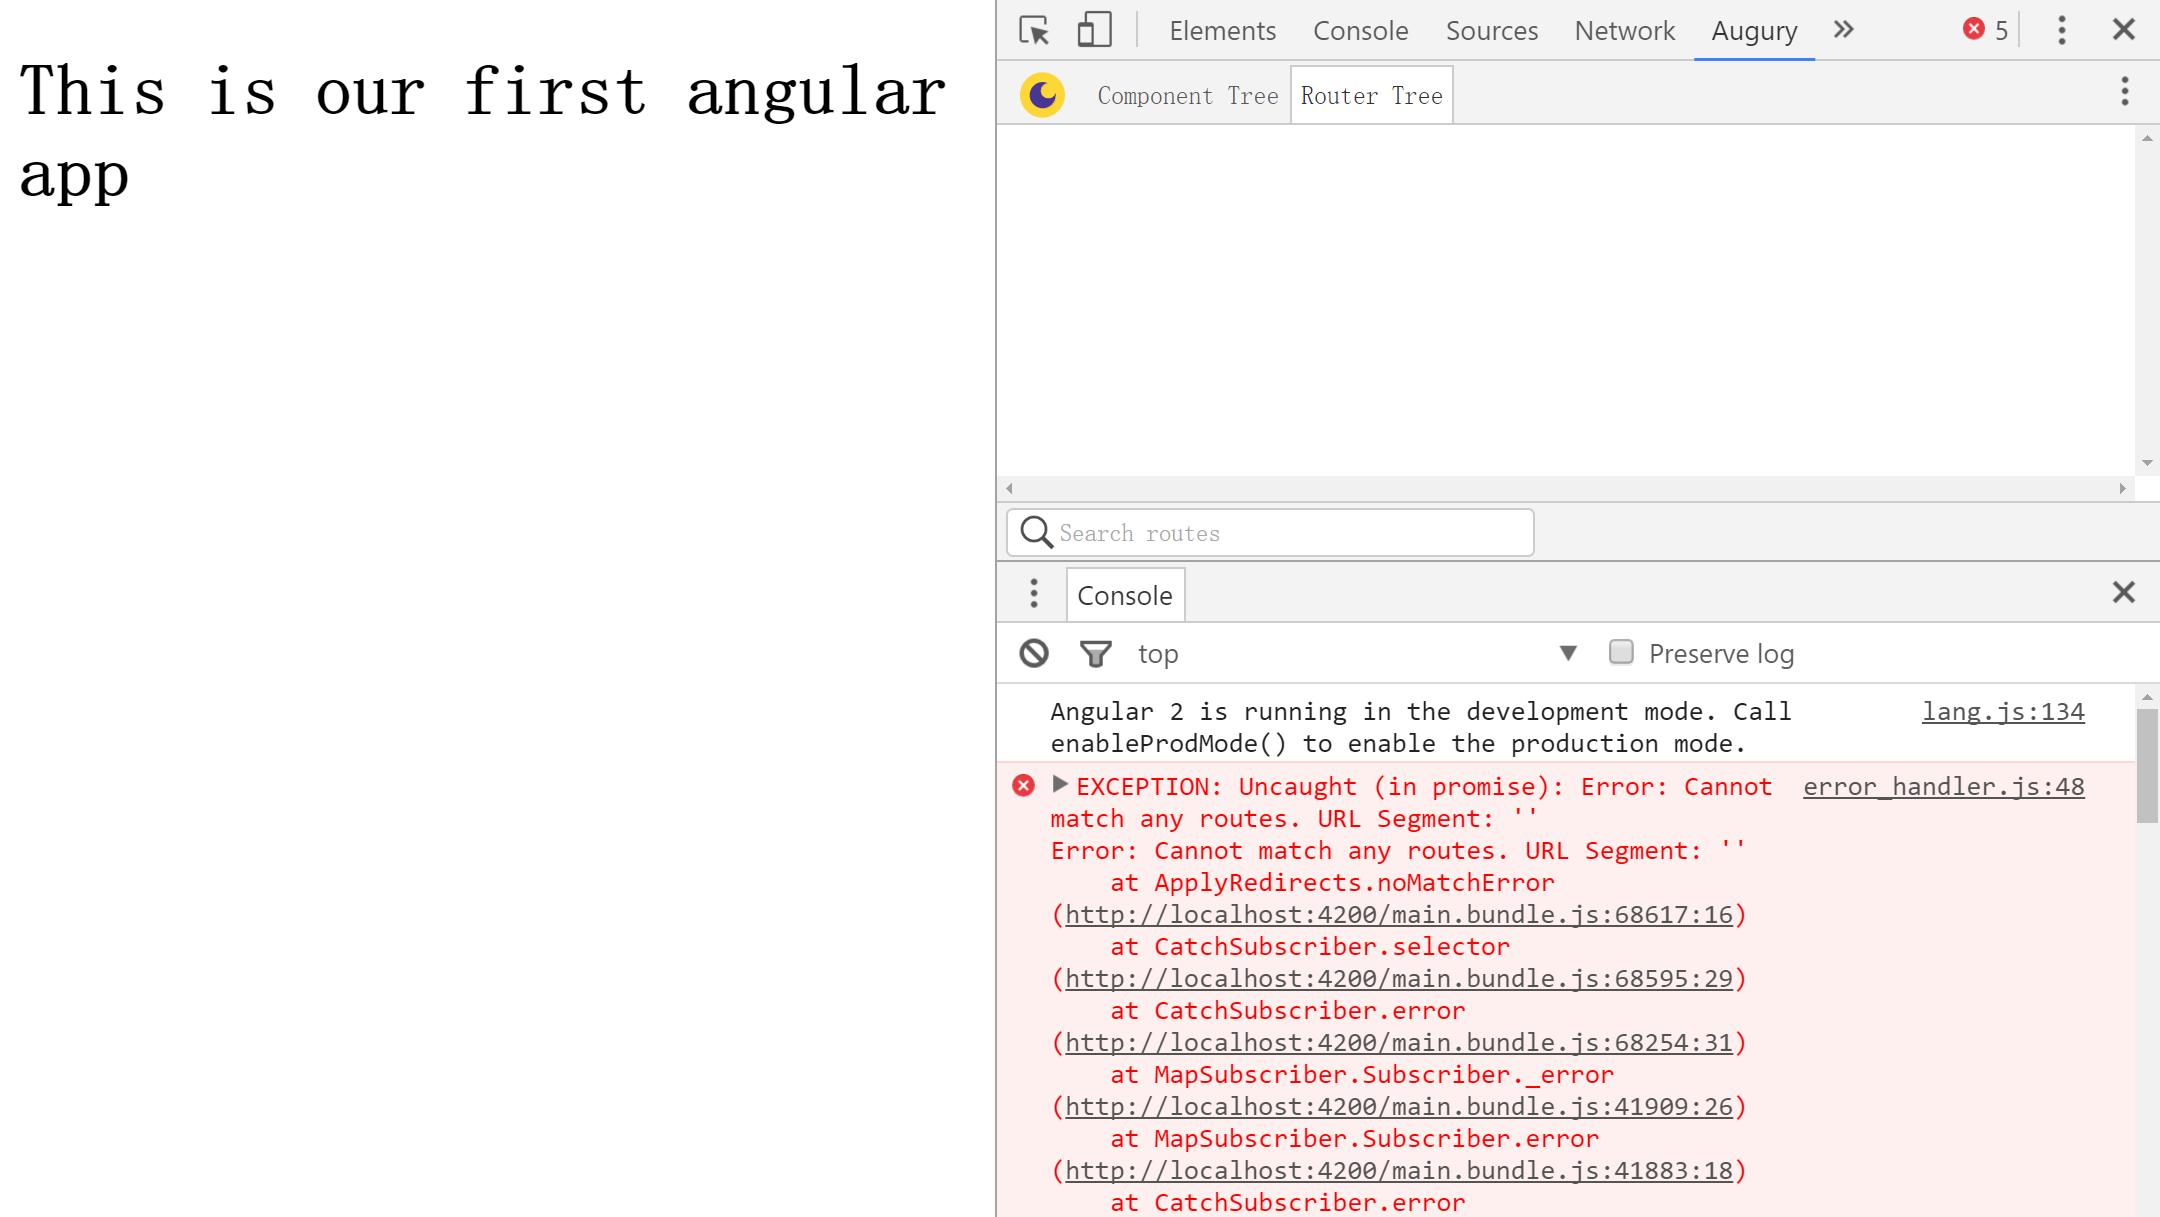 image_1b0hgdsiu87n1lha1kcahl51ckb9.png-233.2kB
这个错误看上去应该是对于''没有找到匹配的route,这是由于我们只定义了一个'login',我们再试试在浏览器地址栏输入:http://localhost:4200/login。这次仍然出错,但错误信息变成了下面的样子,意思是我们没有找到一个outlet去加载LoginComponent。对的,这就引出了router outlet的概念,如果要显示对应路由的组件,我们需要一个插头(outlet)来装载组件。
error_handler.js:48EXCEPTION: Uncaught (in promise): Error: Cannot find primary outlet to load 'LoginComponent'
Error: Cannot find primary outlet to load 'LoginComponent'
    at getOutlet (http://localhost:4200/main.bundle.js:66161:19)
    at ActivateRoutes.activateRoutes (http://localhost:4200/main.bundle.js:66088:30)
    at http://localhost:4200/main.bundle.js:66052:19
    at Array.forEach (native)
    at ActivateRoutes.activateChildRoutes (http://localhost:4200/main.bundle.js:66051:29)
    at ActivateRoutes.activate (http://localhost:4200/main.bundle.js:66046:14)
    at http://localhost:4200/main.bundle.js:65787:56
    at SafeSubscriber._next (http://localhost:4200/main.bundle.js:9000:21)
    at SafeSubscriber.__tryOrSetError (http://localhost:4200/main.bundle.js:42013:16)
    at SafeSubscriber.next (http://localhost:4200/main.bundle.js:41955:27)
下面我们把<router-outlet></router-outlet>写在src\app\app.component.html的末尾,地址栏输入http://localhost:4200/login重新看看浏览器中的效果吧,我们的应用应该正常显示了。但如果输入http://localhost:4200时仍然是有异常出现的,我们需要添加一个路由定义来处理。输入http://localhost:4200时相对于根路径的path应该是空,即''。而我们这时希望将用户仍然引导到登录页面,这就是redirectTo: 'login'的作用。pathMatch: 'full'的意思是必须完全符合路径的要求,也就是说http://localhost:4200/1是不会匹配到这个规则的,必须严格是http://localhost:4200
    RouterModule.forRoot([
      {
        path: '',
        redirectTo: 'login',
        pathMatch: 'full'
      },
      {
        path: 'login',
        component: LoginComponent
      }
    ])
注意路径配置的顺序是非常重要的,Angular2使用“先匹配优先”的原则,也就是说如果一个路径可以同时匹配几个路径配置的规则的话,以第一个匹配的规则为准。
但是现在还有一点小不爽,就是直接在app.modules.ts中定义路径并不是很好的方式,因为随着路径定义的复杂,这部分最好还是用单独的文件来定义。现在我们新建一个文件src\app\app.routes.ts,将上面在app.modules.ts中定义的路径删除并在app.routes.ts中重新定义。
import { Routes, RouterModule } from '@angular/router';
import { LoginComponent } from './login/login.component';

export const routes: Routes = [
  {
    path: '',
    redirectTo: 'login',
    pathMatch: 'full'
  },
  {
    path: 'login',
    component: LoginComponent
  }
];

export const routing = RouterModule.forRoot(routes);
接下来我们在app.modules.ts中引入routing,import { routing } from './app.routes';,然后在imports数组里添加routing,现在我们的app.modules.ts看起来是下面这个样子。
import { BrowserModule } from '@angular/platform-browser';
import { NgModule } from '@angular/core';
import { FormsModule } from '@angular/forms';
import { HttpModule } from '@angular/http';

import { AppComponent } from './app.component';
import { LoginComponent } from './login/login.component';
import { AuthService } from './core/auth.service';
import { routing } from './app.routes';

@NgModule({
  declarations: [
    AppComponent,
    LoginComponent
  ],
  imports: [
    BrowserModule,
    FormsModule,
    HttpModule,
    routing
  ],
  providers: [
    {provide: 'auth',  useClass: AuthService}
    ],
  bootstrap: [AppComponent]
})
export class AppModule { }
让待办事项变得有意义
现在我们来规划一下根路径'',对应根路径我们想建立一个todo组件,那么我们使用ng g c todo来生成组件,然后在app.routes.ts中加入路由定义,对于根路径我们不再需要重定向到登录了,我们把它改写成重定向到todo。
export const routes: Routes = [
  {
    path: '',
    redirectTo: 'todo',
    pathMatch: 'full'
  },
  {
    path: 'todo',
    component: TodoComponent
  },
  {
    path: 'login',
    component: LoginComponent
  }
];
在浏览器中键入http://localhost:4200可以看到自动跳转到了todo路径,并且我们的todo组件也显示出来了。

我们希望的Todo页面应该有一个输入待办事项的输入框和一个显示待办事项状态的列表。那么我们先来定义一下todo的结构,todo应该有一个id用来唯一标识,还应该有一个desc用来描述这个todo是干什么的,再有一个completed用来标识是否已经完成。好了,我们来建立这个todo模型吧,在todo文件夹下新建一个文件todo.model.ts
export class Todo {
  id: number;
  desc: string;
  completed: boolean;
}
然后我们应该改造一下todo组件了,引入刚刚建立好的todo对象,并且建立一个todos数组作为所有todo的集合,一个desc是当前添加的新的todo的内容。当然我们还需要一个addTodo方法把新的todo加到todos数组中。这里我们暂且写一个漏洞百出的版本。
import { Component, OnInit } from '@angular/core';
import { Todo } from './todo.model';

@Component({
  selector: 'app-todo',
  templateUrl: './todo.component.html',
  styleUrls: ['./todo.component.css']
})
export class TodoComponent implements OnInit {
  todos: Todo[] = [];
  desc = '';
  constructor() { }

  ngOnInit() {
  }

  addTodo(){
    this.todos.push({id: 1, desc: this.desc, completed: false});
    this.desc = '';
  }
}
然后我们改造一下src\app\todo\todo.component.html
<div>
  <input type="text" [(ngModel)]="desc" (keyup.enter)="addTodo()">
  <ul>
    <li *ngFor="let todo of todos">{{ todo.desc }}</li>
  </ul>
</div>
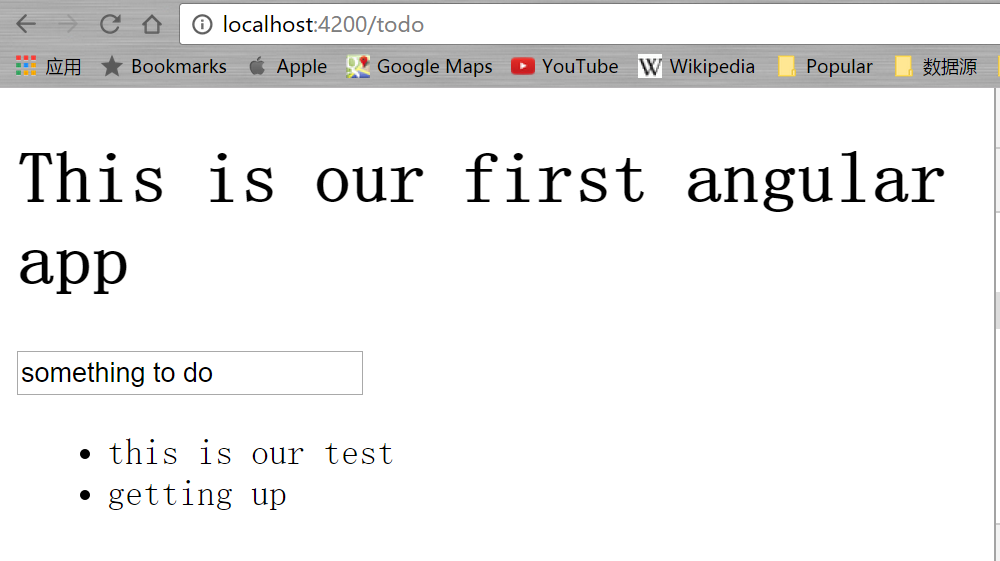
如上面代码所示,我们建立了一个文本输入框,这个输入框的值应该是新todo的描述(desc),我们想在用户按了回车键后进行添加操作((keyup.enter)="addTodo())。由于todos是个数组,所以我们利用一个循环将数组内容显示出来(<li *ngFor="let todo of todos">{{ todo.desc }}</li>)。好了让我们欣赏一下成果吧
如果我们还记得之前提到的业务逻辑应该放在单独的service中,我们还可以做的更好一些。在todo文件夹内建立TodoService:ng g s todo\todo。上面的例子中所有创建的todo都是id为1的,这显然是一个大bug,我们看一下怎么处理。常见的不重复id创建方式有两种,一个是搞一个自增长数列,另一个是采用随机生成一组不可能重复的字符序列,常见的就是UUID了。我们来引入一个uuid的包:npm i --save angular2-uuid,由于这个包中已经含有了用于typescript的定义文件,这里就执行这一个命令就足够了。由于此时Todo对象的id已经是字符型了,请更改其声明为id: string;。
然后修改service成下面的样子:
import { Injectable } from '@angular/core';
import {Todo} from './todo.model';
import { UUID } from 'angular2-uuid';

@Injectable()
export class TodoService {

  todos: Todo[] = [];

  constructor() { }

  addTodo(todoItem:string): Todo[] {
    let todo = {
      id: UUID.UUID(),
      desc: todoItem,
      completed: false
    };
    this.todos.push(todo);
    return this.todos;
  }
}
当然我们还要把组件中的代码改成使用service的
import { Component, OnInit } from '@angular/core';
import { Todo } from './todo.model';
import { TodoService } from './todo.service';

@Component({
  selector: 'app-todo',
  templateUrl: './todo.component.html',
  styleUrls: ['./todo.component.css'],
  providers:[TodoService]
})
export class TodoComponent implements OnInit {
  todos: Todo[] = [];
  desc = '';
  constructor(private service:TodoService) { }

  ngOnInit() {
  }

  addTodo(){
    this.todos = this.service.addTodo(this.desc);
    this.desc = '';
  }
}
为了可以清晰的看到我们的成果,我们为chrome浏览器装一个插件,在chrome的地址栏中输入chrome://extensions,拉到最底部会看到一个“获取更多扩展程序”的链接,点击这个链接然后搜索“Augury”,安装即可。安装好后,按F12调出开发者工具,里面出现一个叫“Augury”的tab。
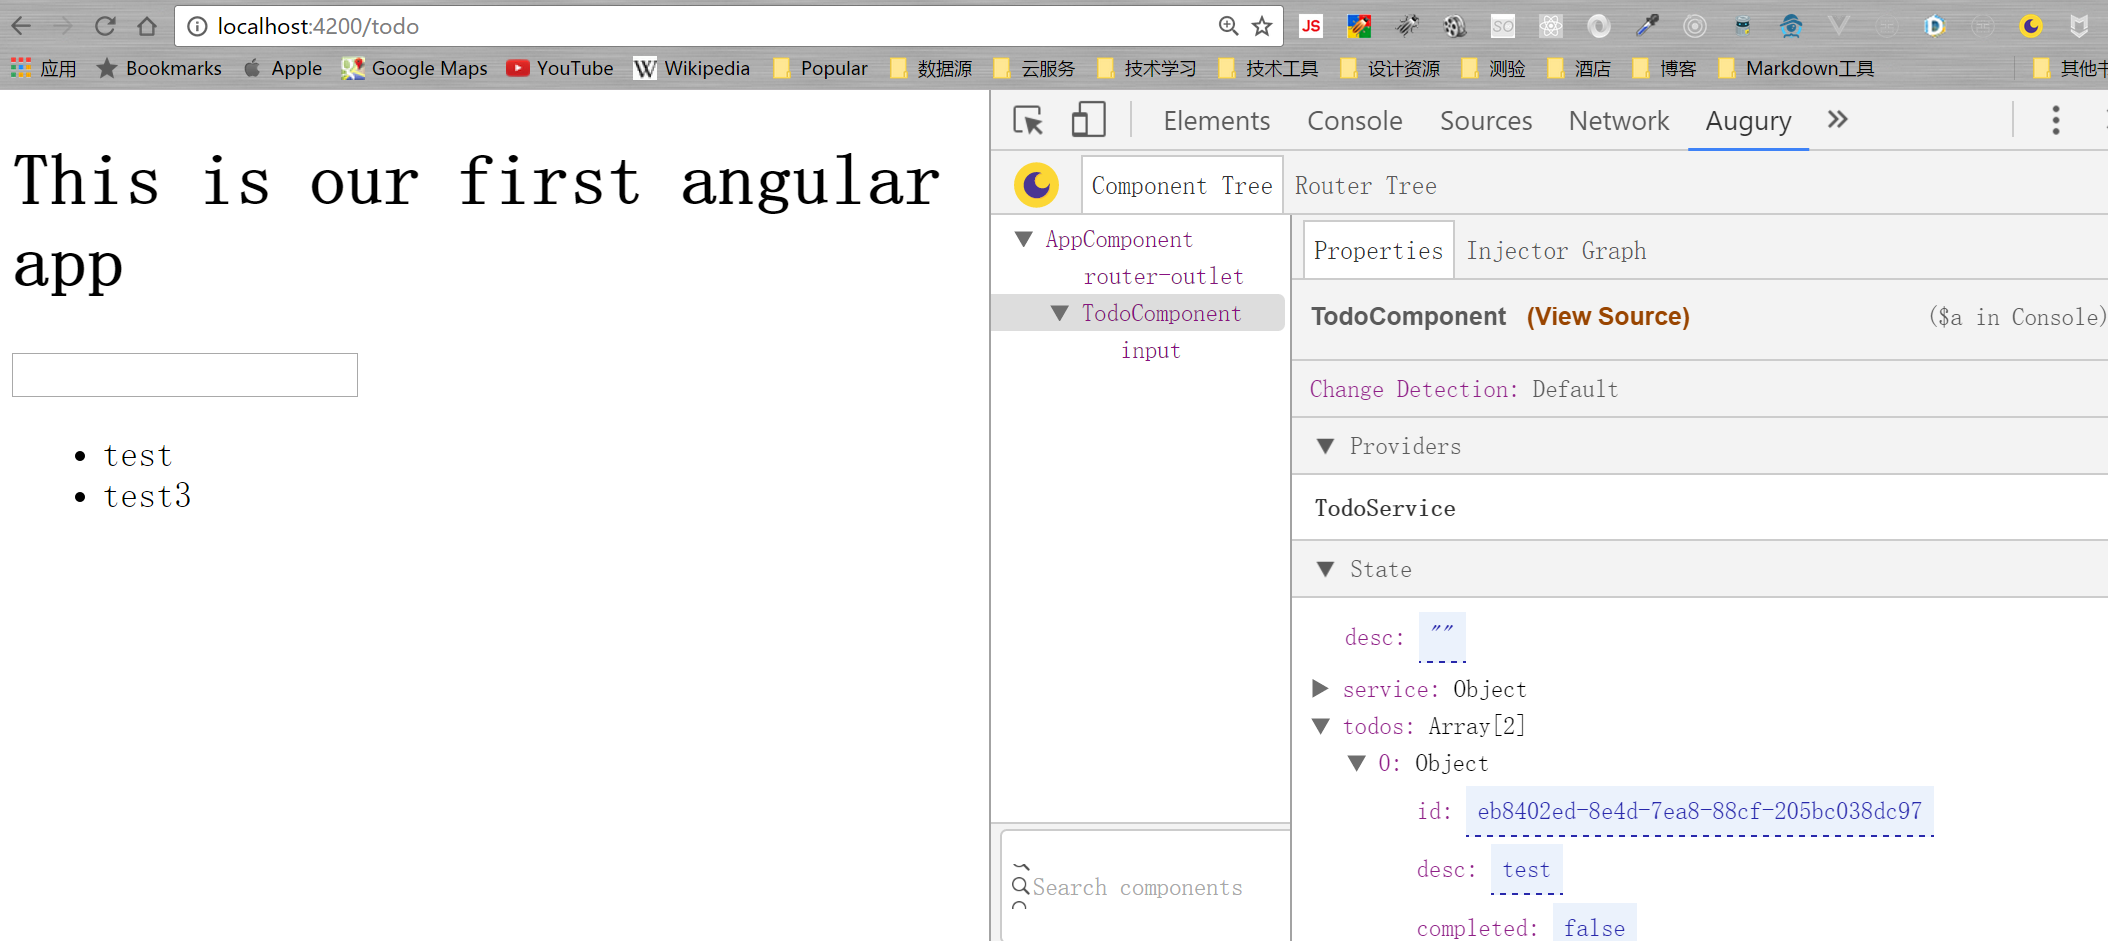
我们可以看到id这时候被设置成了一串字符,这个就是UUID了。
建立模拟web服务和异步操作
实际的开发中我们的service是要和服务器api进行交互的,而不是现在这样简单的操作数组。但问题来了,现在没有web服务啊,难道真要自己开发一个吗?答案是可以做个假的,假作真时真亦假。我们在开发过程中经常会遇到这类问题,等待后端同学的进度是很痛苦的。所以Angular内建提供了一个可以快速建立测试用web服务的方法:内存 (in-memory) 服务器。
一般来说,你需要知道自己对服务器的期望是什么,期待它返回什么样的数据,有了这个数据呢,我们就可以自己快速的建立一个内存服务器了。拿这个例子来看,我们可能需要一个这样的对象
class Todo {
  id: string;
  desc: string;
  completed: boolean;
}
对应的JSON应该是这样的
{
  "data": [
    {
      "id": "f823b191-7799-438d-8d78-fcb1e468fc78",
      "desc": "blablabla",
      "completed": false
    },
    {
      "id": "c316a3bf-b053-71f9-18a3-0073c7ee3b76",
      "desc": "tetssts",
      "completed": false
    },
    {
      "id": "dd65a7c0-e24f-6c66-862e-0999ea504ca0",
      "desc": "getting up",
      "completed": false
    }
  ]
}
首先我们需要安装angular-in-memory-web-api,输入npm install --save angular-in-memory-web-api
然后在Todo文件夹下创建一个文件src\app\todo\todo-data.ts
import { InMemoryDbService } from 'angular-in-memory-web-api';
import { Todo } from './todo.model';

export class InMemoryTodoDbService implements InMemoryDbService {
  createDb() {
    let todos: Todo[] = [
      {id: "f823b191-7799-438d-8d78-fcb1e468fc78", desc: 'Getting up', completed: true},
      {id: "c316a3bf-b053-71f9-18a3-0073c7ee3b76", desc: 'Go to school', completed: false}
    ];
    return {todos};
  }
}
可以看到,我们创建了一个实现InMemoryDbService的内存数据库,这个数据库其实也就是把数组传入进去。接下来我们要更改src\app\app.module.ts,加入类引用和对应的模块声明:
import { InMemoryWebApiModule } from 'angular-in-memory-web-api';
import { InMemoryTodoDbService } from './todo/todo-data';
然后在imports数组中紧挨着HttpModule加上InMemoryWebApiModule.forRoot(InMemoryTodoDbService),。
现在我们在service中试着调用我们的“假web服务”吧
import { Injectable } from '@angular/core';
import { Http, Headers } from '@angular/http';
import { UUID } from 'angular2-uuid';

import 'rxjs/add/operator/toPromise';

import { Todo } from './todo.model';

@Injectable()
export class TodoService {

  //定义你的假WebAPI地址,这个定义成什么都无所谓
  //只要确保是无法访问的地址就好
  private api_url = 'api/todos';
  private headers = new Headers({'Content-Type': 'application/json'});

  constructor(private http: Http) { }

  // POST /todos
  addTodo(desc:string): Promise<Todo> {
    let todo = {
      id: UUID.UUID(),
      desc: desc,
      completed: false
    };
    return this.http
            .post(this.api_url, JSON.stringify(todo), {headers: this.headers})
            .toPromise()
            .then(res => res.json().data as Todo)
            .catch(this.handleError);
  }

  private handleError(error: any): Promise<any> {
    console.error('An error occurred', error);
    return Promise.reject(error.message || error);
  }
}
上面的代码我们看到定义了一个api_url = 'api/todos',你可能会问这个是怎么来的?分两部分看,api/todos中前面的api定义成什么都可以,但后面这个todos是有讲究的,我们回去看一下src\app\todo\todo-data.ts返回的return {todos},这个其实是return {todos: todos}的省略表示形式,如果我们不想让这个后半部分是todos,我们可以写成{nahnahnah: todos}。这样的话我们改写成api_url = 'blablabla/nahnahnah'也无所谓,因为这个内存Web服务的机理是拦截Web访问,也就是说随便什么地址都可以,内存Web服务会拦截这个地址并解析你的请求是否满足RESTful API的要求
简单来说RESTful API中GET请求用于查询,PUT用于更新,DELETE用于删除,POST用于添加。比如如果url是api/todos,那么
- 查询所有待办事项:以GET方法访问
api/todos - 查询单个待办事项:以GET方法访问
api/todos/id,比如id是1,那么访问api/todos/1 - 更新某个待办事项:以PUT方法访问
api/todos/id - 删除某个待办事项:以DELETE方法访问
api/todos/id - 增加一个待办事项:以POST方法访问
api/todos
在service的构造函数中我们注入了Http,而angular的Http封装了大部分我们需要的方法,比如例子中的增加一个todo,我们就调用this.http.post(url, body, options),上面代码中的.post(this.api_url, JSON.stringify(todo), {headers: this.headers})含义是:构造一个POST类型的HTTP请求,其访问的url是this.api_url,request的body是一个JSON(把todo对象转换成JSON),在参数配置中我们配置了request的header。
这个请求发出后返回的是一个Observable(可观察对象),我们把它转换成Promise然后处理res(Http Response)。Promise提供异步的处理,注意到then中的写法,这个和我们传统编程写法不大一样,叫做lambda表达式,相当于是一个匿名函数,(input parameters) => expression,=>前面的是函数的参数,后面的是函数体。
还要一点需要强调的是:在用内存Web服务时,一定要注意res.json().data中的data属性必须要有,因为内存web服务坑爹的在返回的json中加了data对象,你真正要得到的json是在这个data里面。
下一步我们来更改Todo组件的addTodo方法以便可以使用我们新的异步http方法
  addTodo(){
    this.service
      .addTodo(this.desc)
      .then(todo => {
        this.todos = [...this.todos, todo];
        this.desc = '';
      });
  }
这里面的前半部分应该还是好理解的:this.service.addTodo(this.desc)是调用service的对应方法而已,但后半部分是什么鬼?...这个貌似省略号的东东是ES7中计划提供的Object Spread操作符,它的功能是将对象或数组“打散,拍平”。这么说可能还是不懂,举例子吧:
let arr = [1,2,3];
let arr2 = [...arr];
arr2.push(4);

// arr2 变成了 [1,2,3,4]
// arr 保存原来的样子

let arr3 = [0, 1, 2];
let arr4 = [3, 4, 5];
arr3.push(...arr4);
// arr3变成了[0, 1, 2, 3, 4, 5]

let arr5 = [0, 1, 2];
let arr6 = [-1, ...arr5, 3];
// arr6 变成了[-1, 0, 1, 2, 3]
所以呢我们上面的this.todos = [...this.todos, todo];相当于为todos增加一个新元素,和push很像,那为什么不用push呢?因为这样构造出来的对象是全新的,而不是引用的,在现代编程中一个明显的趋势是不要在过程中改变输入的参数。第二个原因是这样做会带给我们极大的便利性和编程的一致性。下面通过给我们的例子添加几个功能,我们来一起体会一下。
首先更改src\app\todo\todo.service.ts
//src\app\todo\todo.service.ts
import { Injectable } from '@angular/core';
import { Http, Headers } from '@angular/http';
import { UUID } from 'angular2-uuid';

import 'rxjs/add/operator/toPromise';

import { Todo } from './todo.model';

@Injectable()
export class TodoService {

  private api_url = 'api/todos';
  private headers = new Headers({'Content-Type': 'application/json'});
  constructor(private http: Http) { }
  // POST /todos
  addTodo(desc:string): Promise<Todo> {
    let todo = {
      id: UUID.UUID(),
      desc: desc,
      completed: false
    };
    return this.http
            .post(this.api_url, JSON.stringify(todo), {headers: this.headers})
            .toPromise()
            .then(res => res.json().data as Todo)
            .catch(this.handleError);
  }
  // PUT /todos/:id
  toggleTodo(todo: Todo): Promise<Todo> {
    const url = `${this.api_url}/${todo.id}`;
    console.log(url);
    let updatedTodo = Object.assign({}, todo, {completed: !todo.completed});
    return this.http
            .put(url, JSON.stringify(updatedTodo), {headers: this.headers})
            .toPromise()
            .then(() => updatedTodo)
            .catch(this.handleError);
  }
  // DELETE /todos/:id
  deleteTodoById(id: string): Promise<void> {
    const url = `${this.api_url}/${id}`;
    return this.http
            .delete(url, {headers: this.headers})
            .toPromise()
            .then(() => null)
            .catch(this.handleError);
  }
  // GET /todos
  getTodos(): Promise<Todo[]>{
    return this.http.get(this.api_url)
              .toPromise()
              .then(res => res.json().data as Todo[])
              .catch(this.handleError);
  }
  private handleError(error: any): Promise<any> {
    console.error('An error occurred', error);
    return Promise.reject(error.message || error);
  }
}
然后更新src\app\todo\todo.component.ts
import { Component, OnInit } from '@angular/core';
import { TodoService } from './todo.service';
import { Todo } from './todo.model';

@Component({
  selector: 'app-todo',
  templateUrl: './todo.component.html',
  styleUrls: ['./todo.component.css'],
  providers: [TodoService]
})
export class TodoComponent implements OnInit {
  todos : Todo[] = [];
  desc: string = '';

  constructor(private service: TodoService) {}
  ngOnInit() {
    this.getTodos();
  }
  addTodo(){
    this.service
      .addTodo(this.desc)
      .then(todo => {
        this.todos = [...this.todos, todo];
        this.desc = '';
      });
  }
  toggleTodo(todo: Todo) {
    const i = this.todos.indexOf(todo);
    this.service
      .toggleTodo(todo)
      .then(t => {
        this.todos = [
          ...this.todos.slice(0,i),
          t,
          ...this.todos.slice(i+1)
          ];
      });
  }
  removeTodo(todo: Todo) {
    const i = this.todos.indexOf(todo);
    this.service
      .deleteTodoById(todo.id)
      .then(()=> {
        this.todos = [
          ...this.todos.slice(0,i),
          ...this.todos.slice(i+1)
        ];
      });
  }
  getTodos(): void {
    this.service
      .getTodos()
      .then(todos => this.todos = [...todos]);
  }
}
更新模板文件src\app\todo\todo.component.html
<section class="todoapp">
  <header class="header">
    <h1>Todos</h1>
    <input class="new-todo" placeholder="What needs to be done?" autofocus="" [(ngModel)]="desc" (keyup.enter)="addTodo()">
  </header>
  <section class="main" *ngIf="todos?.length > 0">
    <input class="toggle-all" type="checkbox">
    <ul class="todo-list">
      <li *ngFor="let todo of todos" [class.completed]="todo.completed">
        <div class="view">
          <input class="toggle" type="checkbox" (click)="toggleTodo(todo)" [checked]="todo.completed">
          <label (click)="toggleTodo(todo)">{{todo.desc}}</label>
          <button class="destroy" (click)="removeTodo(todo); $event.stopPropagation()"></button>
        </div>
      </li>
    </ul>
  </section>
  <footer class="footer" *ngIf="todos?.length > 0">
    <span class="todo-count">
      <strong>{{todos?.length}}</strong> {{todos?.length == 1 ? 'item' : 'items'}} left
    </span>
    <ul class="filters">
      <li><a href="">All</a></li>
      <li><a href="">Active</a></li>
      <li><a href="">Completed</a></li>
    </ul>
    <button class="clear-completed">Clear completed</button>
  </footer>
</section>
更新组件的css样式:src\app\todo\todo.component.css
.todoapp {
    background: #fff;
    margin: 130px 0 40px 0;
    position: relative;
    box-shadow: 0 2px 4px 0 rgba(0, 0, 0, 0.2),
                0 25px 50px 0 rgba(0, 0, 0, 0.1);
}
.todoapp input::-webkit-input-placeholder {
    font-style: italic;
    font-weight: 300;
    color: #e6e6e6;
}
.todoapp input::-moz-placeholder {
    font-style: italic;
    font-weight: 300;
    color: #e6e6e6;
}
.todoapp input::input-placeholder {
    font-style: italic;
    font-weight: 300;
    color: #e6e6e6;
}
.todoapp h1 {
    position: absolute;
    top: -155px;
    width: 100%;
    font-size: 100px;
    font-weight: 100;
    text-align: center;
    color: rgba(175, 47, 47, 0.15);
    -webkit-text-rendering: optimizeLegibility;
    -moz-text-rendering: optimizeLegibility;
    text-rendering: optimizeLegibility;
}
.new-todo,
.edit {
    position: relative;
    margin: 0;
    width: 100%;
    font-size: 24px;
    font-family: inherit;
    font-weight: inherit;
    line-height: 1.4em;
    border: 0;
    color: inherit;
    padding: 6px;
    border: 1px solid #999;
    box-shadow: inset 0 -1px 5px 0 rgba(0, 0, 0, 0.2);
    box-sizing: border-box;
    -webkit-font-smoothing: antialiased;
    -moz-osx-font-smoothing: grayscale;
}
.new-todo {
    padding: 16px 16px 16px 60px;
    border: none;
    background: rgba(0, 0, 0, 0.003);
    box-shadow: inset 0 -2px 1px rgba(0,0,0,0.03);
}
.main {
    position: relative;
    z-index: 2;
    border-top: 1px solid #e6e6e6;
}
label[for='toggle-all'] {
    display: none;
}
.toggle-all {
    position: absolute;
    top: -55px;
    left: -12px;
    width: 60px;
    height: 34px;
    text-align: center;
    border: none; /* Mobile Safari */
}
.toggle-all:before {
    content: '❯';
    font-size: 22px;
    color: #e6e6e6;
    padding: 10px 27px 10px 27px;
}
.toggle-all:checked:before {
    color: #737373;
}
.todo-list {
    margin: 0;
    padding: 0;
    list-style: none;
}
.todo-list li {
    position: relative;
    font-size: 24px;
    border-bottom: 1px solid #ededed;
}
.todo-list li:last-child {
    border-bottom: none;
}
.todo-list li.editing {
    border-bottom: none;
    padding: 0;
}
.todo-list li.editing .edit {
    display: block;
    width: 506px;
    padding: 12px 16px;
    margin: 0 0 0 43px;
}
.todo-list li.editing .view {
    display: none;
}
.todo-list li .toggle {
    text-align: center;
    width: 40px;
    /* auto, since non-WebKit browsers doesn't support input styling */
    height: auto;
    position: absolute;
    top: 0;
    bottom: 0;
    margin: auto 0;
    border: none; /* Mobile Safari */
    -webkit-appearance: none;
    appearance: none;
}
.todo-list li .toggle:after {
    content: url('data:image/svg+xml;utf8,<svg xmlns="http://www.w3.org/2000/svg" width="40" height="40" viewBox="-10 -18 100 135"><circle cx="50" cy="50" r="50" fill="none" stroke="#ededed" stroke-width="3"/></svg>');
}
.todo-list li .toggle:checked:after {
    content: url('data:image/svg+xml;utf8,<svg xmlns="http://www.w3.org/2000/svg" width="40" height="40" viewBox="-10 -18 100 135"><circle cx="50" cy="50" r="50" fill="none" stroke="#bddad5" stroke-width="3"/><path fill="#5dc2af" d="M72 25L42 71 27 56l-4 4 20 20 34-52z"/></svg>');
}
.todo-list li label {
    word-break: break-all;
    padding: 15px 60px 15px 15px;
    margin-left: 45px;
    display: block;
    line-height: 1.2;
    transition: color 0.4s;
}
.todo-list li.completed label {
    color: #d9d9d9;
    text-decoration: line-through;
}
.todo-list li .destroy {
    display: none;
    position: absolute;
    top: 0;
    right: 10px;
    bottom: 0;
    width: 40px;
    height: 40px;
    margin: auto 0;
    font-size: 30px;
    color: #cc9a9a;
    margin-bottom: 11px;
    transition: color 0.2s ease-out;
}
.todo-list li .destroy:hover {
    color: #af5b5e;
}
.todo-list li .destroy:after {
    content: '×';
}
.todo-list li:hover .destroy {
    display: block;
}
.todo-list li .edit {
    display: none;
}
.todo-list li.editing:last-child {
    margin-bottom: -1px;
}
.footer {
    color: #777;
    padding: 10px 15px;
    height: 20px;
    text-align: center;
    border-top: 1px solid #e6e6e6;
}
.footer:before {
    content: '';
    position: absolute;
    right: 0;
    bottom: 0;
    left: 0;
    height: 50px;
    overflow: hidden;
    box-shadow: 0 1px 1px rgba(0, 0, 0, 0.2),
                0 8px 0 -3px #f6f6f6,
                0 9px 1px -3px rgba(0, 0, 0, 0.2),
                0 16px 0 -6px #f6f6f6,
                0 17px 2px -6px rgba(0, 0, 0, 0.2);
}
.todo-count {
    float: left;
    text-align: left;
}
.todo-count strong {
    font-weight: 300;
}
.filters {
    margin: 0;
    padding: 0;
    list-style: none;
    position: absolute;
    right: 0;
    left: 0;
}
.filters li {
    display: inline;
}
.filters li a {
    color: inherit;
    margin: 3px;
    padding: 3px 7px;
    text-decoration: none;
    border: 1px solid transparent;
    border-radius: 3px;
}
.filters li a:hover {
    border-color: rgba(175, 47, 47, 0.1);
}
.filters li a.selected {
    border-color: rgba(175, 47, 47, 0.2);
}
.clear-completed,
html .clear-completed:active {
    float: right;
    position: relative;
    line-height: 20px;
    text-decoration: none;
    cursor: pointer;
}
.clear-completed:hover {
    text-decoration: underline;
}
/*
    Hack to remove background from Mobile Safari.
    Can't use it globally since it destroys checkboxes in Firefox
*/
@media screen and (-webkit-min-device-pixel-ratio:0) {
    .toggle-all,
    .todo-list li .toggle {
        background: none;
    }
    .todo-list li .toggle {
        height: 40px;
    }
    .toggle-all {
        -webkit-transform: rotate(90deg);
        transform: rotate(90deg);
        -webkit-appearance: none;
        appearance: none;
    }
}
@media (max-width: 430px) {
    .footer {
        height: 50px;
    }
    .filters {
        bottom: 10px;
    }
}
更新src\styles.css为如下
/* You can add global styles to this file, and also import other style files */
html, body {
    margin: 0;
    padding: 0;
}
button {
    margin: 0;
    padding: 0;
    border: 0;
    background: none;
    font-size: 100%;
    vertical-align: baseline;
    font-family: inherit;
    font-weight: inherit;
    color: inherit;
    -webkit-appearance: none;
    appearance: none;
    -webkit-font-smoothing: antialiased;
    -moz-osx-font-smoothing: grayscale;
}
body {
    font: 14px 'Helvetica Neue', Helvetica, Arial, sans-serif;
    line-height: 1.4em;
    background: #f5f5f5;
    color: #4d4d4d;
    min-width: 230px;
    max-width: 550px;
    margin: 0 auto;
    -webkit-font-smoothing: antialiased;
    -moz-osx-font-smoothing: grayscale;
    font-weight: 300;
}
:focus {
    outline: 0;
}
.hidden {
    display: none;
}
.info {
    margin: 65px auto 0;
    color: #bfbfbf;
    font-size: 10px;
    text-shadow: 0 1px 0 rgba(255, 255, 255, 0.5);
    text-align: center;
}
.info p {
    line-height: 1;
}
.info a {
    color: inherit;
    text-decoration: none;
    font-weight: 400;
}
.info a:hover {
    text-decoration: underline;
}
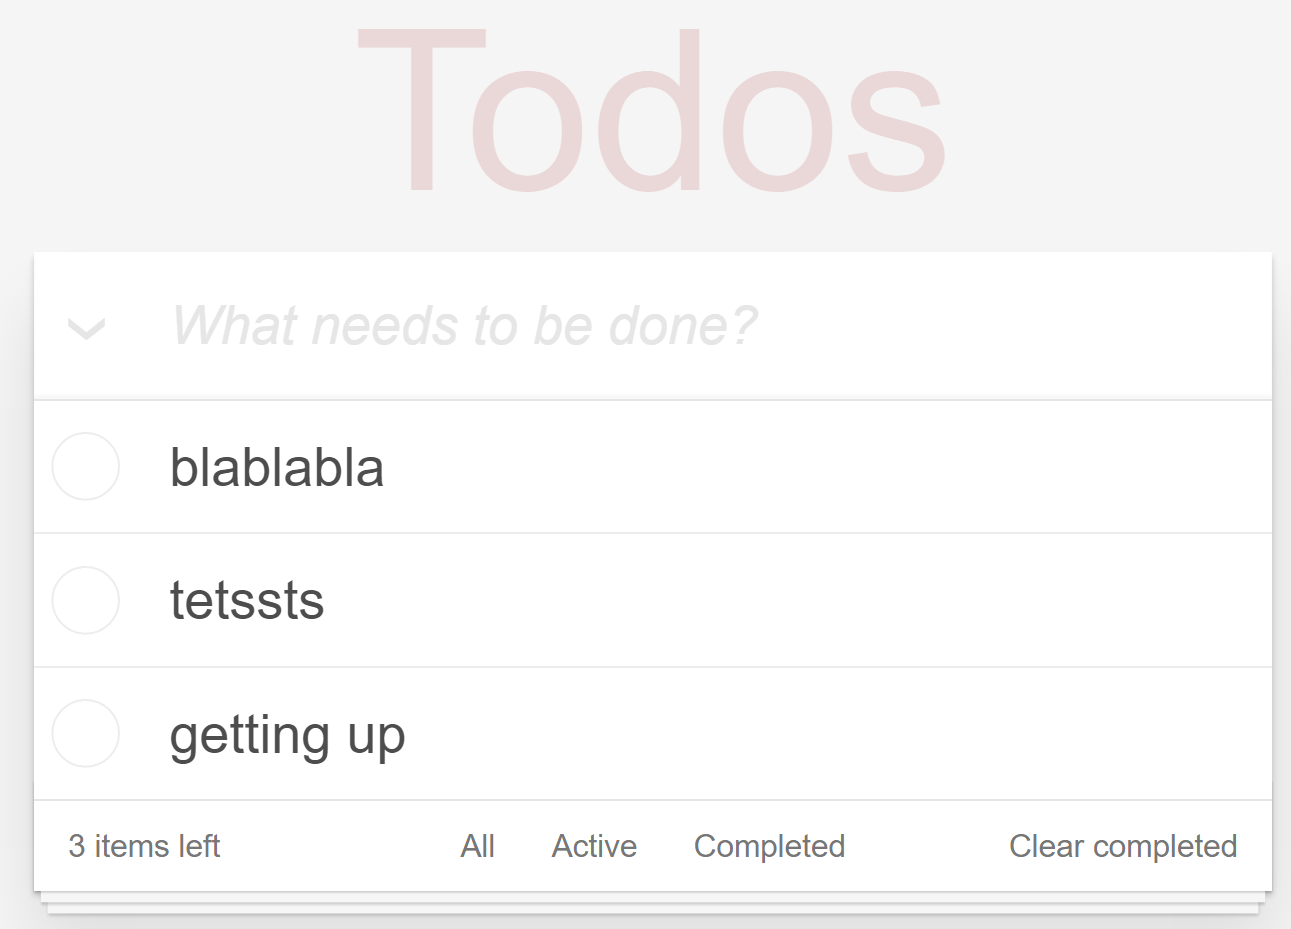
现在我们看看成果吧,现在好看多了
本节代码:https://github.com/wpcfan/awesome-tutorials/tree/chap03/angular2/ng2-tut
纸书出版了,比网上内容丰富充实了,欢迎大家订购!
京东链接:https://item.m.jd.com/product/12059091.html?from=singlemessage&isappinstalled=0

第一节:初识Angular-CLI
第二节:登录组件的构建
第三节:建立一个待办事项应用
第四节:进化!模块化你的应用
第五节:多用户版本的待办事项应用
第六节:使用第三方样式库及模块优化用
第七节:给组件带来活力
Rx--隐藏在Angular 2.x中利剑
Redux你的Angular 2应用
第八节:查缺补漏大合集(上)
第九节:查缺补漏大合集(下)
