导语
系统的 UIButton 默认状态下的样式是图标在左标题在右,但有时候可能需要不同的排版。当然可以通过继承添加子视图来实现需求,但本文打算通过理解 UIButton 自带的 imageEdgeInsets 和 titleEdgeInsets 属性实现该功能。
主要内容包含以下两点:
- 浅析 imageEdgeInsets 和 titleEdgeInsets 的属性的原理 [个人观点]
- 简单实现图标在右标题在左,图标在上标题在下。
环境
macOS Sierra 10.12.4
Xcode 8.3.2
iPhone 6S (10.1.1)
流程
先从苹果官方对该方法的注释入手
The inset or outset margins for the rectangle around the button’s title text.
使用此属性可调整按钮标题的有效绘图矩形的大小并重新定位。(来自 google 翻译)
Use this property to resize and reposition the effective drawing rectangle for the button title. You can specify a different value for each of the four insets (top, left, bottom, right). A positive value shrinks, or insets, that edge—moving it closer to the center of the button. A negative value expands, or outsets, that edge. Use the UIEdgeInsetsMake function to construct a value for this property. The default value is UIEdgeInsetsZero.
关于 UIEdgeInsetsMake 的 top, left, bottom, right ,正数表明更靠近按钮的中心,负数表示更靠近按钮的边缘,默认为 UIEdgeInsetsZero 。
问题 1
- margins 是边距的含义,那原始的位置在哪?
测试代码
#import <UIKit/UIKit.h>

@interface JAButton : UIButton

@end

#import "JAButton.h"

@implementation JAButton
- (instancetype)initWithFrame:(CGRect)frame {
    if (self = [super initWithFrame:frame]) {
        self.layer.borderColor = [UIColor blueColor].CGColor;
        self.layer.borderWidth = 1;
        [self setTitleColor:[UIColor redColor] forState:UIControlStateNormal];

        // [1]
        [self setTitle:@"测试" forState:UIControlStateNormal];

        // [2]
        [self setImage:[UIImage imageNamed:@"arrow"] forState:UIControlStateNormal];
    }
    return self;
}
- (void)layoutSubviews {
    [super layoutSubviews];

    // [3]
    self.titleEdgeInsets = UIEdgeInsetsMake(0, 0, 0, 10);

    // [4]
    self.imageEdgeInsets = UIEdgeInsetsMake(0, 0, 0, 10);
}
@end

...

JAButton *b = [[JAButton alloc] initWithFrame:CGRectMake(10, 100, 100, 40)];
[self.view addSubview:b];
测试 1
只有标题 [注释 2 3 4]
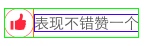
标题的位置如下
标题居中
测试 2
只有图标 [注释 1 3 4]
图标位置信息如下
图标居中
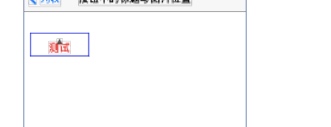
测试 3
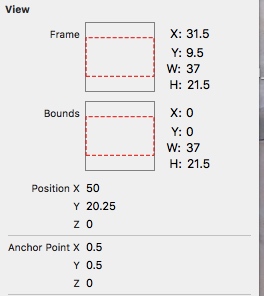
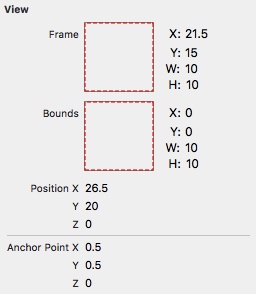
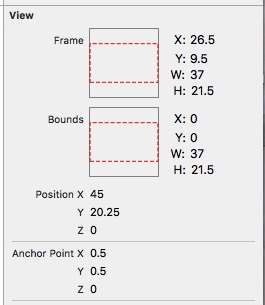
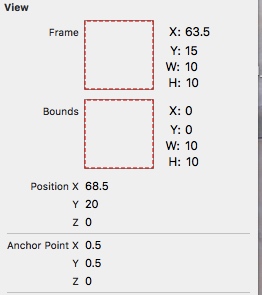
标题 + 图标 [注释 3 4]
图标
标题

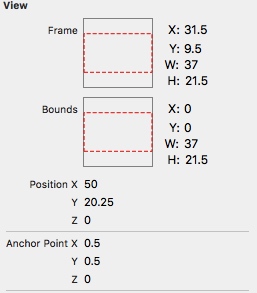
为了维持居中就要将标题和图标看做一个整体即宽度和为 37 + 10 = 47 ,用 UIButton 的宽度来减去总宽度再乘以 0.5 即可实现整体居中,因此图标的 X 就是 (100 - 47) * 0.5 = 26.5
测试 4
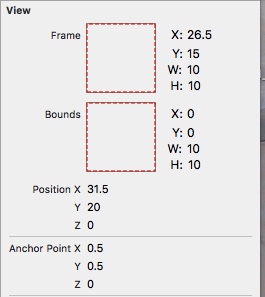
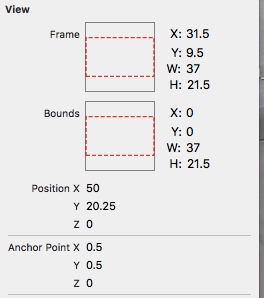
只调整 titleEdgeInsets [注释 2 4]
标题的位置信息如下
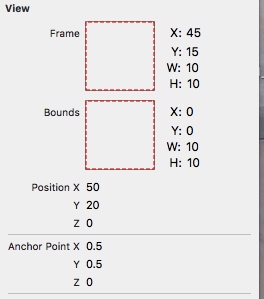
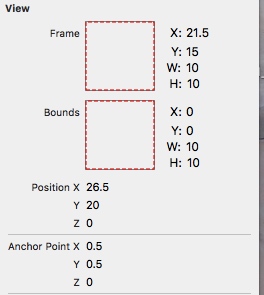
测试 5
只调整 imageEdgeInsets [注释 1 3]
图标的位置信息如下

问题 2
比较测试 4 与测试 1 会发现
- titleEdgeInsets 的 right 设置了 10 , X 却向左偏移了 5 ?
同样对比 测试 5 与测试 2 会发现
- imageEdgeInsets 的 right 设置了 10 , X 却向左偏移了 5
为什么会有这种减半的现象呢?
寻找 & 分析
在搜索后,这篇 博客对我有所启发
回答 1
它们只是image和button相较于原来位置的偏移量,那什么是原来的位置呢?就是这个
没有设置edgeInset时候的位置了。
如要要image在右边,label在左边,那image的左边相对于button的左边右移了labelWidth的距离,image的右边相对于label的左边右移了labelWidth的距离
所以,self.oneButton.imageEdgeInsets = UIEdgeInsetsMake(0, labelWidth, 0, -labelWidth);为什么是负值呢?因为这是contentInset,是偏移量,不是距离
同样的,label的右边相对于button的右边左移了imageWith的距离,label的左边相对于image的右边左移了imageWith的距离
所以self.oneButton.titleEdgeInsets = UIEdgeInsetsMake(0, -imageWith, 0, imageWith); 这样就完成image在右边,label在左边的效果了。
但是对下面的前置知识点,感觉有些疑惑
前置知识点:titleEdgeInsets是title相对于其上下左右的inset,跟tableView的contentInset是类似的,如果只有title,那它上下左右都是相对于button的,image也是一样;
如果同时有image和label,那这时候image的上左下是相对于button,右边是相对于label的;title的上右下是相对于button,左边是相对于image的。
我认为虽然两者都在 UIButton 中,但 Apple 既然将 imageEdgeInsets 和 titleEdgeInsets 拆成两个属性,两者的位置应该不互相依赖才对,即使依赖,也应该依赖 UIButton 这个父视图比较合适。
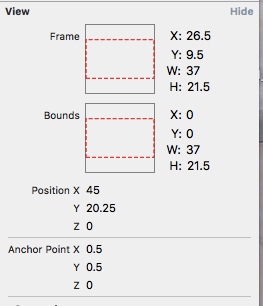
测试 6
在标题和图标同时存在的情况下,调整 titleEdgeInsets [注释 4]
标题
图标
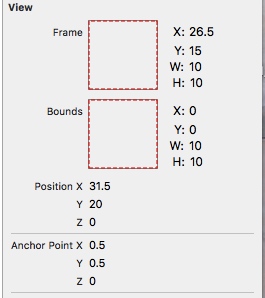
测试 7
在标题和图标同时存在的情况下,调整 imageEdgeInsets [注释 3]
标题
图标
测试 8
在标题和图标同时存在的情况下,调整 imageEdgeInsets 和 titleEdgeInsets [不注释]
标题
图标
小结
将测试 3 和 测试 6 或 测试 3 和测试 7 对比会发现即使在标题和图标同时存在的情况下,单独调整 imageEdgeInsets 或 titleEdgeInsets 都只会对对应的视图的位置产生影响,而且影响同样是 减半 的。而通过将测试 3 和 测试 8 比较, titleEdgeInsets 和 imageEdgeInsets 同时作用的情况下也是一样的。
佐证
上面的参考博客中提到 Aligning text and image on UIButton with imageEdgeInsets and titleEdgeInsets 是 StackOverflow 上关于这个问题的一个讨论。里面有这样一段话,对我有所启发
I believe that this documentation was written imagining that the button has no title, just an image. It makes a lot more sense thought of this way, and behaves how UIEdgeInsets usually do. Basically, the frame of the image (or the title, with titleEdgeInsets) is moved inwards for positive insets and outwards for negative insets。
官方的注释也许正如上面这段话所表达的,只是在告诉我们 imageEdgeInsets/titleEdgeInsets 其实只是描述了父视图(UIButton)与它们各自视图的间距。
回答 2
在理解了 imageEdgeInsets/titleEdgeInsets 的独立性后,我尝试用自己的话来说明为什么会存在"减半"的效果。
比如下面的代码
self.titleEdgeInsets = UIEdgeInsetsMake(0, 0, 0, 10);
在水平方向上 titleLabel 左侧偏移量为 0,titleLabel 右侧偏移量为 10 ,但是偏移量 ≠ X 的变化量。
X 左移 10 那么实际上的偏移属性值应该为 (0,-10,0,10) :
左偏移量(相对于 button 左侧),title 从原始向目标是往边缘方向,所以是负值(参考本文最初的文档理解),偏移量为 10,右偏移量(相对 button 右侧),从原始到目标是往中间方向,所以是正值。
因此上面的代码表明 titleLabel 相对 UIButton 左侧不改变,右侧改变 10 ,应该是做不到的,左侧间距增加1,右侧间距必然会减少1。会被等价转换为
self.titleEdgeInsets = UIEdgeInsetsMake(0, -5, 0, 5);
个人推测
如何转换?
参考 iOS 的坐标系,水平向右为 X 轴正方向 ,垂直向下为 Y 正方向,要根据 titleEdgeInsets / imageEdgeInsets 去计算 title 和 image 的坐标,可以对 UIEdgeInsets 结构体的四个成员( top , left , bottom , right ) 进行处理 (在负方向留正偏移量即是往正方向偏移)。
公式如下
- 水平方向上 X 的偏移量:
(left + (-1) * right) / 2 - 垂直方向上 Y 的偏移量:
(top + (-1) * bottom) / 2
直白点的话: 负间距(left,top)更靠近,正间距(left,top)更远离,原始状态就是 UIEdgeInsets 全为 0 即你不去操作 titleEdgeInsets / imageEdgeInsets 时。
个人推测
实践
实践是检验真理的唯一标准;不管黑猫白猫,能抓老鼠的就是好🐱...
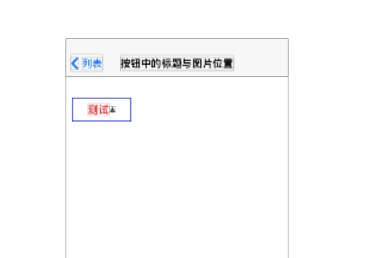
图标在右标题在左
根据上面的猜想,要实现图标与标题的位置交换,很简单: imageView 左侧相对于 UIButton 向中央移动了 titleLabel 的宽度,记为 titleLabel.w,右侧相对于 UIButton 向边缘同样移动了 titleLabel.w 因此
- (void)layoutSubviews {
    [super layoutSubviews];

    // [3]
//    self.titleEdgeInsets = UIEdgeInsetsMake(0, 0, 0, 10);
//
//    // [4]
//    self.imageEdgeInsets = UIEdgeInsetsMake(0, 0, 0, 10);

    self.imageEdgeInsets = UIEdgeInsetsMake(0, self.titleLabel.frame.size.width, 0, -self.titleLabel.frame.size.width);
    self.titleEdgeInsets = UIEdgeInsetsMake(0, -self.imageView.frame.size.width, 0, self.imageView.frame.size.width);
}
标题
图标
但是如果用直接去设置 UIButton 的
UIButton *b = [[UIButton alloc] initWithFrame:CGRectMake(10, 100, 100, 40)];
b.layer.borderColor = [UIColor blueColor].CGColor;
b.layer.borderWidth = 1;
[b setTitleColor:[UIColor redColor] forState:UIControlStateNormal];
[b setTitle:@"测试" forState:UIControlStateNormal];
[b setImage:[UIImage imageNamed:@"arrow"] forState:UIControlStateNormal];
    [self.view addSubview:b];
    b.imageEdgeInsets = UIEdgeInsetsMake(0, b.titleLabel.frame.size.width, 0, -b.titleLabel.frame.size.width);
    b.titleEdgeInsets = UIEdgeInsetsMake(0, -b.imageView.frame.size.width, 0, b.imageView.frame.size.width);
你会发现效果并不如意,原因是因为 titleLabel 的尺寸不正确

我想到的解决方法有三种
- 继承 UIButton ,在子类的 layoutSubviews 中进行处理
- 参考上面博客的作者在 Demo_ButtonImageTitleEdgeInsets 提供的,用
CGFloat labelWidth = [self.titleLabel.text sizeWithFont:self.titleLabel.font].width;来实现,通过字符串计算出 titlelabel 的尺寸,来设置 titleEdgeInsets ,详情见代码段 1 - 第三种通过 sizeToFit 和第二种思路是一样的,详情见代码段 2
代码段 1
@interface NSString(UIStringDrawing)

// Single line, no wrapping. Truncation based on the NSLineBreakMode.
- (CGSize)sizeWithFont:(UIFont *)font NS_DEPRECATED_IOS(2_0, 7_0, "Use -sizeWithAttributes:") __TVOS_PROHIBITED;
代码段 2
UIButton *b = [[UIButton alloc] initWithFrame:CGRectMake(10, 100, 100, 40)];
b.layer.borderColor = [UIColor blueColor].CGColor;
b.layer.borderWidth = 1;
[b setTitleColor:[UIColor redColor] forState:UIControlStateNormal];
[b setTitle:@"测试" forState:UIControlStateNormal];
[b setImage:[UIImage imageNamed:@"arrow"] forState:UIControlStateNormal];
[self.view addSubview:b];

// 看这里 ---
[b.titleLabel sizeToFit];

b.imageEdgeInsets = UIEdgeInsetsMake(0, b.titleLabel.frame.size.width, 0, -b.titleLabel.frame.size.width);
b.titleEdgeInsets = UIEdgeInsetsMake(0, -b.imageView.frame.size.width, 0, b.imageView.frame.size.width);

虽然位置不对,但尺寸已经是正确的了,也能实现合适的效果。
图标在下标题在上
根据上面的原理,应该可以比较简单的推算出的 imageEdgeInsets 和 titleEdgeInsets
要求: imageView 和 titleLabel 都居中,且 imageVeiw 在上
两者都存在的情况下,原始的左右间距是( UIButton 的宽度 - 两者的宽度之和) * 0.5,
imageView 的 X 要向右移动 ((UIButton 的宽度 - imageView 的宽度) - (UIButton 的宽度 - 两者的宽度之和)) * 0.5
titleLable 的宽度 * 0.5
阶段 1
    self.imageEdgeInsets = UIEdgeInsetsMake(0, self.titleLabel.frame.size.width * 0.5, 0, -self.titleLabel.frame.size.width * 0.5);
    self.titleEdgeInsets = UIEdgeInsetsMake(0, -self.imageView.frame.size.width * 0.5, 0, self.imageView.frame.size.width * 0.5);
两者都居中了,然后调整垂直方向
阶段 2
self.imageEdgeInsets = UIEdgeInsetsMake(-5, self.titleLabel.frame.size.width * 0.5, 5, -self.titleLabel.frame.size.width * 0.5);
self.titleEdgeInsets = UIEdgeInsetsMake(5, -self.imageView.frame.size.width * 0.5, -5, self.imageView.frame.size.width * 0.5);
效果有点丑...
说明: 这里忽略了 UIButton 放不下 titleLabel 或者用 xib 创建有 intrinsicSize 引用的问题。
假想的实现
CGFloat imageX = (CGRectGetWidth(self.imageView.frame)+ CGRectGetWidth(self.titleLabel.frame)) * 0.5 + (self.imageEdgeInsets.left - self.imageEdgeInsets.right) / 2;
CGFloat imageY = (CGRectGetHeight(self.frame) - self.imageView.image.size.height) * 0.5 + (self.imageEdgeInsets.top - self.imageEdgeInsets.bottom) / 2;
CGFloat imageW = self.imageView.image.size.width;
CGFloat imageH = self.imageView.image.size.height;

CGFloat titleX = (CGRectGetWidth(self.titleLabel.frame) + CGRectGetWidth(self.titleLabel.frame) * 0.5) + (self.titleEdgeInsets.left - self.titleEdgeInsets.right) / 2;
CGFloat titleY = (CGRectGetWidth(self.frame) - CGRectGetHeight(self.titleLabel.frame)) * 0.5 + (self.titleEdgeInsets.top - self.titleEdgeInsets.bottom) / 2;
CGFloat titleW = CGRectGetWidth(self.titleLabel.frame);
CGFloat titleH = CGRectGetHeight(self.titleLabel.frame);
总结
本文通过控制变量法😷 测试了 UIButton 的 imageEdgeInsets 和 titleEdgeInsets 属性的作用效果,发现两者是相互独立且只参考父视图 ( UIButton ) ,同时对实现图标在右标题在上,图标在上标题在下这两种样式提供了一点思路。
