THEME INSTALLATION
Generally, you can install the 'Total' theme in two ways either by FTP/Cpanel or via WordPress Dashboard itself. Based on the resources available and users preference you may choose any one method from the available two methods.
INSTALLATION VIA FTP/CPANEL
To Install the theme via FTP/Cpanel follow these steps:
Download a Copy of 'Total' Theme zip file from WordPress.
Save the downloaded theme zip file in your hard drive.
Extract the downloaded zip file you will find a folder with style and other theme files inside it.
Now Connect the ftp server using the FTP details and copy the extracted folder to 'site-name/wp-content/themes/' path.
Now go to the Dashboard > Appearance > Themes.
You'll see the Total theme in the theme dashboard.
Activate the theme.
INSTALL VIA WORDPRESS DASHBOARD
To install the theme via WordPress Dashboard follow these steps:
Login into WordPress Dashboard.
Go to Dashboard > Appearance > Themes.
Click on Add New button then search for the Total keyword in search field.
Hover over the Total theme from the search result and click on Install button.
Once installed Activate the theme.

HOME PAGE SETUP
The theme provides you the option to display a Static Normal page as a front page, or Featured home page (which includes featured home sections like 'about us' section, 'portfolio section' etc..) as a front page or Blog posts in the home page. You may choose any of the available three options as per your need.
SETTING FEATURED HOME PAGE AS FRONT PAGE
To display a static front page follow these steps:
Create a home page
Login to your WordPress Dashboard.
Go to Dashboard > Pages > Add New.
Enter the title for the page.
Enter the contents for the page in content area.
Select **Home Page **as a page template from Template drop-down option.
Click on Publish/Update button.

Configure to display a freatured home page as front page
Login to your WordPress Dashboard.
Go to Dashboard > Settings > Reading
Inside the Front page displays set the option to A static page and choose the page you created using **Home Page **page template from the Front Page drop-down list.
Once done, Click on Save Changes button.

SETTING A STATIC FRONT PAGE
To display a static front page follow these steps:
Create a page
Login to your WordPress Dashboard.
Go to Dashboard > Pages > Add New.
Enter the title for the page.
Enter the contents for the page in content area.
Click on Publish/Update button.

Configure to display a static front page
Login to your WordPress Dashboard.
Go to Dashboard > Settings > Reading
Inside the Front page displays set the option to A static page and choose the page you created from the Front Page drop-down list.
Once done, Click on Save Changes button.

SETTING BLOG AS A FRONT PAGE
Login to your WordPress Dashboard.
Go to Dashboard > Settings > Reading
Inside the Front page displays set the option to Your latest posts.
Set the no. of posts to display in your front page in Blog pages show at most option.
Once done, Click on Save Changes button.

TEMPLATE COLOR SETUP
Template color option allows you to change the color scheme for your entire site. The theme allows you to choose template color for your site from the unlimited color options. To configure the Template color for your site follow these steps:
Login to you WordPress Dashboard.
Go to Dashboard > Appearance > Customize.
Go to General Settings > Colors.
Choose the template color for your site from Theme Primary Color color picker option.
Then, click on Save & Publish button.


CONFIGURE LOGO
Header logo option allows you to display a logo in your site replacing the default site tagline text. To configure the header logo for your site follow these steps:
Login to you WordPress Dashboard.
Go to Dashboard > Appearance > Customize.
Go to General Settings > Site Logo/Title/Tagline
Click on Select Logo button.
Choose the logo of your choice from the media library.
You will be provided with the image crop functionality crop the image as per your requirement.
Then, click on Save & Publish button.
MENU SETUP
- Creating General Menu
- Defining a Menu
You must define a menu before you can add items to it.
Login to the WordPress Dashboard.
From the Appearance menu on the left-hand side of the Dashboard, select the Menus option to bring up the Menu Editor.
Select Create a new menu at the top of the page
Enter a name for your new menu in the Menu Name box
Click the Create Menu button.
Your new custom menu has now been defined.

- Adding Items to a Menu
You can add different link types into your menu, these are split between panes left of the menu you're currently editing.
Locate the pane entitled Pages.
Within this pane, select the View All link to bring up a list of all the currently published Pages on your site.
Select the Pages that you want to add by clicking the checkbox next to each Page's title.
Click the Add to Menu button located at the bottom of this pane to add your selection(s) to the menu that you created in the previous step.
Click the Save Menu button once you've added all the menu items you want.

- Creating One-Page Menu
- Defining a Menu
You must define a menu before you can add items to it.
Login to the WordPress Dashboard.
From the Appearance menu on the left-hand side of the Dashboard, select the Menus option to bring up the Menu Editor.
Select Create a new menu at the top of the page
Enter a name for your new menu in the Menu Name box
Click the Create Menu button.
Your new custom menu has now been defined.
- Adding Items to a Menu
You will need to add a custom link as a menu item with unique slug for each home sections. Refer to a table for the slugs. To add the custom menu link follow these steps:
Locate the pane entitled Custom Links.
Enter the the siteurl with the unique slug for the section at the end (e.g. http://yourwebsiteurl.com/#section_name )
Click the Add to Menu button located at the bottom of this pane to add your selection(s) to the menu that you created in the previous step.
Click the Save Menu button once you've added all the menu items you want.
S.No.
Section
Slug
1
Slider Section
ht-home-slider-section
2
About Us Section
ht-about-us-section
3
Featured Post Section
ht-featured-post-section
4
Portfolio Section
ht-portfolio-section
5
Service Section
ht-service-post-section
6
Team Section
ht-team-section
7
Counter Section
ht-counter-section
8
Testimonial Section
ht-testimonial-section
9
Blog Section
ht-blog-section
10
Client Logo Section
ht-logo-section
11
Call to Action Section
ht-cta-section

CONFIGURE STICKY HEADER
The theme provides the option to keep the header sticky or not. For this follow these steps:
Login to you WordPress Dashboard.
Go to Dashboard > Appearance > Customize.
Go to General Settings > Header Settings.
Set the Sticky Header option to Enable if you wish to have a sticky header else set the option to Disable.
Once done, click on Save & Publish button.

SLIDER SETUP
The theme provides you the option to display maximum of three slides in the site. You'll need to create pages to display it has the slides in your site.

CREATE PAGE (SLIDES)
Login to you WordPress Dashboard.
Go to Dashboard > Pages > Add New.
Enter the title for the page (will be displayed as the caption title).
Enter the short description in the content area (will be displayed as a caption description).
Set the featured image for the page (will be displayed as the slide image).
Click on Publish/Update button.
Create rest of the slides in the same way.

CONFIGURE SLIDER
Login to your WordPress Dashboard.
Go to Dashboard > Appearance > Customize.
Go to Home Sections > Home Slider.
Select the page you've created for the slides from the Slider (1-3) page drop-down list.
Once done, Click on Save & Publish button.

SETUP HOME PAGE SECTIONS
The theme allows you to create total of 10 featured home sections.
About Us Section
Featured Section
Portfolio Section
Service Section
Team Section
Counter Section
Testimonial Section
Blog Section
Clients Logo Section
Call To Action Section
These sections will get displayed in the page which you've created using Home Page page template.
- ABOUT US SECTION
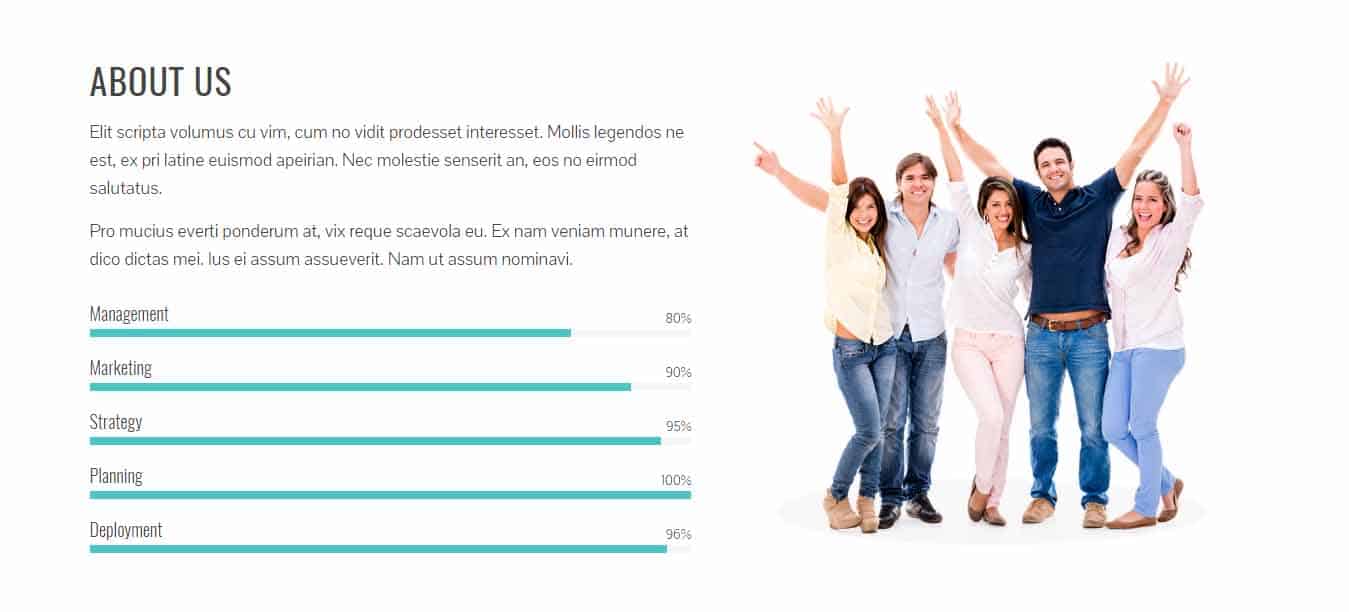
Create About Us Page
Login to your WordPress Dashboard.
Go to Dashboard > Pages > Add New.
Enter the title for the about us page.
Enter the contents for the about us page in content area.
Click on Publish/Update button.

Configure About Us Section
Login to your WordPress Dashboard.
Go to Dashboard > Appearance > Customize.
Go to Home Sections > About Us Section.
Set 'Disable Section' to 'No' if you wish to disable about us section in your home page else set the option to 'Yes'.
Select the about us page you've created for the about us section from 'Select a page' drop-down list.
Set the Progress Bar (1-4) as per your requirement.
Set the image on the right side of the about us section by clicking on the 'Upload Image' button under 'Right Image' title Or you may also display a particular widget instead of image by selecting the widget of your choice from 'Replace Image by Widget' drop-down list.
Once Done, Click on 'Save & Publish' button.

- FEATURED SECTION
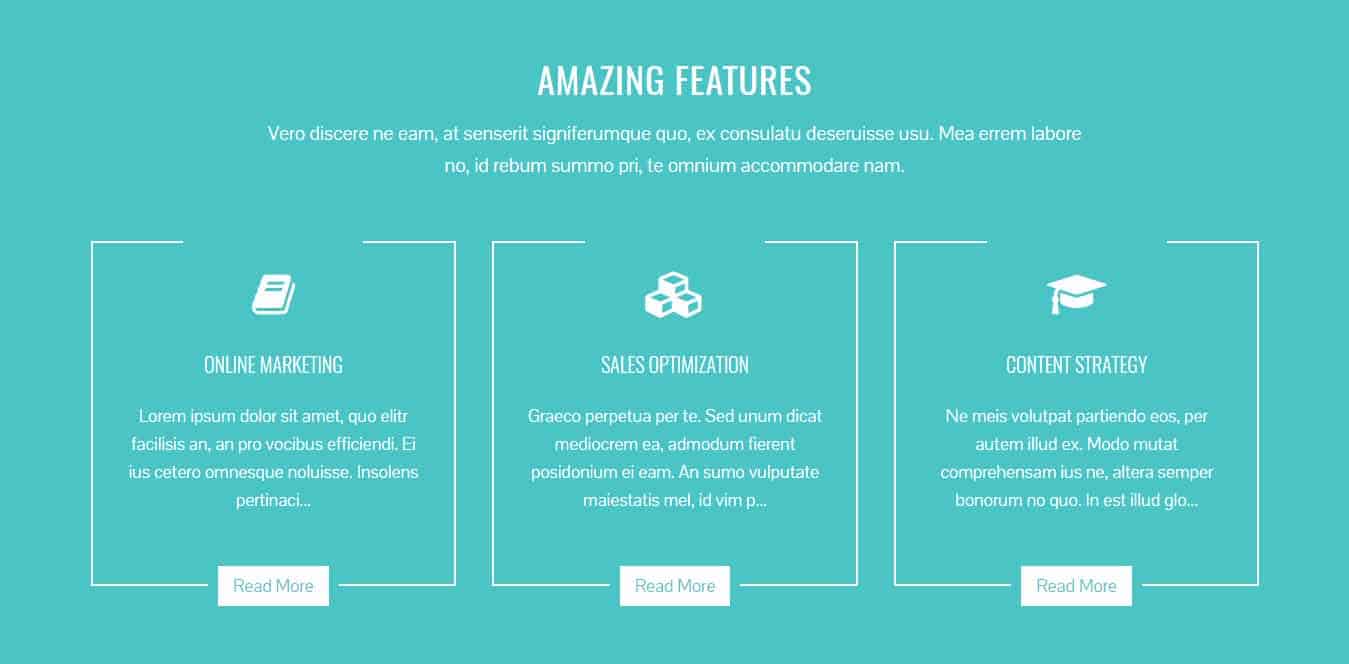
The theme allows you to display 3 features inside the feature section of home page. To configure the feature section you'll have to create feature page and later configure it to display it from the customizer.
Create Feature Page
Login to your WordPress Dashboard.
Go to Dashboard > Pages > Add New.
Enter the title for the feature page.
Enter the contents for the page page in content area.
Click on Publish/Update button.

Create other feature pages in the same way.

Configure Featured Section
Login to your WordPress Dashboard.
Go to Dashboard > Appearance > Customize.
Go to Home Sections > Featured Section.
Set 'Disable Section' to 'No' if you wish to disable Featured section in your home page else set the option to 'Yes'.
Set the featured section title under 'Title' text field.
Set the featured section sub-title under 'Sub Title' textarea field.
Select the Featured page that you've created for the Featured Page 1 from 'Select a page' drop-down page list.
Set the icon for the Featured Page 1 from 'FontAwesome Icon' icon picker drop-down list.
Set other featured page in the same way.
Once Done, Click on 'Save & Publish' button.

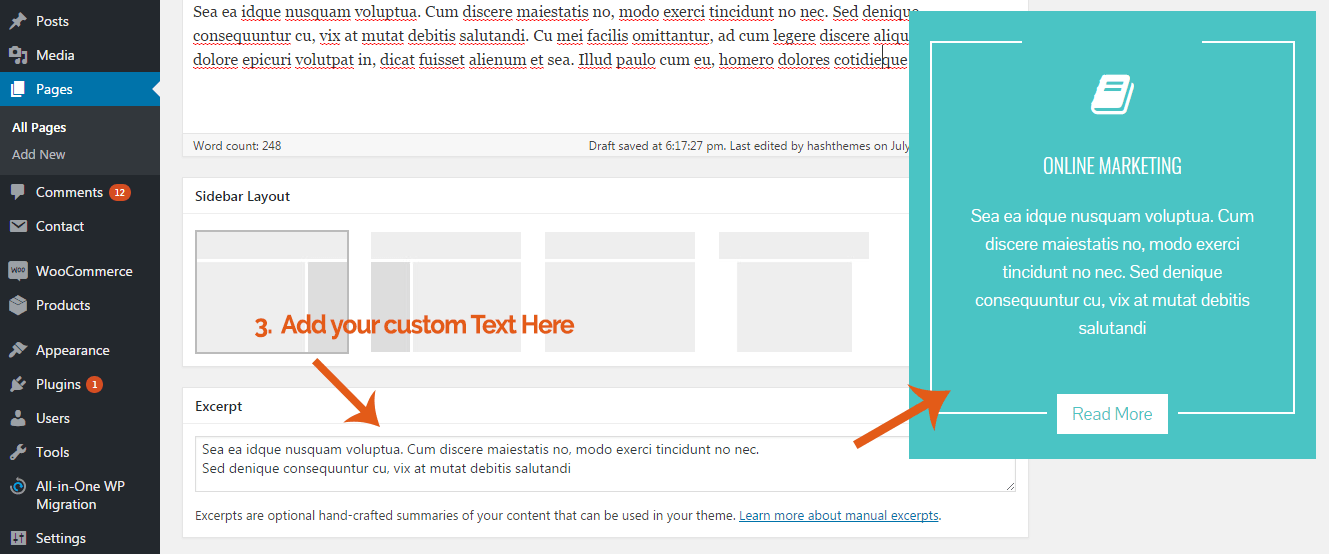
Display Custom Text on Featured Section
The featured section strips all the HTML tag and display the initial few characters. If you want to display the custom text rather that the page content then
Click on the Screen Option at the top of the page editor
Check on Excerpt field
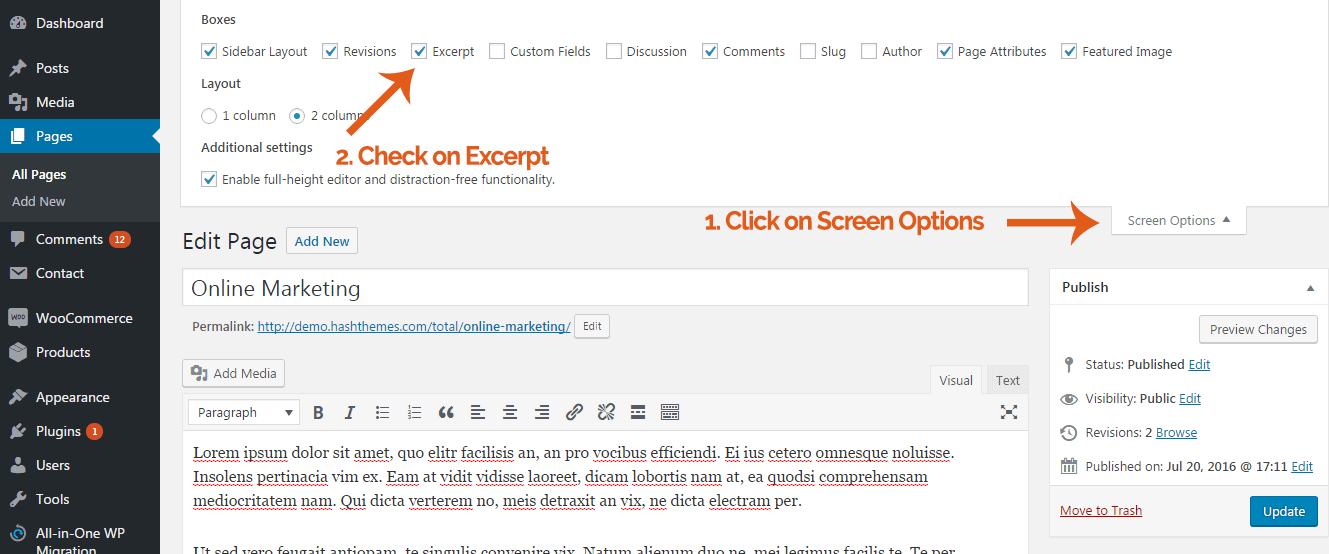
Scroll down to the bottom of the page editor
Add the custom text in the Excerpt field
- PORTFOLIO SECTION
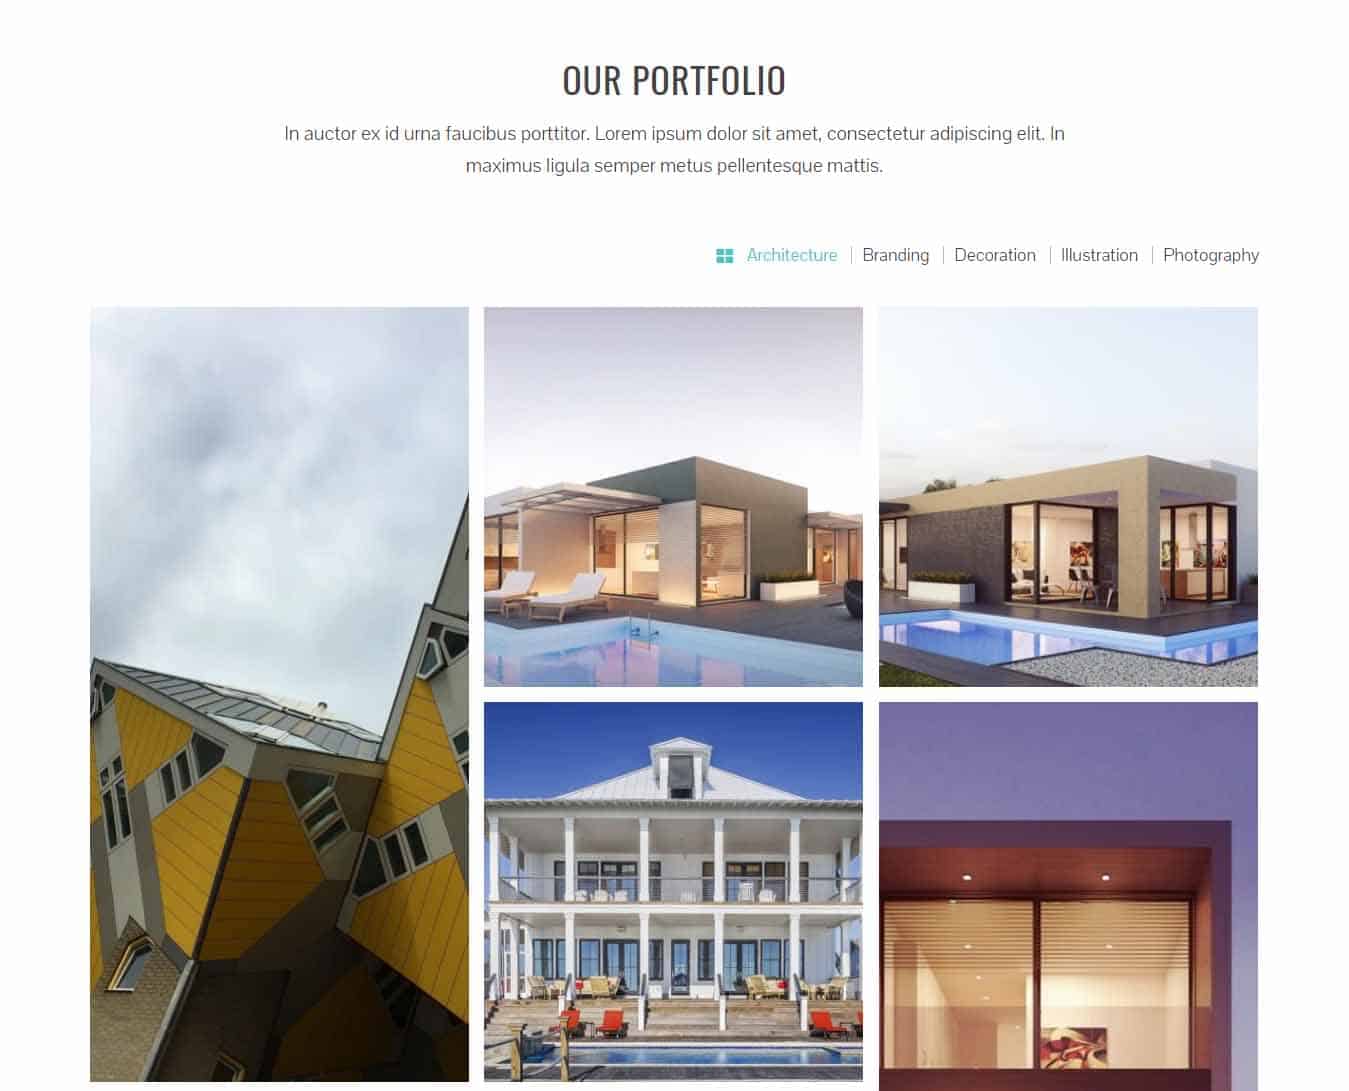
To Create a Portfolio Section You'll initially need create the portfolio categories and portfolio posts then later configure to display the portfolio via Customizer.
Create Portfolio Category
Login to your WordPress Dashboard.
Go to Dashboard > Posts > Categories.
Enter the name for the portfolio Category.
Click on 'Add New Category' button.


Create Portfolio Posts
Login to your WordPress Dashboard.
Go to Dashboard > Posts > Add New.
Enter the title for the portfolio post.
Enter the contents for the portfolio post.
Select the Portfolio category/ies under the categories option.
Set the featured image for the portfolio post.
Click on Publish/Update button.

Configure Portfolio Section
Login to your WordPress Dashboard.
Go to Dashboard > Appearance > Customize.
Go to Home Sections > Portfolio Section.
Set 'Disable Section' to 'No' if you wish to disable portfolio section in your home page else set the option to 'Yes'.
Set the title for the portfolio section under 'Title' textfield.
Set the sub title for the portfolio section under 'Sub Title' textarea field.
Select Portfolio Categories you whose posts you wish to display in the portfolio section.
Once Done, Click on 'Save & Publish' button.

- SERVICE SECTION
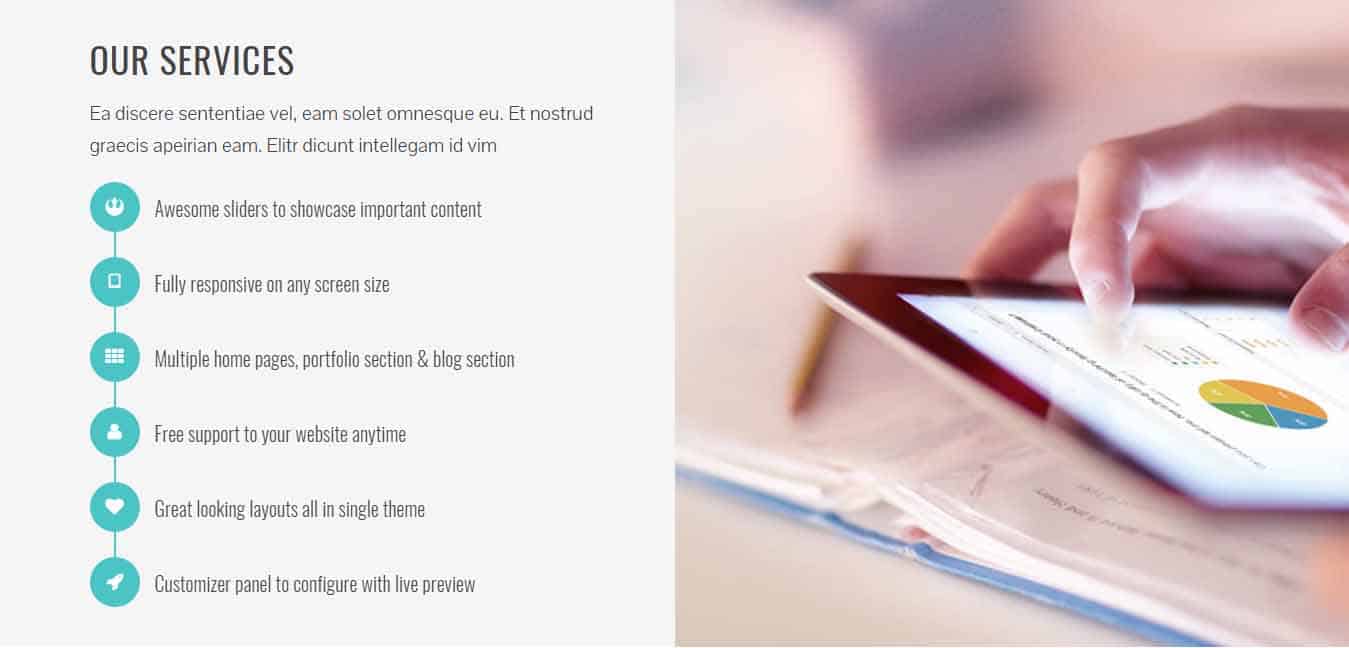
The theme allows you to display 6 features inside the service section of home page. To configure the service section you'll have to create service page and later configure it to display it from the customizer.
Create Service Page
Login to your WordPress Dashboard.
Go to Dashboard > Pages > Add New.
Enter the title for the service page.
Enter the contents for the page page in content area.
Click on Publish/Update button.

Create other service pages in the same way.

Configure Service Section
Login to your WordPress Dashboard.
Go to Dashboard > Appearance > Customize.
Go to Home Sections > Service Section.
Set 'Disable Section' to 'No' if you wish to disable Service section in your home page else set the option to 'Yes'.
Set the service section title under 'Title' text field.
Set the service section sub-title under 'Sub Title' textarea field.
Select the Service page that you've created for the Service Page 1 from 'Select a page' drop-down page list.
Set the icon for the Service Page 1 from 'FontAwesome Icon' icon picker drop-down list.
Set other service page in the same way.
Set the Image for service section on the right by clicking on 'Upload Image' button under 'Left Image' image upload option.
Once Done, Click on 'Save & Publish' button.

- TEAM SECTION
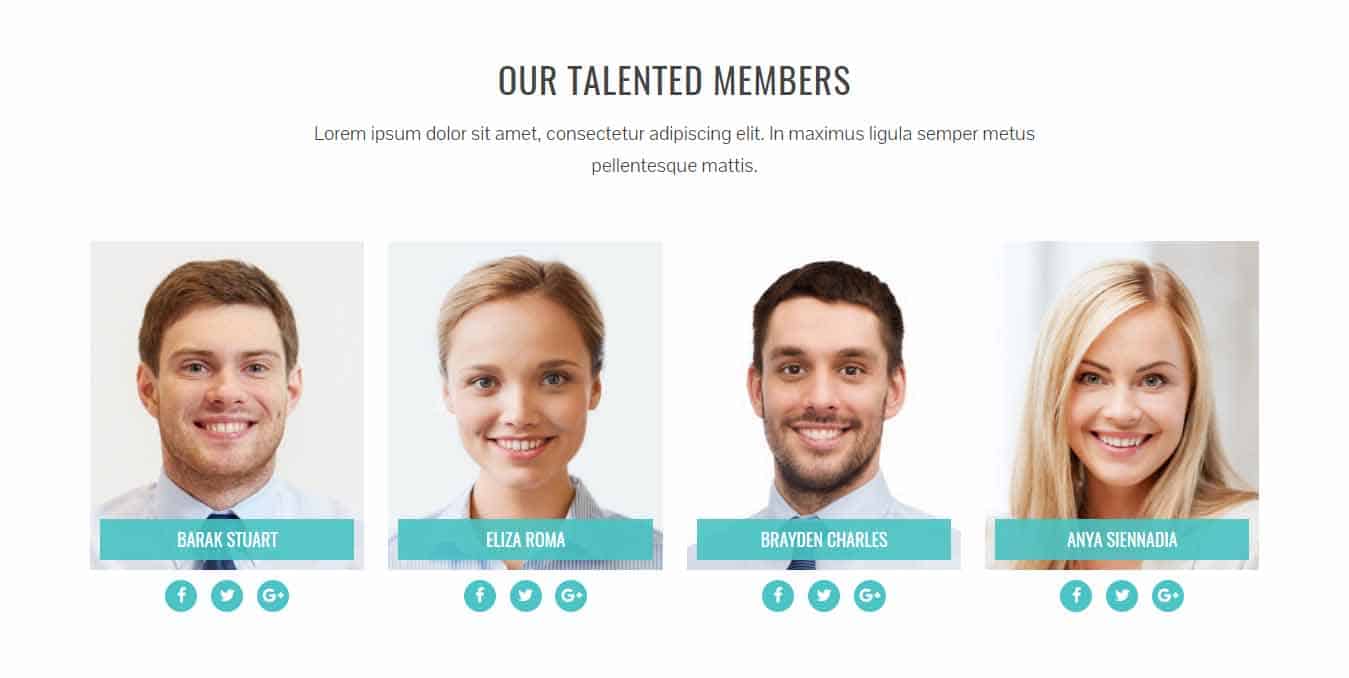
The theme allows you to display 4 team members inside the Team Section of home page. To configure the team section you'll have to create team member page and later configure it to display it from the customizer.
Create Team Member Page
Login to your WordPress Dashboard.
Go to Dashboard > Pages > Add New.
Enter the name for the team member in title field.
Enter the description about the team member in the content area.
Set the featured image for the team member.
Click on Publish/Update button.

Create other team member pages in the same way.

Configure Team Section
Login to your WordPress Dashboard.
Go to Dashboard > Appearance > Customize.
Go to Home Sections > Team Section.
Set 'Disable Section' to 'No' if you wish to disable Team Section in your home page else set the option to 'Yes'.
Set the Team Section title under 'Title' text field.
Set the Team Section sub-title under 'Sub Title' textarea field.
Select the Team Member page that you've created for the Team Member 1 from 'Select a page' drop-down page list.
Set the designation for the Team Member 1 in 'Team Member Designation' textfield.
Set the Team Member 1's social profile link (Facebook, Twitter & Google+ URL).
Configure other Team Member's in the same way.
Once Done, Click on 'Save & Publish' button.

- COUNTER SECTION
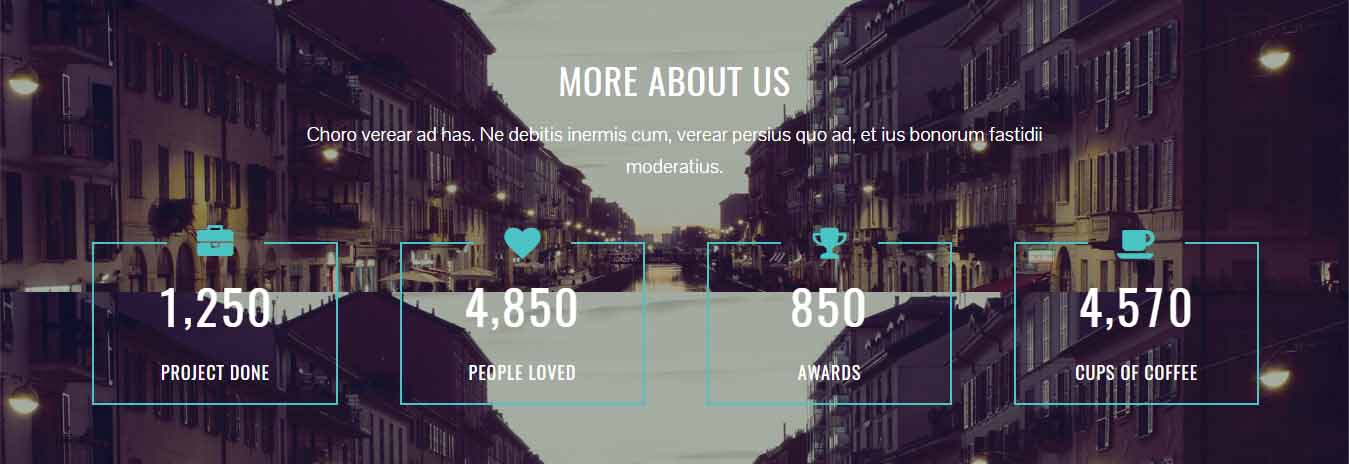
The theme allows you to display 4 counters under the Counter Section. To configure the counter section follow these steps:
Login to your WordPress Dashboard.
Go to Dashboard > Appearance > Customize.
Go to Home Sections > Counter Section.
Set 'Disable Section' to 'No' if you wish to disable Counter Section in your home page else set the option to 'Yes'.
Set the Counter Section title under 'Title' text field.
Set the Counter Section sub-title under 'Sub Title' textarea field.
Set the Counter Section's background by clicking on the upload image button under Section Background.
Set the title for the counter(1-4) in 'Title' textfield.
Set the counter no. for the counter(1-4) in 'Counter Value' textfield.
Select the icon of your choice for the counter(1-4) from Counter Icon drop-down list.
Once Done, Click on 'Save & Publish' button.


- TESTIMONIAL SECTION

The theme allows you to display unlimited client testimonial inside the Testimonial Section of home page. To configure the Testimonial section you'll have to create Client Testimonial page and later configure it to display it from the customizer.
Create Client Testimony Page
Login to your WordPress Dashboard.
Go to Dashboard > Pages > Add New.
Enter the name of a client in title field.
Enter the testimony of the client in the content area.
Set the featured image for the client.
Click on Publish/Update button.

Create other client testimonial pages in the same way.

Configure Testimonial Section
Login to your WordPress Dashboard.
Go to Dashboard > Appearance > Customize.
Go to Home Sections > Testimonial Section.
Set 'Disable Section' to 'No' if you wish to disable Testimonial Section in your home page else set the option to 'Yes'.
Set the Testimonial Section title under 'Title' text field.
Set the Testimonial Section sub-title under 'Sub Title' textarea field.
Select the Client Testimony page that you've created for the Testimonial section under the 'Testimonial' drop-down page list.
Once Done, Click on 'Save & Publish' button.

- BLOG SECTION
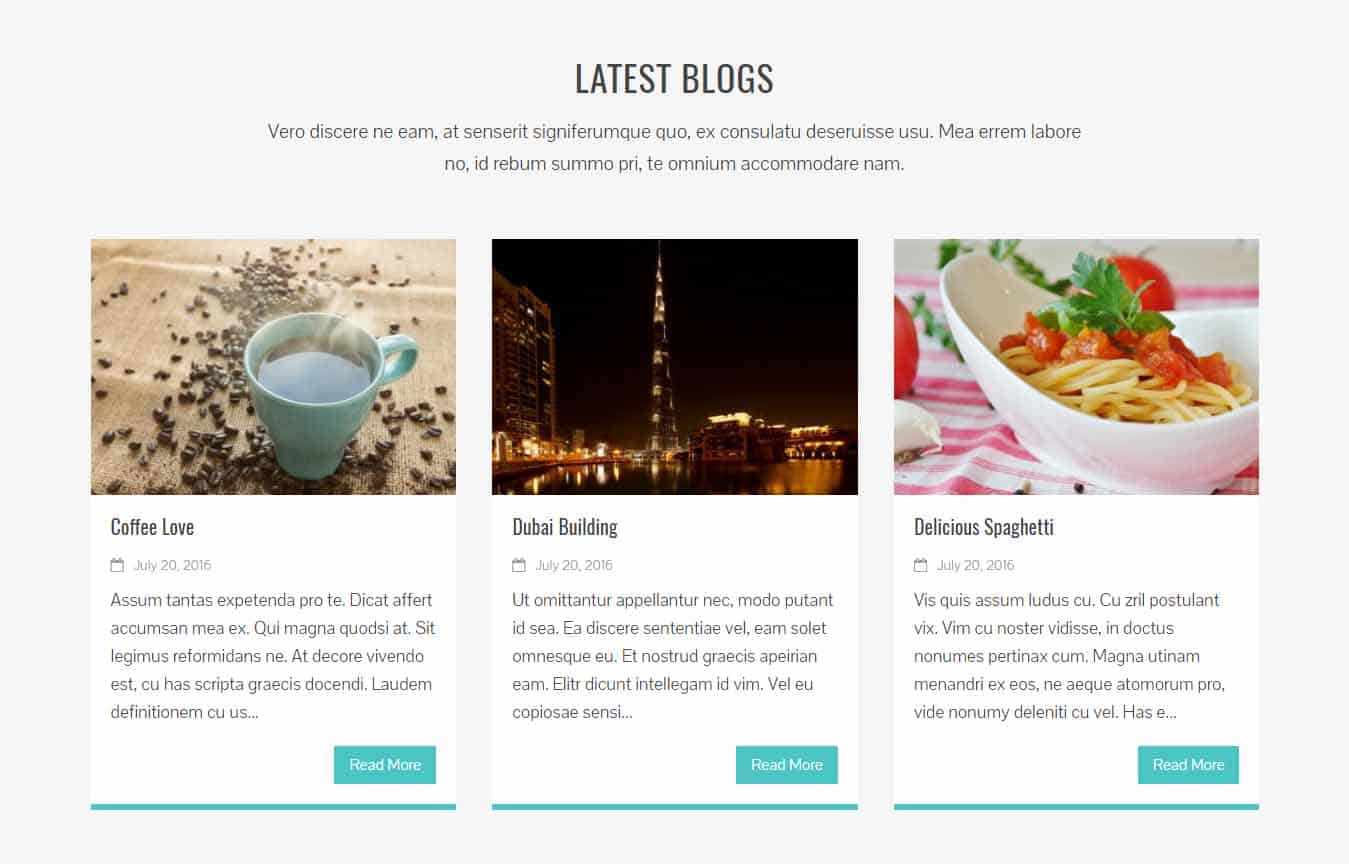
To Create a Blog Section You'll initially need create the blog categories and blog posts then later configure to display the blog via Customizer.
Create Blog Category
Login to your WordPress Dashboard.
Go to Dashboard > Posts > Categories.
Enter the name for the Blog Category.
Click on 'Add New Category' button.

Create Blog Posts
Login to your WordPress Dashboard.
Go to Dashboard > Posts > Add New.
Enter the title for the blog post.
Enter the contents for the blog post.
Select the Blog category/ies under the categories option.
Set the featured image for the blog post.
Click on Publish/Update button.

Configure Blog Section
Login to your WordPress Dashboard.
Go to Dashboard > Appearance > Customize.
Go to Home Sections > Blog Section.
Set 'Disable Section' to 'No' if you wish to disable Blog Section in your home page else set the option to 'Yes'.
Set the title for the Blog Section under 'Title' textfield.
Set the sub title for the Blog Section under 'Sub Title' textarea field.
Set the no. of posts to display in blog section from 'Number of posts to show' drop-down list.
You may prevent the posts from certain categories to display in Blog Section by check marking on the blog categories under 'Exclude Category from Blog Posts' option.
Once Done, Click on 'Save & Publish' button.

- CLIENTS LOGO SECTION

The theme allows you to display unlimited client logos as a carousel under the Client Logo Section. To configure the Client Logo Section follow these steps:
Login to your WordPress Dashboard.
Go to Dashboard > Appearance > Customize.
Go to Home Sections > Client Logo Section.
Set 'Disable Section' to 'No' if you wish to disable Client Logo Section in your home page else set the option to 'Yes'.
Set the Client Logo Section title under 'Title' text field.
Set the Client Logo Section sub-title under 'Sub Title' textarea field.
Click on Add/Edit Gallery button and select the multiple client logo images from the media library. These Logos will be displayed as a carousel.
Once Done, Click on 'Save & Publish' button.


- CALL TO ACTION SECTION
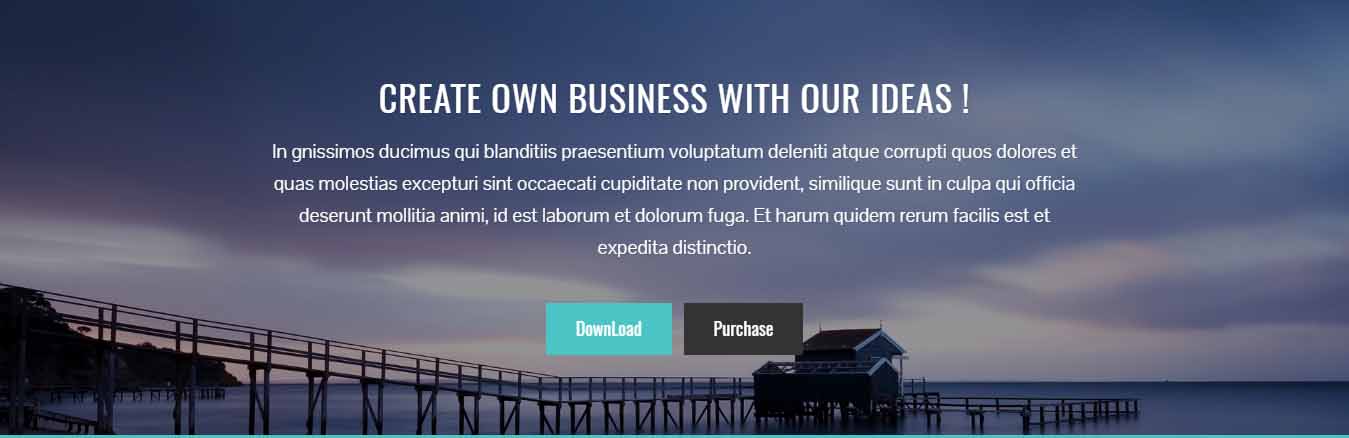
Configure the Call to Action Section following these steps:
Login to your WordPress Dashboard.
Go to Dashboard > Appearance > Customize.
Go to Home Sections > Call To Action Section.
Set 'Disable Section' to 'No' if you wish to disable Call to action Section in your home page else set the option to 'Yes'.
Set the Call to Action Section title under 'Title' text field.
Set the Call to Action Section sub-title under 'Sub Title' textarea field.
Set the button 1 text in 'Button 1 Text' textfield.
Set the url for button 1 in 'Button 1 Link' textfield.
Set the button 2 text in 'Button 2 Text' textfield.
Set the url for button 2 in 'Button 2 Link' textfield.
Set the background image for the Call to Action section by clicking on 'Upload Image' button under 'Background Image' and choosing the image from the media library.
Once Done, Click on 'Save & Publish' button.


FOOTER SETUP

The theme allows you to display 4 footer widget areas in the Footer. To Configure these footer widgets follow these steps:
Login to your WordPress Dashboard.
Go to Dashboard > Appearance > Widgets.
Drag and Drop the widgets of your choice to Footer One, Footer Two, Footer Three & Footer Four widget areas.
Configure the widget contents and settings.
Once Done, Click on 'Save' button.

-- THE END --
