环境:
| 软件 | 版本 |
|---|---|
| Java Version | 1.8.0_45 |
| Tomcat Version | Tomcat/8.5.4 |
| Ansible Version | 2.4 |
| GitLab Version | 11.1.2 |
| Jenkins Version | 2.121.2 |
| 操作系统 | CentOS 7.3 |
安装Ansible
[root@deploy ~]# yum -y install ansible
[root@deploy ~]# ansible --version
ansible 2.4.2.0
  config file = /etc/ansible/ansible.cfg
  configured module search path = [u'/root/.ansible/plugins/modules', u'/usr/share/ansible/plugins/modules']
  ansible python module location = /usr/lib/python2.7/site-packages/ansible
  executable location = /usr/bin/ansible
  python version = 2.7.5 (default, Nov  6 2016, 00:28:07) [GCC 4.8.5 20150623 (Red Hat 4.8.5-11)]

#优化ansible配置文件
[root@deploy ~]# vim /etc/ansible/ansible.cfg

1.长连接设置
将
#ssh_args = -C -o ControlMaster=auto -o ControlPersist=60s
修改为
ssh_args = -C -o ControlMaster=auto -o ControlPersist=5d

2.开启pipelining
将
#pipelining = False
修改为
pipelining = True

3.开启缓存
在 #gathering = implicit 下面追加
gathering = smart
fact_caching_timeout = 86400
fact_caching = jsonfile
fact_caching_connection = /tmp/ansible_fact_cache
安装GitLab
#配置yum源
[root@deploy ~]# cat > /etc/yum.repos.d/gitlab-ce.repo << EOF
[gitlab-ce]
name=Gitlab CE Repository
baseurl=https://mirrors.tuna.tsinghua.edu.cn/gitlab-ce/yum/el\$releasever/
gpgcheck=0
enabled=1
EOF

#更新yum缓存
[root@deploy ~]# yum clean all
[root@deploy ~]# yum makecache

#安装GitLab依赖包
[root@deploy ~]# yum install -y curl policycoreutils-python openssh-server iptables-services

#安装GitLab,安装过程中会出现下图的图案
[root@deploy ~]# sudo yum -y install gitlab-ce

配置GitLab
#编辑配置文件
[root@deploy ~]# vim /etc/gitlab/gitlab.rb

#修改访问地址
external_url 'http://10.241.0.1'

#开启备份
gitlab_rails['manage_backup_path'] = true
gitlab_rails['backup_path'] = "/var/opt/gitlab/backups"
gitlab_rails['backup_keep_time'] = 604800

#初始化配置,并启动服务
[root@deploy ~]# gitlab-ctl reconfigure

#查看状态
[root@deploy ~]# gitlab-ctl status
run: alertmanager: (pid 22380) 17s; run: log: (pid 22496) 15s
run: gitaly: (pid 22287) 18s; run: log: (pid 22397) 17s
run: gitlab-monitor: (pid 22310) 17s; run: log: (pid 22342) 17s
run: gitlab-workhorse: (pid 22266) 18s; run: log: (pid 22350) 17s
run: logrotate: (pid 21787) 75s; run: log: (pid 22352) 17s
run: nginx: (pid 21754) 77s; run: log: (pid 22351) 17s
run: node-exporter: (pid 22018) 63s; run: log: (pid 22398) 16s
run: postgres-exporter: (pid 22406) 16s; run: log: (pid 22498) 15s
run: postgresql: (pid 21475) 127s; run: log: (pid 22313) 17s
run: prometheus: (pid 22353) 17s; run: log: (pid 22373) 17s
run: redis: (pid 21415) 133s; run: log: (pid 22312) 17s
run: redis-exporter: (pid 22054) 51s; run: log: (pid 22343) 17s
run: sidekiq: (pid 21718) 84s; run: log: (pid 22315) 17s
run: unicorn: (pid 22511) 12s; run: log: (pid 22314) 17s

#查看gitlab版本号
[root@deploy ~]# cat /opt/gitlab/embedded/service/gitlab-rails/VERSION
11.1.2

#开启防火墙
[root@deploy ~]# systemctl  stop firewalld
[root@deploy ~]# systemctl  disable firewalld
[root@deploy ~]# systemctl  start iptables
[root@deploy ~]# iptables -I INPUT -p tcp --dport 80 -j ACCEPT
[root@deploy ~]# service  iptables save
iptables: Saving firewall rules to /etc/sysconfig/iptables:[  OK  ]

#访问gitlab, 第一次登陆会要求设置密码
浏览器打开 http://10.241.0.1
汉化Gitlab,可省略
#安装git
[root@deploy ~]# yum install -y git

#下载相同版本的汉化补丁,和gitlab版本保持一致
[root@deploy ~]# git clone https://gitlab.com/xhang/gitlab.git gitlab-cn -b v11.1.2-zh

#查看该汉化补丁的版本
[root@deploy ~]# cat gitlab/VERSION
11.1.2

停止gitlab服务
[root@deploy ~]# gitlab-ctl stop

#切换到gitlab汉化包所在的目录(即步骤二获取的汉化版gitlab)
[root@deploy ~]# cd gitlab-cn

#比较汉化标签和原标签,导出 patch 用的 diff 文件到/root下
[root@deploy gitlab-cn]# git diff v11.1.2 v11.1.2-zh > ../11.1.2-zh.diff

#将10.7.0-zh.diff作为补丁更新到gitlab中
[root@deploy gitlab-cn]# cd ..
[root@deploy ~]# yum install patch -y
[root@deploy ~]# patch  -d /opt/gitlab/embedded/service/gitlab-rails -p1 < 11.1.2-zh.diff

#出现以下提供一直按回车即可
can't find file to patch at input line 5
Perhaps you used the wrong -p or --strip option?
The text leading up to this was:
--------------------------
|diff --git a/app/assets/javascripts/awards_handler.js b/app/assets/javascripts/awards_handler.js
|index 70f20c5..b8089dd 100644
|--- a/app/assets/javascripts/awards_handler.js
|+++ b/app/assets/javascripts/awards_handler.js
--------------------------
File to patch:

#启动gitlab
[root@deploy ~]# gitlab-ctl start

#再次访问已经可以看到汉化完成

安装jenkins
#可以从我的服务器上下载 也可以从官网下载
[root@deploy ~]# wget http://download.baiyongjie.com/deploy/jdk-8u45-linux-x64.tar.gz
[root@deploy ~]# wget http://download.baiyongjie.com/deploy/jenkins_2.121.2.war
[root@deploy ~]# wget http://download.baiyongjie.com/deploy/apache-tomcat-8.5.4.tar.gz

#安装jdk
[root@deploy ~]# tar zxvf jdk-8u45-linux-x64.tar.gz
[root@deploy ~]# mv  jdk1.8.0_45  /usr/local/
[root@deploy ~]# mv jdk-8u45-linux-x64.tar.gz  /usr/local/src/

#添加到系统的环境变量
[root@deploy ~]# cat >>/etc/profile << EOF
export JAVA_HOME=/usr/local/jdk1.8.0_45
export JRE_HOME=\${JAVA_HOME}/jre
export CLASSPATH=.:\${JAVA_HOME}/lib:\${JRE_HOME}/lib
export PATH=\${JAVA_HOME}/bin:\$PATH
EOF

#使profile文件生效,并查看java版本
[root@deploy ~]# source  /etc/profile
[root@deploy ~]# java -version
java version "1.8.0_45"
Java(TM) SE Runtime Environment (build 1.8.0_45-b14)
Java HotSpot(TM) 64-Bit Server VM (build 25.45-b02, mixed mode)

#安装tomcat
[root@deploy ~]# tar zxvf apache-tomcat-8.5.4.tar.gz
[root@deploy ~]# mv apache-tomcat-8.5.4  /usr/local/jenkins
[root@deploy ~]# rm -rf /usr/local/jenkins/webapps/*
[root@deploy ~]# mv apache-tomcat-8.5.4.tar.gz  /usr/local/src/

#修改tomcat字符集,及端口
[root@deploy ~]# vim /usr/local/jenkins/conf/server.xml
    <Connector port="8080" URIEncoding="UTF-8" protocol="HTTP/1.1"
               connectionTimeout="20000"
               redirectPort="8443" />

#启动jenkins
[root@deploy ~]# mv jenkins_2.121.2.war  /usr/local/jenkins/webapps/jenkins.war
[root@deploy ~]# /usr/local/jenkins/bin/startup.sh

#查看tomcat日志
[root@deploy ~]# tail -f /usr/local/jenkins/logs/catalina.out
31-Jul-2018 19:17:39.687 INFO [localhost-startStop-1] org.apache.catalina.startup.HostConfig.deployWAR Deployment of web application archive /usr/local/jenkins/webapps/jenkins.war has finished in 18,725 ms
31-Jul-2018 19:17:39.692 INFO [main] org.apache.coyote.AbstractProtocol.start Starting ProtocolHandler [http-nio-8090]
31-Jul-2018 19:17:39.697 INFO [main] org.apache.coyote.AbstractProtocol.start Starting ProtocolHandler [ajp-nio-8009]
31-Jul-2018 19:17:39.698 INFO [main] org.apache.catalina.startup.Catalina.start Server startup in 18776 ms

#配置防火墙
[root@deploy ~]# iptables -I INPUT -p tcp --dport  8090 -j ACCEPT
[root@deploy ~]# service iptables save
iptables: Saving firewall rules to /etc/sysconfig/iptables:[  OK  ]

#访问Jenkins
http://10.241.0.1

#第一次打开jenkins需要初始化密码
[root@deploy ~]# cat /root/.jenkins/secrets/initialAdminPassword
23952aded0864751a5abf5676a6a81d3

#解决jenkins插件问题,访问
http://10.241.0.1/jenkins/pluginManager/advanced

#修改最下面的升级站点地址
http://updates.jenkins-ci.org/update-center.json
#清华大学镜像源 https://mirrors.tuna.tsinghua.edu.cn/jenkins/
#上海大学镜像源 https://mirrors.shu.edu.cn/jenkins/

#如配置地址后仍然无法在线使用,那可以采用下载插件,手动安装
http://mirror.xmission.com/jenkins/plugins/


#重启jenkins命令
kill -9 `ps -ef|grep '/usr/local/jenkins' | grep -v grep | awk '{print $2}' `
/usr/local/jenkins/bin/startup.sh

Jenkins 整合 Gitlab
配置Gitlab

上传服务器秘钥到gitlab
# 生成秘钥
[root@deploy ~]# ssh-keygen
Generating public/private rsa key pair.
Enter file in which to save the key (/root/.ssh/id_rsa):
Enter passphrase (empty for no passphrase):
Enter same passphrase again:
Your identification has been saved in /root/.ssh/id_rsa.
Your public key has been saved in /root/.ssh/id_rsa.pub.
The key fingerprint is:
SHA256:NRuBl+TBQow5l3nb+E/MCg95tpZRF/+amoRTaBIhTXw root@deploy
The key's randomart image is:
+---[RSA 2048]----+
|      .O+*+.     |
|      +.XoEo   . |
|       o.==+    o|
|         oo=. . o|
|        S +o.+ ..|
|         o+o= + .|
|          o*.B o |
|           o*.+  |
|           .o.   |
+----[SHA256]-----+

[root@deploy ~]# cat .ssh/id_rsa.pub
ssh-rsa AAAB3NzaC1yc2EAAAADAQABAAABAQC1kOUt1qRxd/rJJkOIYOeM9u0twE9pZq4txKwEtAy3lT2LCcxgWbcjC0VBI84FO9XE8BKA/oEA1wCErVevnDoYfLT99x8t6SLc8bKZ9SOSAAt1LO5HkzaaBDnuoXyVRduWJHlN9zS7lGYxbEY1AHYWwA3hDl3Y/SPUC6ulwCU7QnbOn8GE7qGXW8BDdeTyIEXqn3pFYFTa7TiqnjR9w3iqzso32Yo/sDeEsdsm6uw8uEVUexBqeUdjB6OP35JLpnwaGhoXeiIW87fCtk37PFzb5quZB2yoBKTJHFU8lC+Ihh/Z/iGOyU0mmjvq8ot8P5RfDPFtpFc4Oipm3c3etNd root@deploy
将公钥上传到gitlab

初始化项目
[root@deploy ~]# mkdir -p /data/Ansible/
[root@deploy ~]# cd /data/Ansible/
[root@deploy Ansible]# git config --global user.name "baiyongjie"
[root@deploy Ansible]# git config --global user.email "misterbyj@163.com"

[root@deploy Ansible]# git clone ssh://git@101.89.82.106:59888/root/Ansible.git code
Cloning into 'code'...
The authenticity of host '[101.89.82.106]:59888 ([101.89.82.106]:59888)' can't be established.
ECDSA key fingerprint is SHA256:KgiTZyrCxFQwHivVyAYc1XrpvfWVliLaC+S0cg2fwYE.
ECDSA key fingerprint is MD5:b8:f9:75:c9:53:c1:48:6e:90:65:c5:5b:e7:5c:bd:ba.
Are you sure you want to continue connecting (yes/no)? yes
Warning: Permanently added '[101.89.82.106]:59888' (ECDSA) to the list of known hosts.
warning: You appear to have cloned an empty repository.

[root@deploy Ansible]# cd code/
[root@deploy code]# echo "##### jenkins test"  > README.md
[root@deploy code]# git add .
[root@deploy code]# git commit -m 'add readme'
[master (root-commit) 3b6717d] add readme
 1 file changed, 1 insertion(+)
 create mode 100644 README.md
[root@deploy code]# git push -u origin master
Counting objects: 3, done.
Writing objects: 100% (3/3), 227 bytes | 0 bytes/s, done.
Total 3 (delta 0), reused 0 (delta 0)
To ssh://git@101.89.82.106:59888/root/Ansible.git
 * [new branch]      master -> master
Branch master set up to track remote branch master from origin.
配置Gitlab,为整合Jenkins做准备


配置Jenkins
选择系统管理->管理插件->可选择插件->搜索 gitlab


然后继续安装Gitlab Authentication和Gitlab Hook

配置jenkins连接gitlab,选择左侧的系统管理,然后选择中间的系统设置


配置GitLab,Connection Name随便填,Git Host URL填GitLab的访问地址,然后点Add—jenkins,如图:

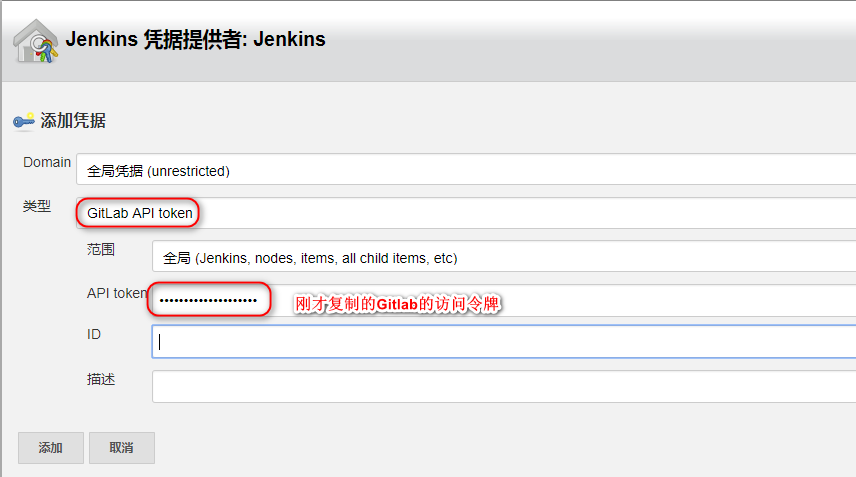
Credentials选择刚创建的GitLab Api Token,然后点下Test Connection,看下是否成功,如成功点击最下面的保存


源码管理选择git,选择Add-Jenkins,配置Gitlab的账号密码


配置自动触发,点击构建触发器,先勾选Build when a change is pushed to GitLab,点击高级,然后再点击一下Generate就会生成一个Secret Token,如下

点击左下角的保存按钮。记录两个东西,一个是Build when a change is pushed to GitLab那一行中,GitLab CI Service URL:后面的 URL;
还有一个就是刚刚生成的Secret Token,这俩在后面配置GitLab工程时需要用到
配置Gitlab工程
在gitlab进入那个叫Ansible的项目,点击设置,点击导入所有仓库,在URL里填写刚刚记下来的URL,在安全令牌里填写刚刚记下来的Secret Token,如图:

然后点击下面绿色的增加Web钩子,如多出一个如下图的web钩子

如果提示 Urlis blocked: Requests to localhost are not allowed,这需要开启允许钩子访问本地网络

对刚刚生成的web钩子点击test,选择push events,然后就会出现200的成功字样,如图:

如果你再点击一下test上面的edit,就会看到钩子最近调用情况,再点击view details的话,就会看到具体的调用细节,如图:

测试自动构建
在服务器上push代码,
[root@deploy code]# echo "测试jenkins是否会自动构建" > auto-jenkins
[root@deploy code]# git add .
[root@deploy code]# git commit -m 'test autojenkins'
[master 2290848] test autojenkins
 1 file changed, 1 insertion(+)
 create mode 100644 auto-jenkins
[root@deploy code]# git push origin master
Counting objects: 4, done.
Delta compression using up to 8 threads.
Compressing objects: 100% (2/2), done.
Writing objects: 100% (3/3), 320 bytes | 0 bytes/s, done.
Total 3 (delta 0), reused 0 (delta 0)
To ssh://git@101.89.82.106:59888/root/Ansible.git
   3b6717d..2290848  master -> master
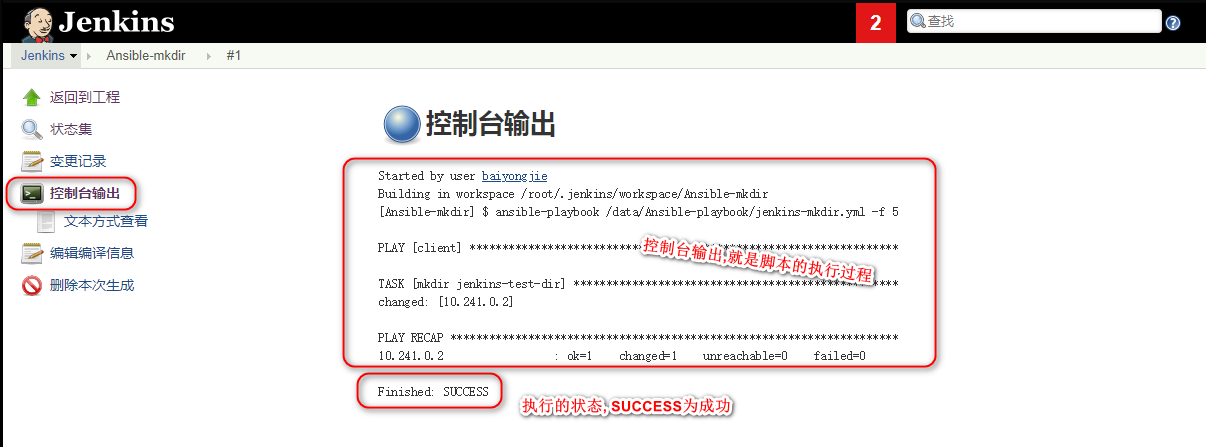
到Jenkins查看构建记录,发现push动作已经出发了Jenkins的自动构建

查看构建的控制台输出日志,重点看commit message和Finished

结束语.
至此,Jenkins结合Gitlab就已经做完了,
每次开发push代码后触发jenkins的自动构建,
可以在下面的构建步骤里增加一些shell,ansible-playbook等来帮助我们完成自动部署等操作.
Jenkins 整合 Ansible
安装jenkins和ansible
要jenkins支持ansible的前提条件是在jenkins所在的主机上安装ansible
jenkins和ansible安装可以参考 https://baiyongjie.com/?p=188
测试ansible
[root@deploy ansible]# cd /etc/ansible/
[root@deploy ansible]# > hosts
[root@deploy ansible]# vim hosts
[client]
10.241.0.2

# 生成秘钥
[root@deploy ~]# ssh-keygen
Generating public/private rsa key pair.
Enter file in which to save the key (/root/.ssh/id_rsa):
Enter passphrase (empty for no passphrase):
Enter same passphrase again:
Your identification has been saved in /root/.ssh/id_rsa.
Your public key has been saved in /root/.ssh/id_rsa.pub.
The key fingerprint is:
SHA256:NRuBl+TBQow5l3nb+E/MCg95tpZRF/+amoRTaBIhTXw root@deploy
The key's randomart image is:
+---[RSA 2048]----+
|      .O+*+.     |
|      +.XoEo   . |
|       o.==+    o|
|         oo=. . o|
|        S +o.+ ..|
|         o+o= + .|
|          o*.B o |
|           o*.+  |
|           .o.   |
+----[SHA256]-----+

#将秘钥拷贝到客户机
[root@deploy ansible]# ssh-copy-id  10.241.0.2
/usr/bin/ssh-copy-id: INFO: Source of key(s) to be installed: "/root/.ssh/id_rsa.pub"
/usr/bin/ssh-copy-id: INFO: attempting to log in with the new key(s), to filter out any that are already installed
/usr/bin/ssh-copy-id: INFO: 1 key(s) remain to be installed -- if you are prompted now it is to install the new keys
root@10.241.0.2's password:

Number of key(s) added: 1

Now try logging into the machine, with:   "ssh '10.241.0.2'"
and check to make sure that only the key(s) you wanted were added.

#测试ansible能否正常运行
[root@deploy ansible]# ansible  client -m ping
10.241.0.2 | SUCCESS => {
    "changed": false,
    "ping": "pong"
}

#新建一个测试的ansible-playbook
[root@deploy ~]# mkdir -p /data/Ansible-playbook
[root@deploy ~]# vim /data/Ansible-playbook/jenkins-mkdir.yml
---
- hosts: client
  gather_facts: no

  tasks:
    - name: mkdir jenkins-test-dir
      file: path=/data/jenkins-test-dir  state=directory
配置jenkins
登陆jenkins 选择系统管理->管理插件 安装以下两个插件: Ansible、AnsiColor


然后构建的步骤新加一个Ansible-playbook,配置脚本路径,然后保存


到client主机查看 jenkins-test-dir 目录是否创建成功
#查看client的ip地址
[root@deploy ~]# cat /etc/ansible/hosts
[client]
10.241.0.2

#登陆到远程主机
[root@deploy ~]# ssh 10.241.0.2
Last login: Fri Aug  3 22:02:58 2018 from gateway

#查看目录是否存在
[root@client ~]# tree  /data/
/data/
└── jenkins-test-dir

#查看目录的详细信息
[root@client ~]# stat  /data/jenkins-test-dir/
  File: ‘/data/jenkins-test-dir/’
  Size: 6               Blocks: 0          IO Block: 4096   directory
Device: 802h/2050d      Inode: 68197841    Links: 2
Access: (0755/drwxr-xr-x)  Uid: (    0/    root)   Gid: (    0/    root)
Access: 2018-08-03 22:19:48.393000000 +0800
Modify: 2018-08-03 22:12:27.046000000 +0800
Change: 2018-08-03 22:12:27.046000000 +0800

#从上面的信息可以看到目录的创建时间为22:12:27, 与jenkins构建时间一致
