这篇文章根据大漠老师的博文写成,请参考<a href="http://damoqiongqiu.github.io/">http://damoqiongqiu.github.io/</a>
搭建的效果请参考<a href="https://baipu.github.io">白璞的技术博客</a>
准备项:
注册一个github账号,创建项目
- 注册
首先你需要有一个github的账号,将来的文章将会将github当成仓库用。所以先注册账户吧:
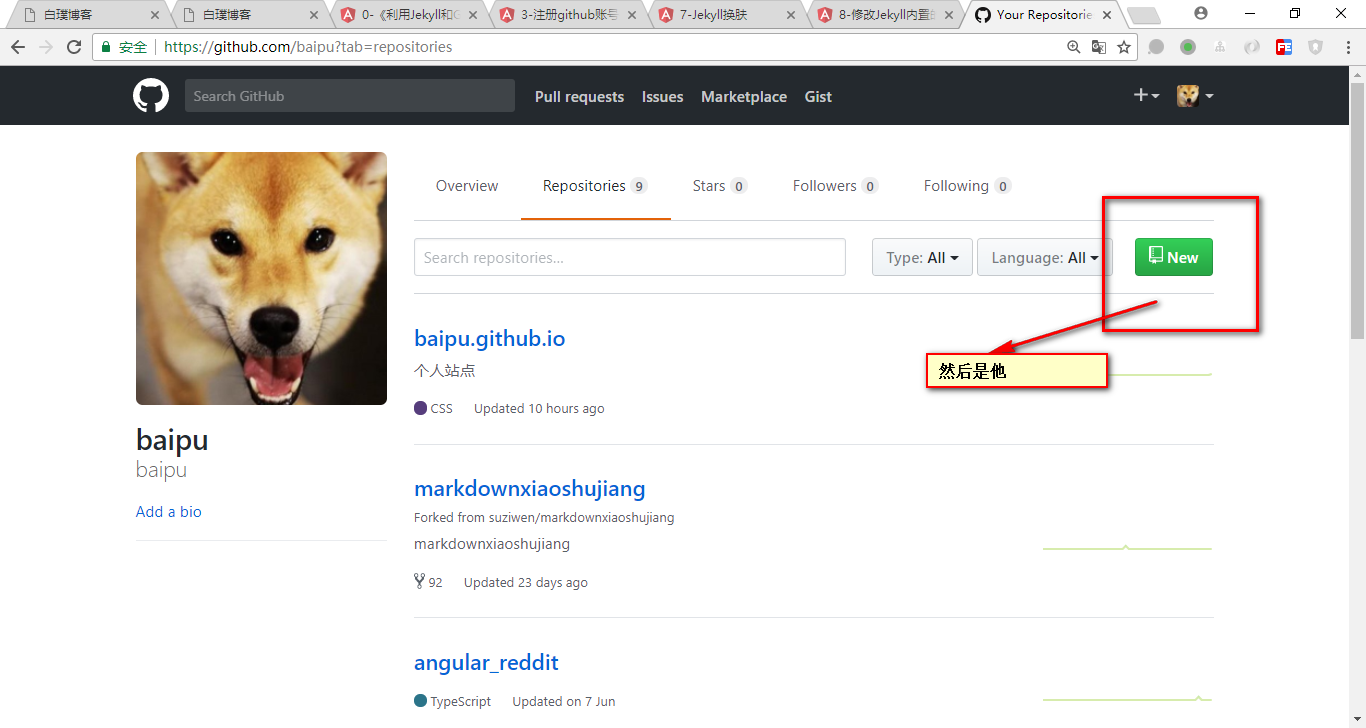
点击这里进入github,然后按要求注册。 - 创建项目
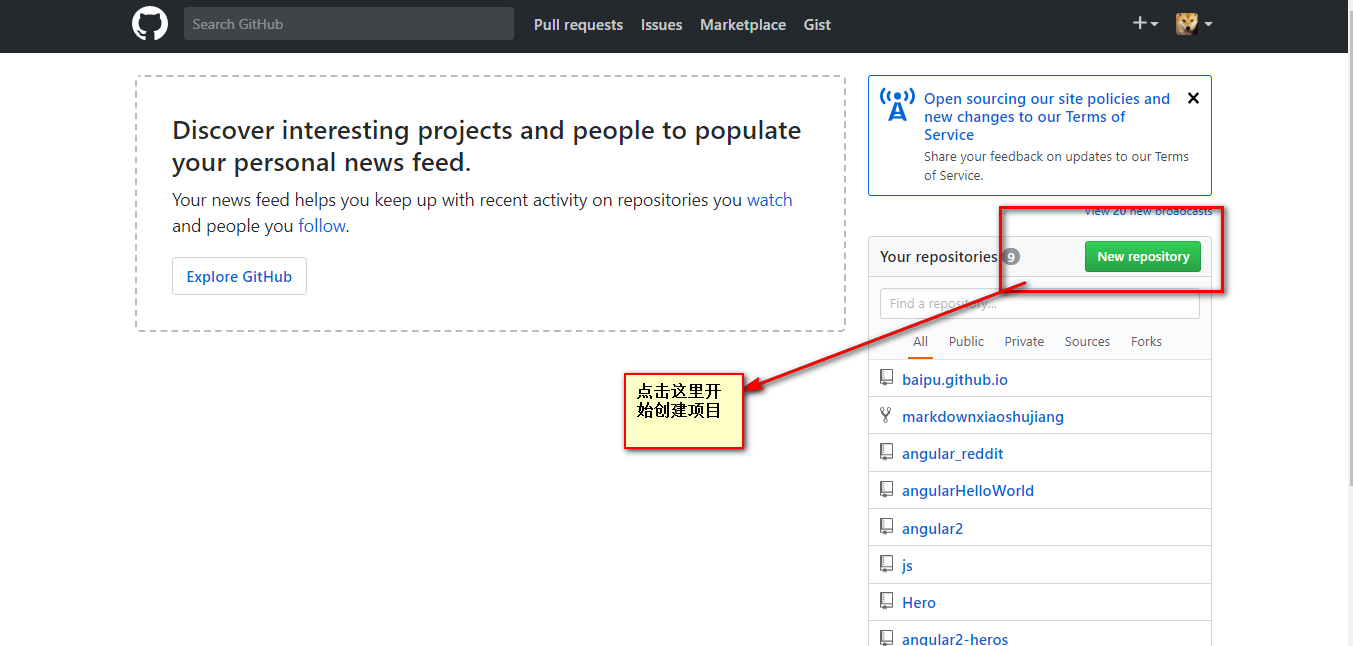
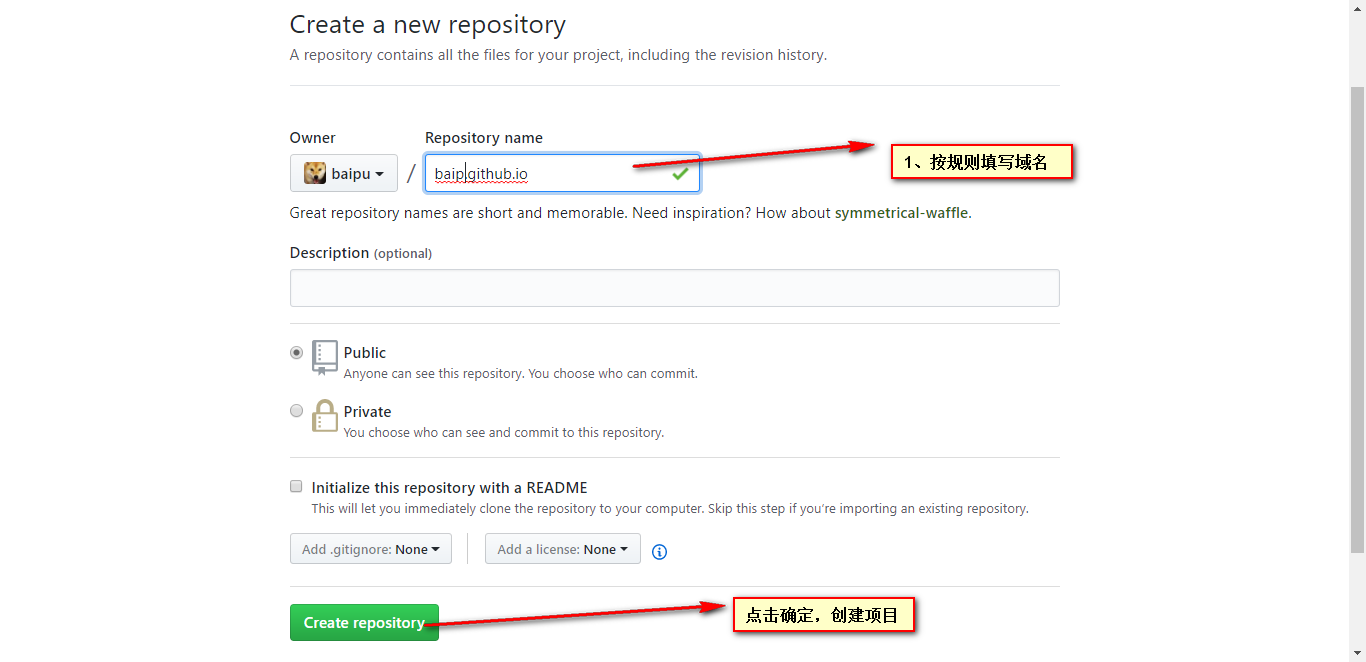
如果找不到上述页面那么下边这样也可以,总之随便点,就是找到repositories然后新建他

写你博客的域名,将来你就是根据这个网址访问你的博客,但是!!
注意了:
他的命名规范必须是:“xxx.github.io” 这里的xx必须是你github的名字,
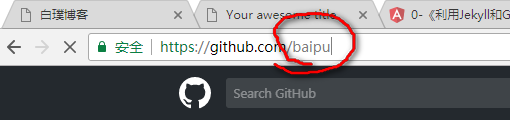
这里我的名字是baipu所以,就的是baipu.github.io名字必须是这个,我之前用的是baip有问题
将工程拷到本地,有很多办法,包括git命令,github 或者是其他的:
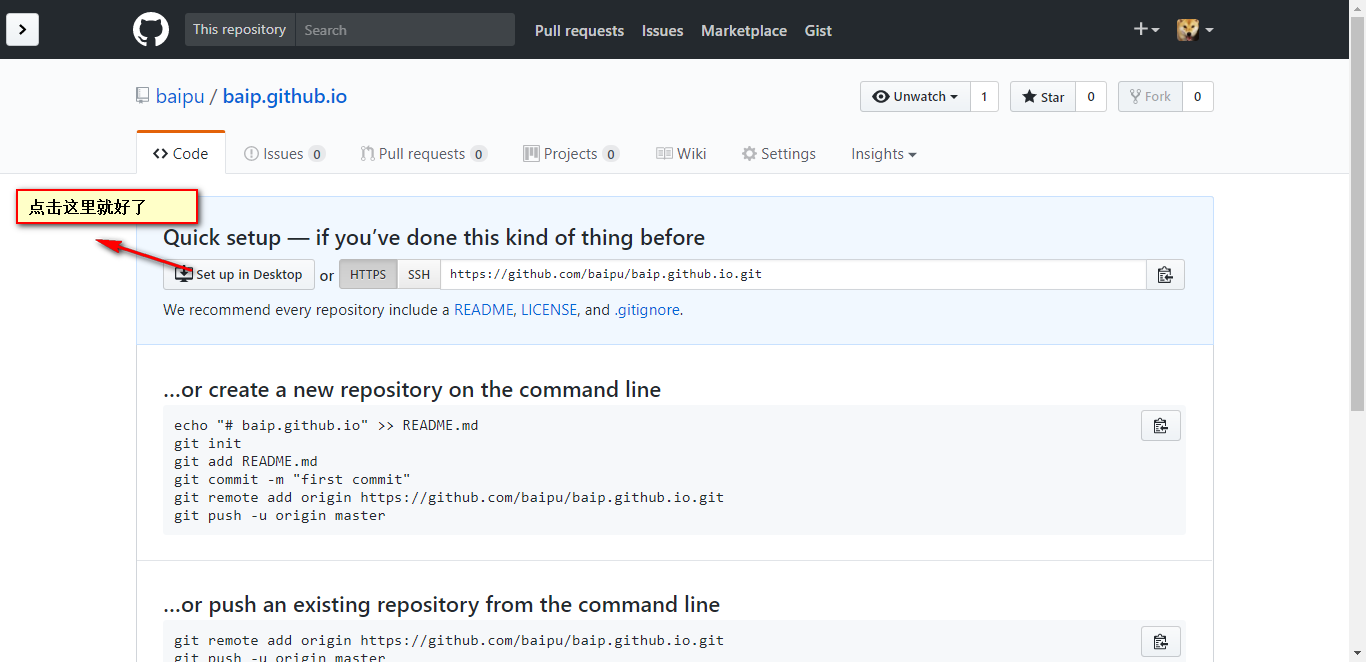
同过命令行的方法添加文件:不用管
echo "# baip.github.io" >> README.md
git init
git add README.md
git commit -m "first commit"
git remote add origin https://github.com/baipu/baip.github.io.git
git push -u origin master
要不就是从其它项目上拷过来的命令行,先不用管
git remote add origin https://github.com/baipu/baip.github.io.git
git push -u origin master
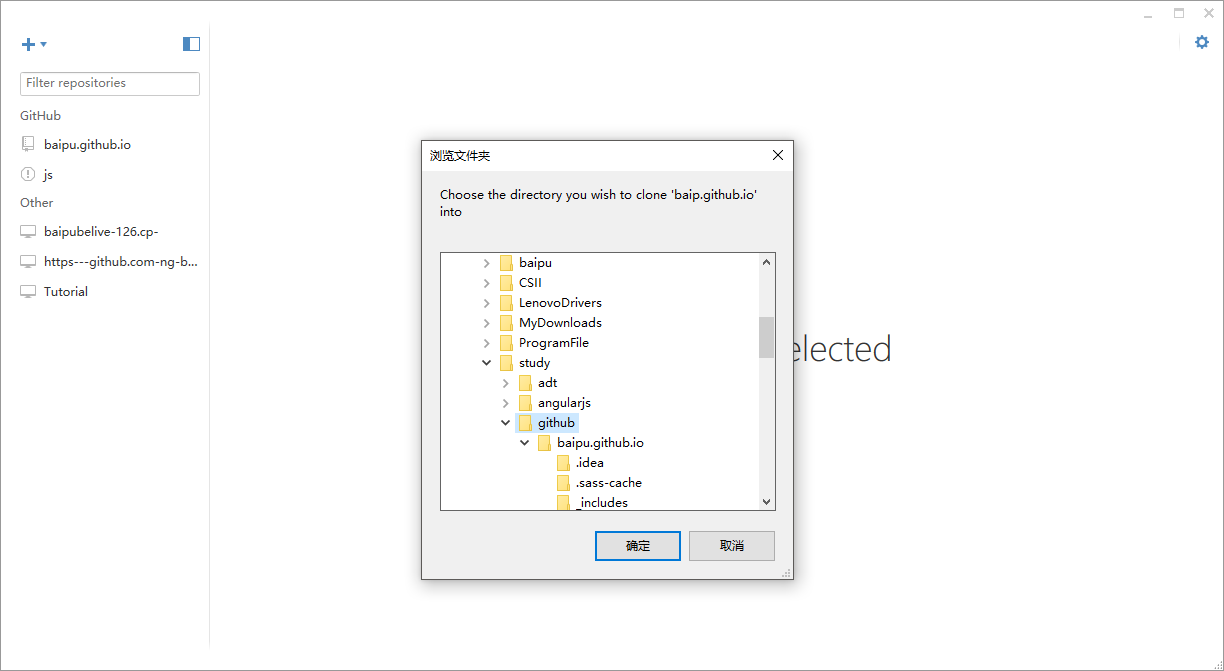
github的客户端里保存文件,如果没有装github可添加一个文件后,down下来
安装jekyll 并配置运行环境
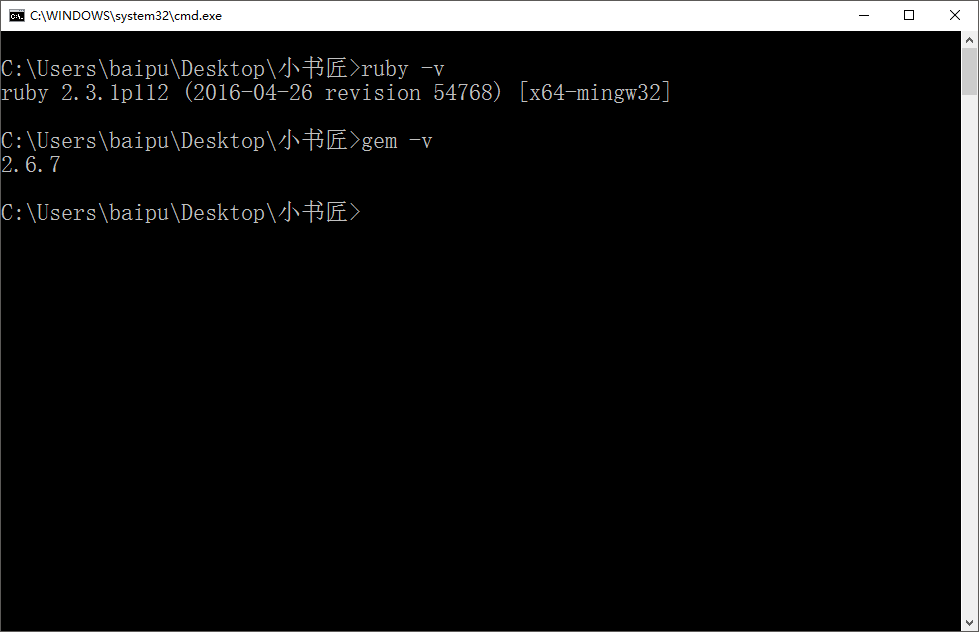
下载ruby 和RubyGems下载页
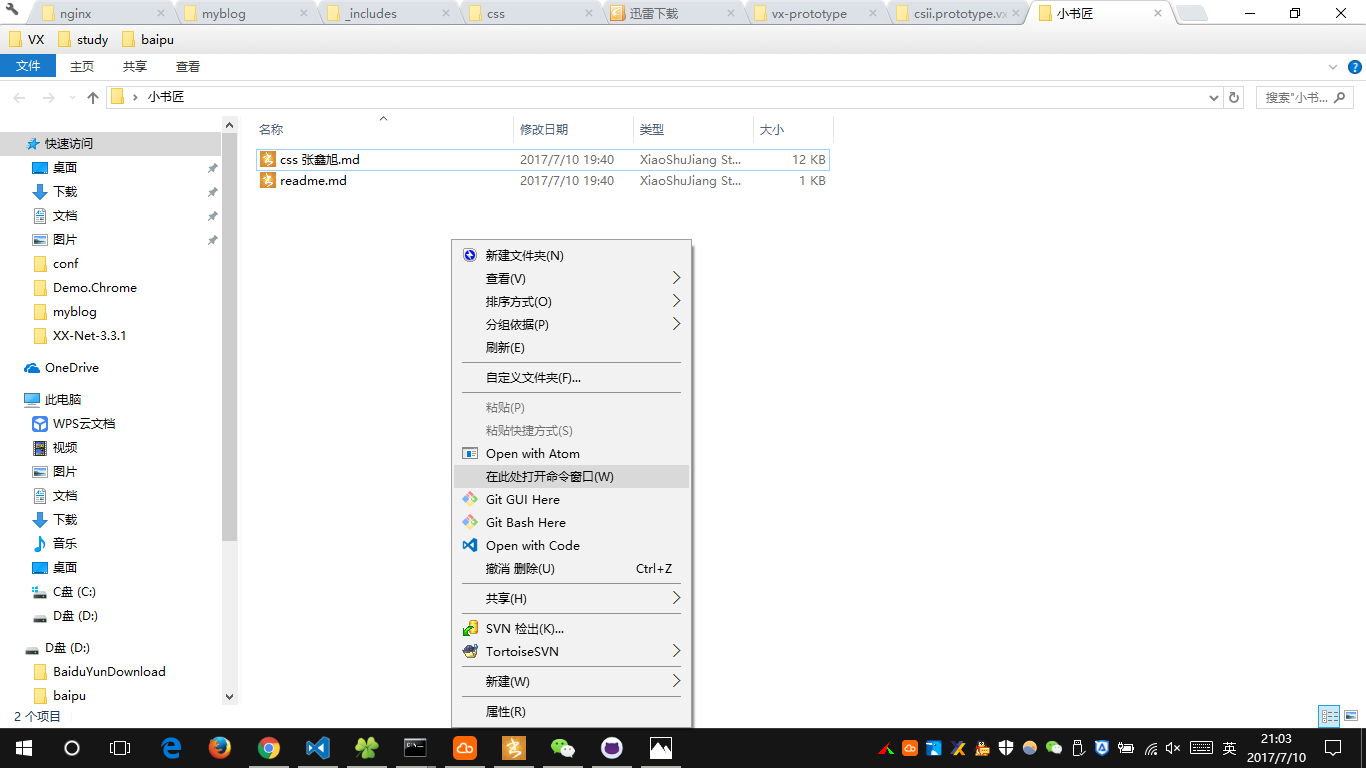
下载rubygems后,具体页面就不详细截图了。解压,然后打开随便一个文件夹,不要点击任何文件,摁住shift键,同时鼠标右键,选择在此处打开命令窗口,书如Ruby -v和gem -v如果显示版本号,说明安装没问题
用Jekyll创建第一个项目
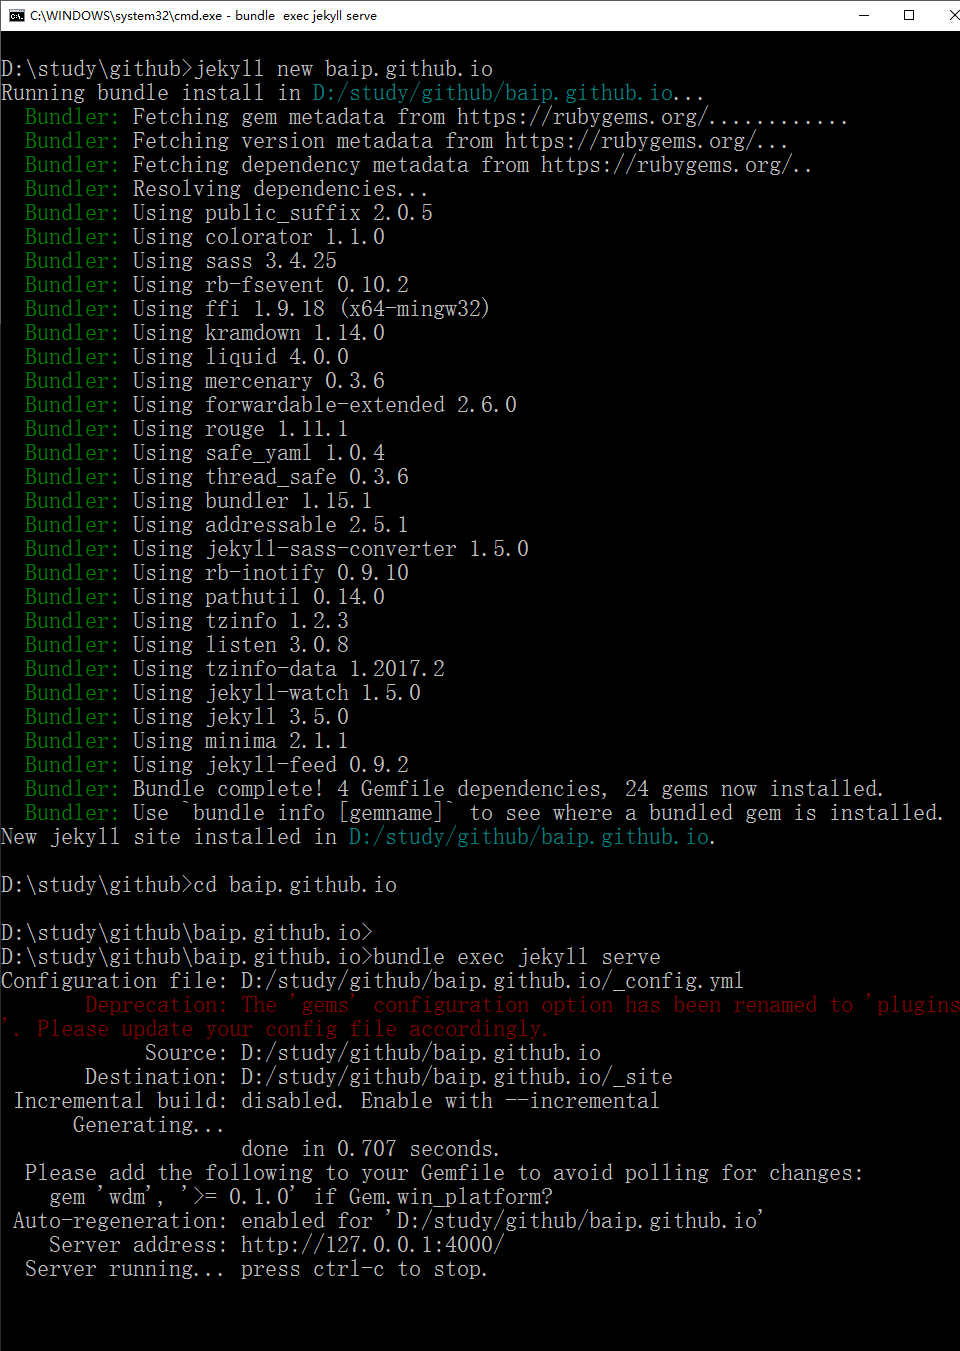
在你刚才拷下文件的外层目录上如上一样,右键,打开命令行,然后执行命令
gem install jekyll bundler

jekyll new baipu.github.io//jekyll new 此处是你刚才项目的名称

cd baipu.github.io//cd 你刚才项目的名称

bundle exec jekyll serve
然后用编辑器打开项目,我用的是vscode
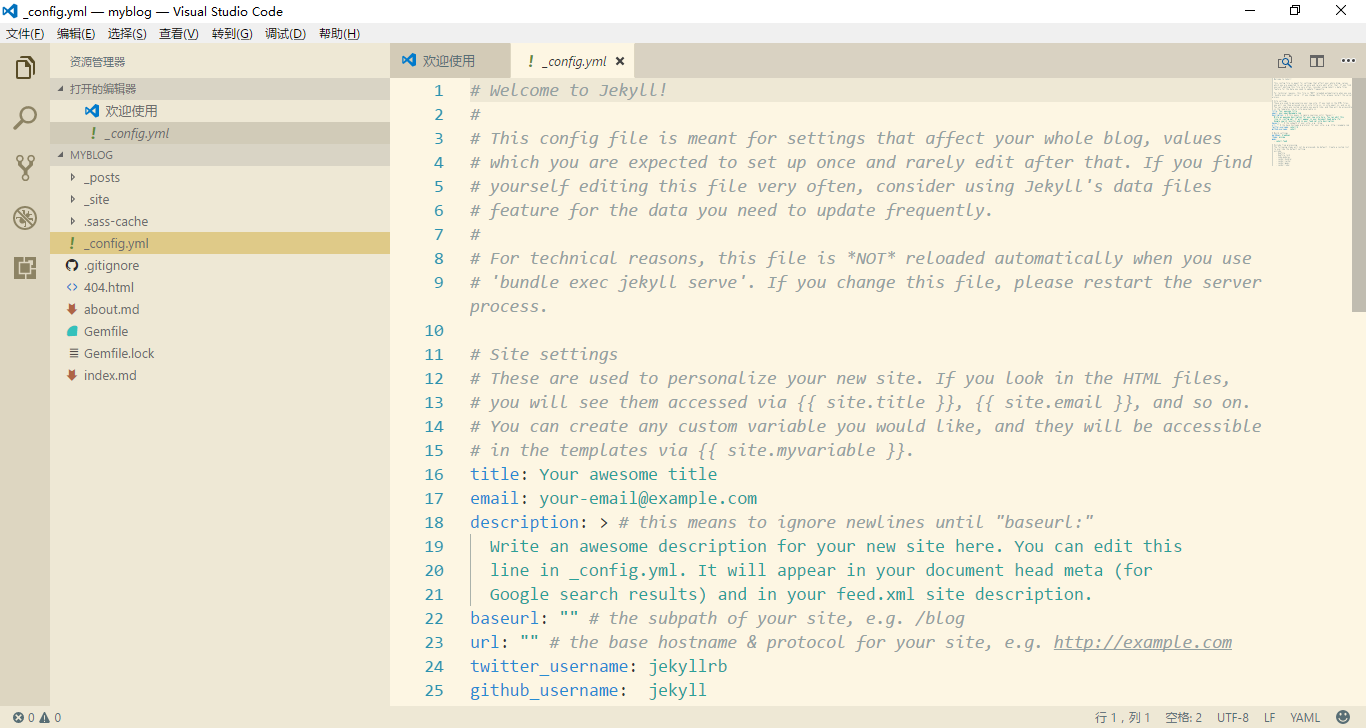
命令行先别关。
这时候需要对文件做一些修改:
注意
把.sass-cache和_site这两个目录添加到.gitignore文件里面去,目的是告诉git不要把这两个目录里面的内容推送到github上去,这是你本地用的,github不需要这些。如果你把_site目录推送到github仓库,github就不会自动帮你构建了。
gitigore文件里面内容如下,你可以拷贝粘贴到你的.gitignore文件里面去:
_site

.sass-cache

.jekyll-metadata
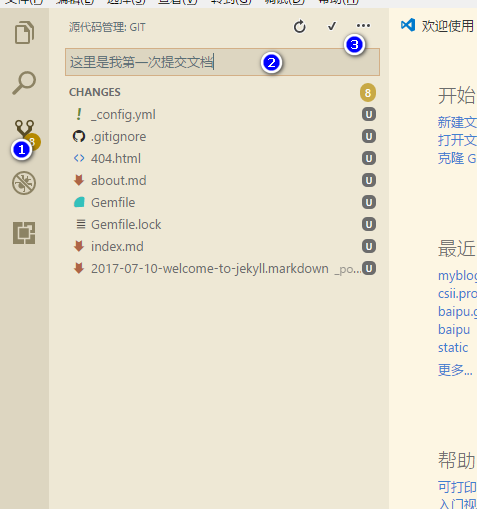
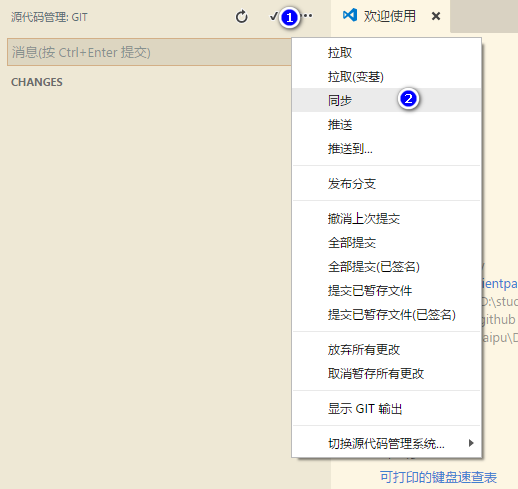
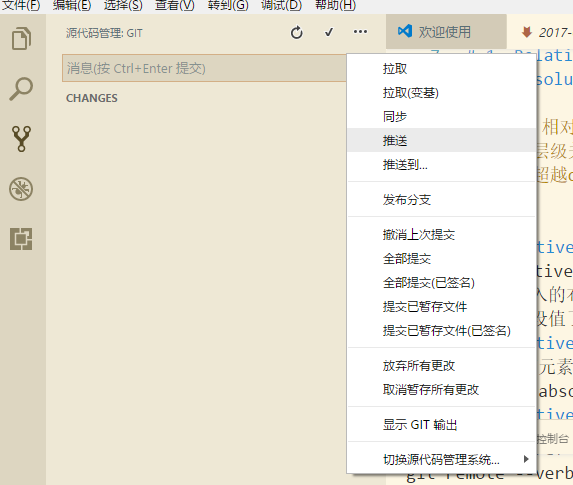
然后提交,发布如下,先提交,然后发布
你本地的命令执行情况如图:
打开链接http://你刚才注册的名字.github.io
注意,如果你是第一次push,github可能会等10分钟之后才会帮你构建,后续的所有push都会立即构建,所以如果现在没有内容的话,等10分钟再来刷新一下吧。

出来这个图不要急,看看你的项目名字和github的名字一样么?如果正常请跳过下列步骤,直接看添加文章
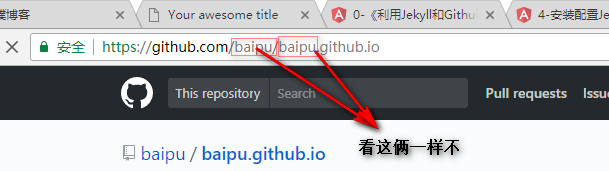
如果不一样,在github上进入设置,然后修改名字
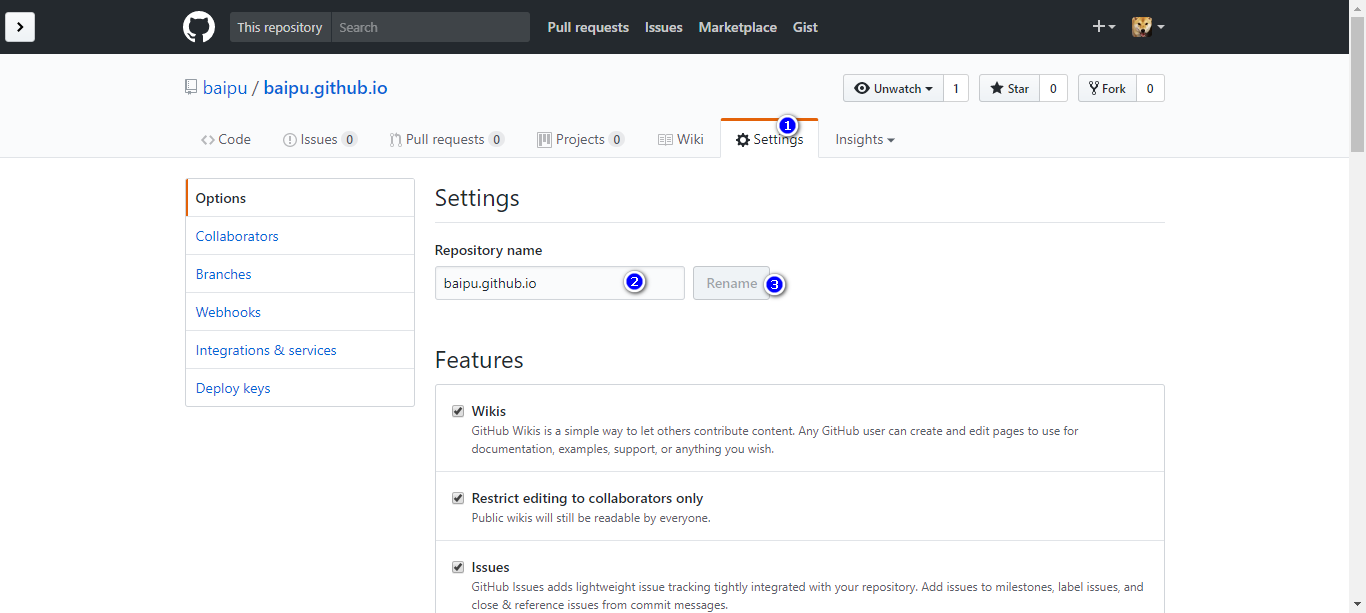
修改的时候确保名字正确github的名字.github.io
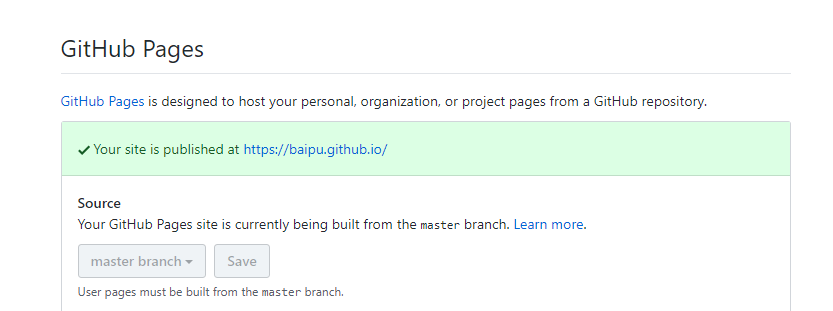
网下拉,看到GitHub Pages下边是这个样子,说明能够访问
添加文章
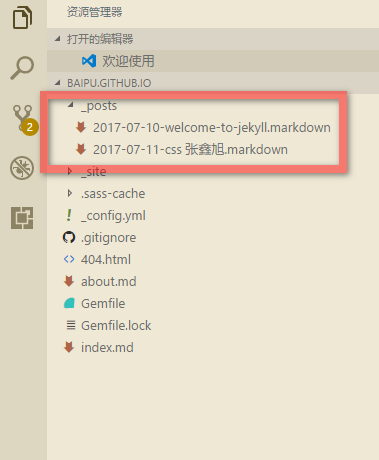
用编辑器打开你github的项目:
添加文章就是相当于_posts文件夹里添加一个markdown的文件
文件名必须是2017-07-10-文件名
后缀必须是markdown不能是md
格式也必须是markdown的格式
markdown的头部需要定制:
---
layout: post
title:  "这是我自己的一篇文章"
date:   2017-07-04 10:51:20 +0800
categories: jekyll update
---
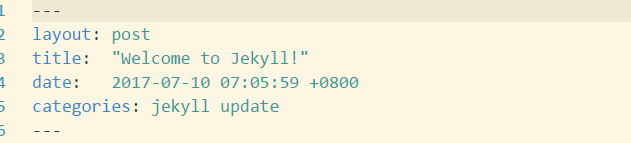
除了这个头部声明之外,接下来你可以随意编写自己的内容了,markdown的语法:
http://www.appinn.com/markdown/
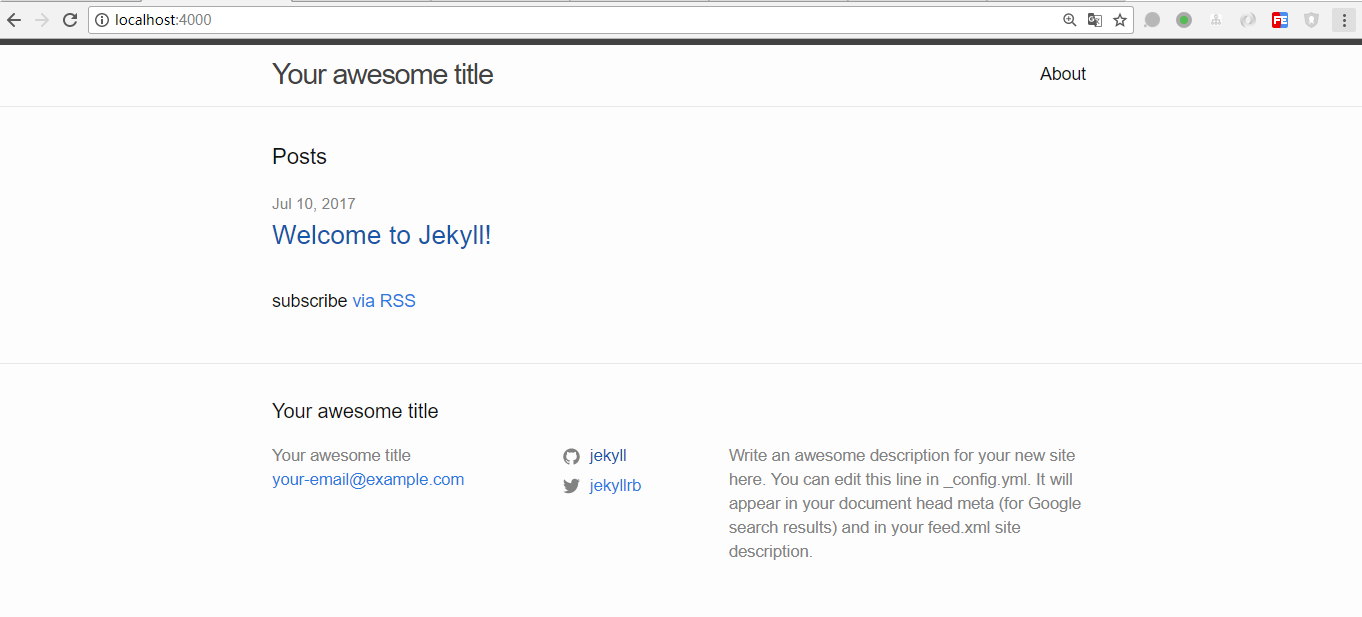
本地服务如下效果:

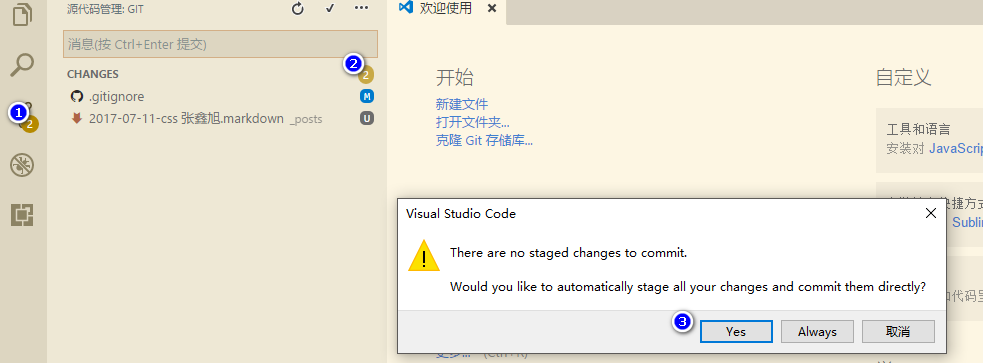
然后提交commit push
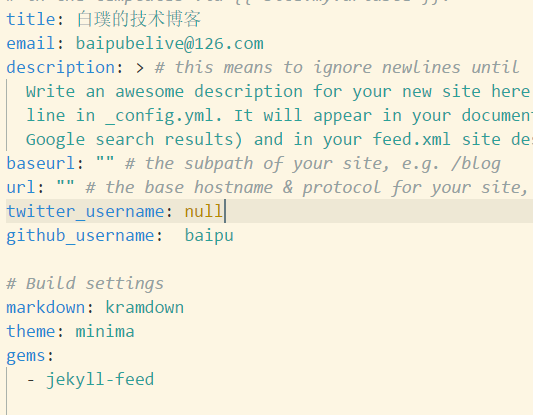
修改参数:
为了让title之类的显示自己的配置,可调试_config.yml文件
改了配置文件后,需要重启服务
bundle exec jekyll serve
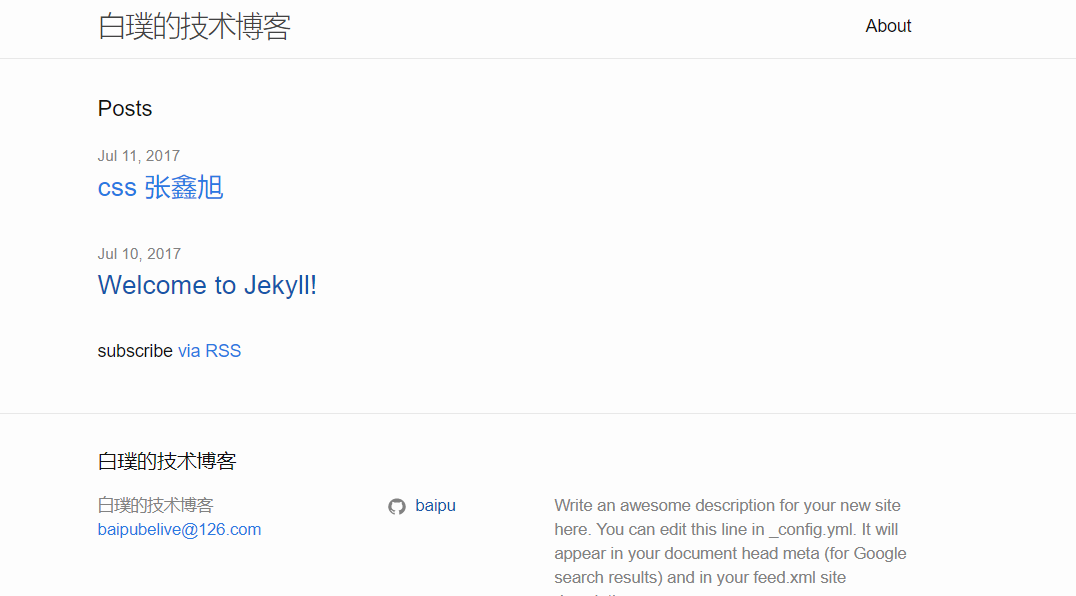
结果如图:
改变外观:
换系统默认的皮肤:
皮肤默认值好像是minima
找到皮肤的路径:
命令:bundle show minima
得到结果:
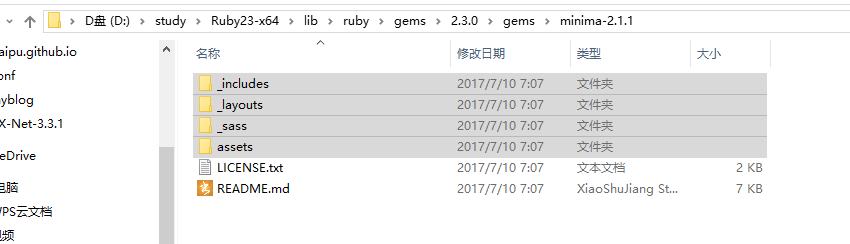
D:/study/Ruby23-x64/lib/ruby/gems/2.3.0/gems/minima-2.1.1
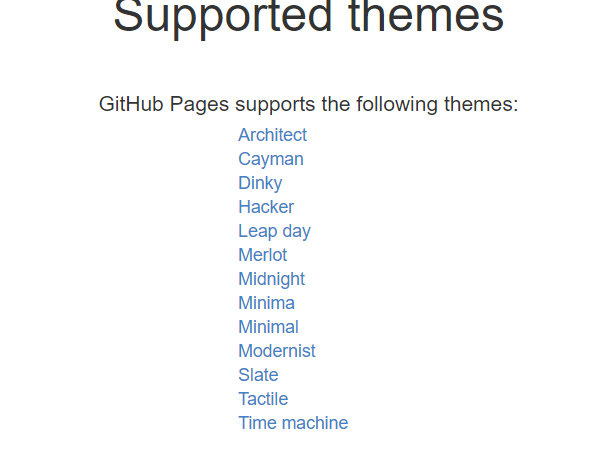
我们不用这个皮肤包,可以换,但是只能换几样,github支持的:
将他改成 目标点击查看github支持的皮肤
如果我们想换Architect需要三部
1、改两个配置文件
-
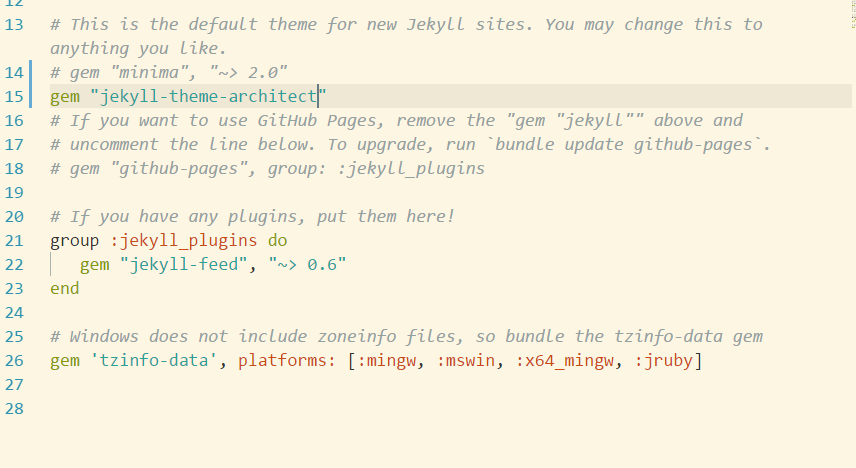
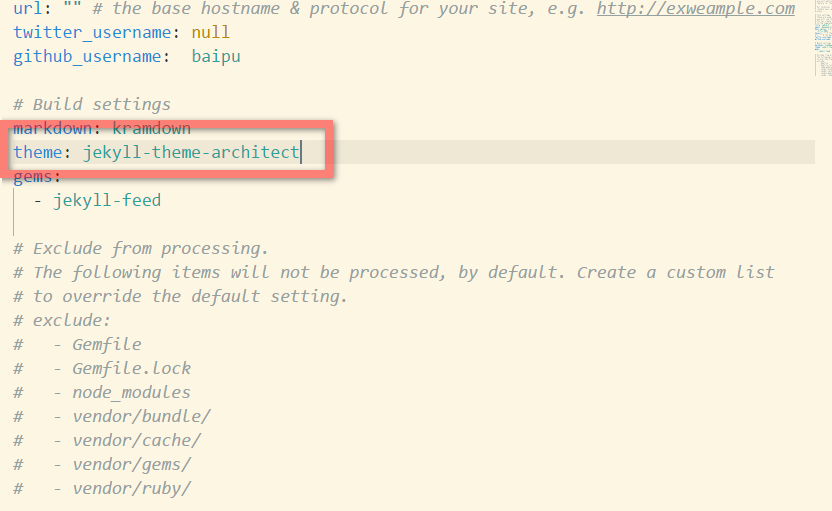
_config.yml里边的 theme 对应的值改成 jekyll-theme-architect -
Gemfile里边的 minima那一行变成 jekyll-theme-architect
 enter description here
2、 用gem安装皮肤:
bundle install

3、换模板,index.md about.md 以及
_post中的文件中的layout配置项全部改成default,就像这样: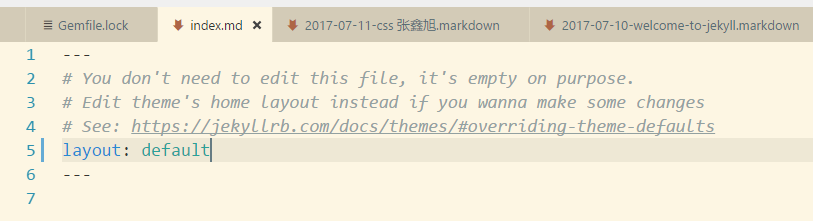
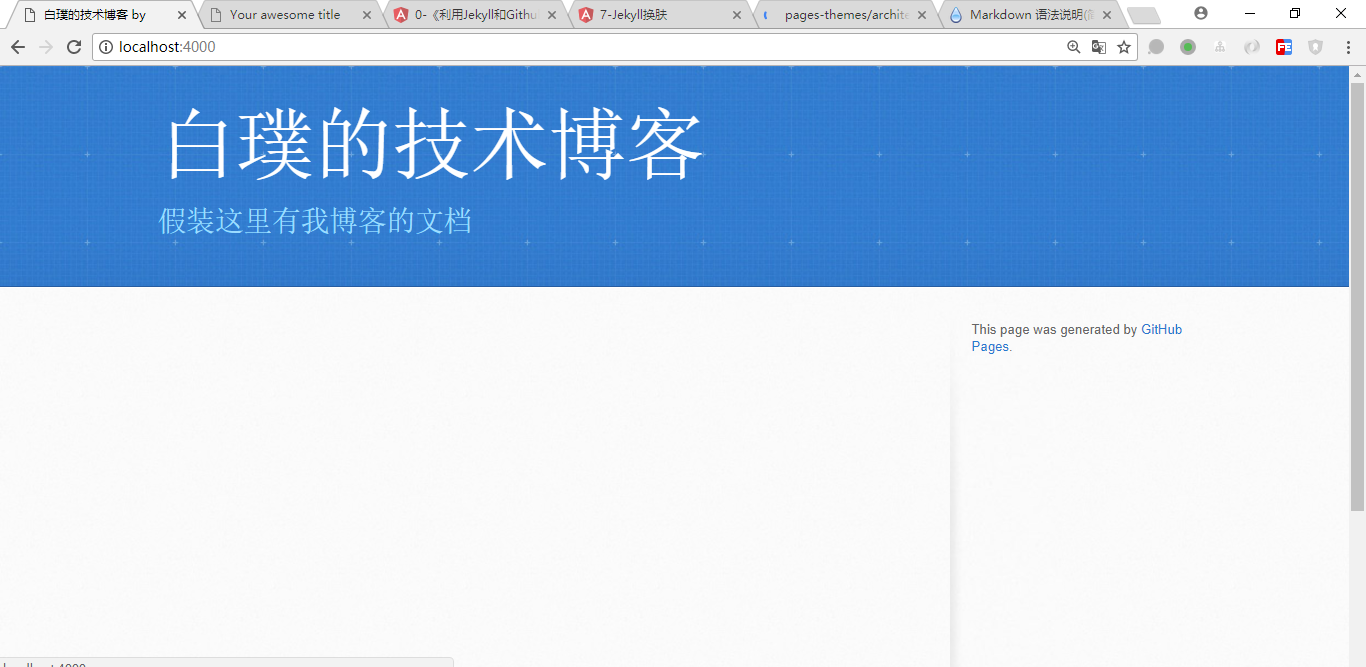
ctrl+C关闭服务,然后重启:
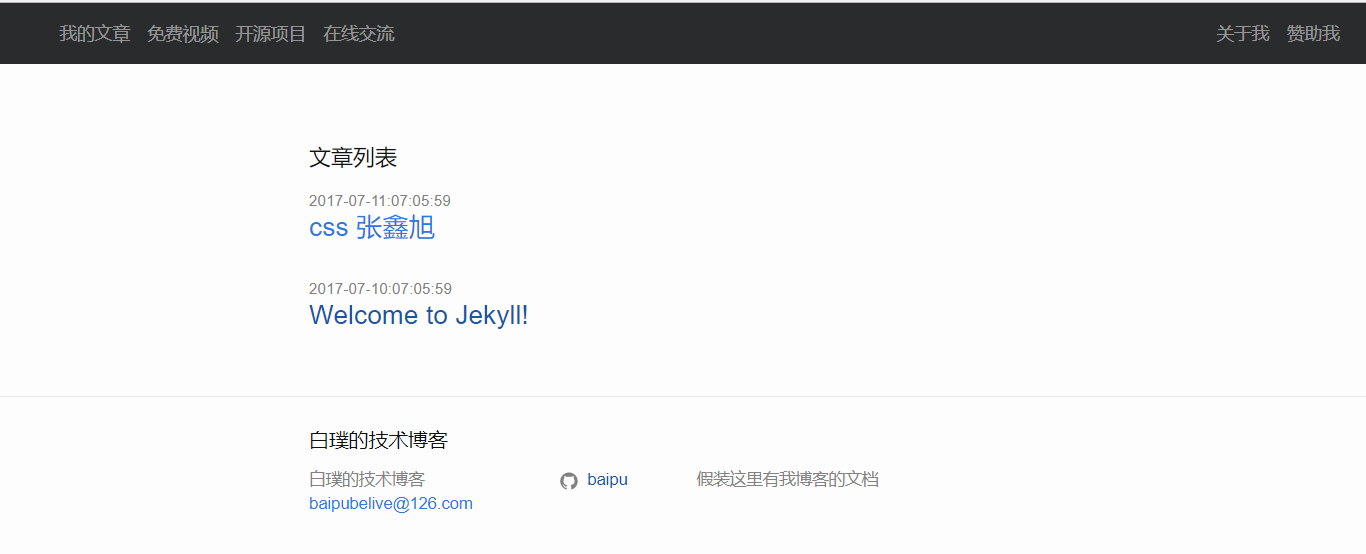
效果入下:
自己修改参数:
这次开始前需要把上一步的换肤步骤全部回退成默认格式
首先,打开你的命令行,运行以下命令,找到minima这款皮肤安装的位置:
bundle show minima

    D:/study/Ruby23-x64/lib/ruby/gems/2.3.0/gems/minima-2.1.1
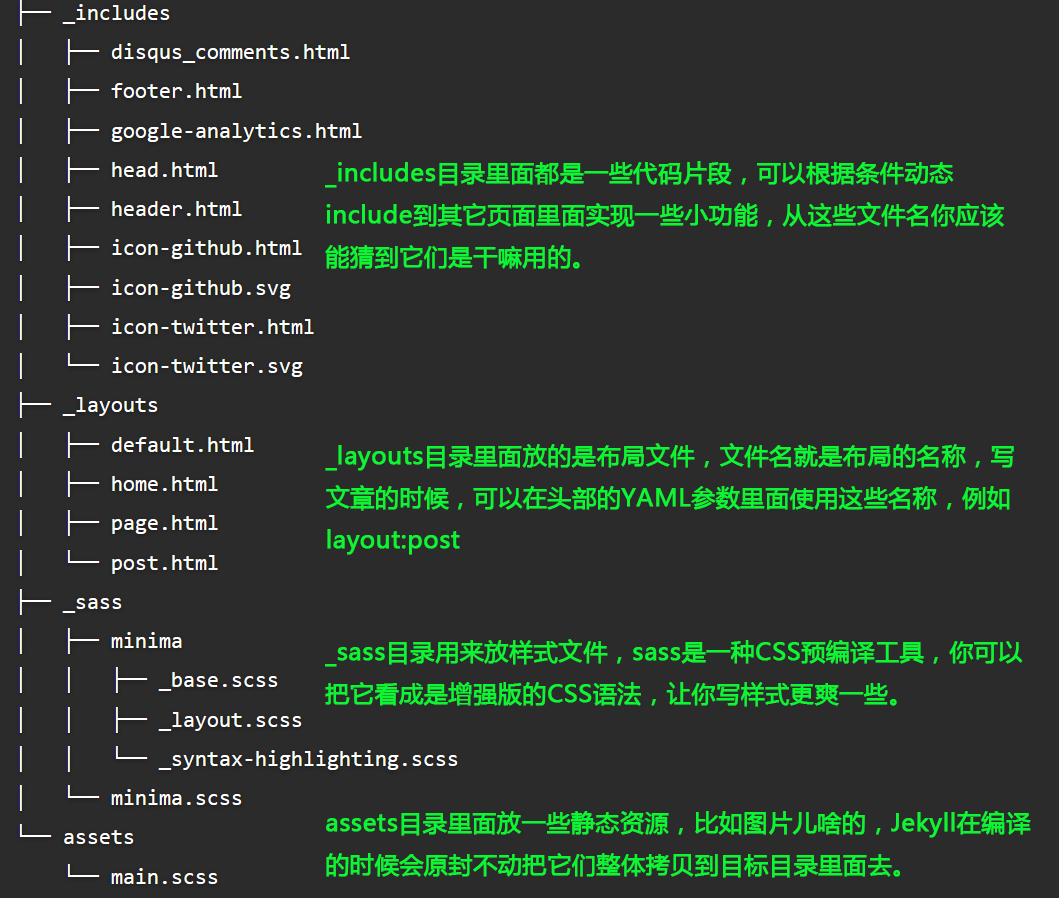
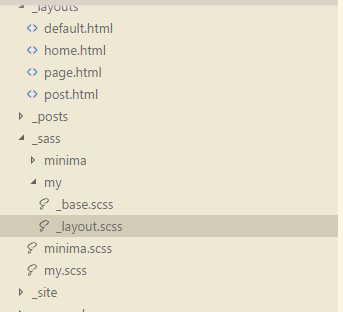
找到位置,将里边的文件夹复制出来
结构如下:
为了防止bundle update需要把上两个文件_config.yml和Gemfile的minima那一行删掉
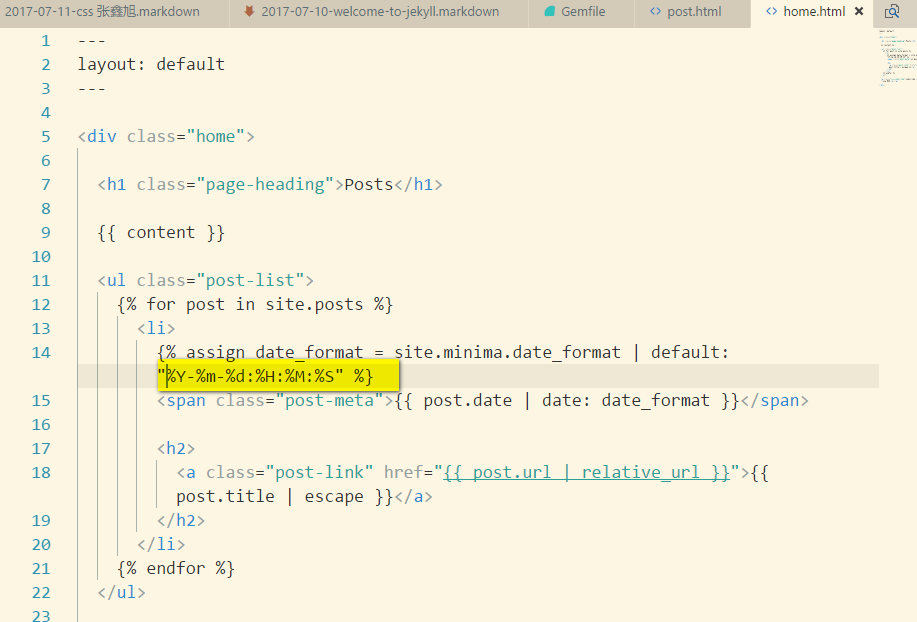
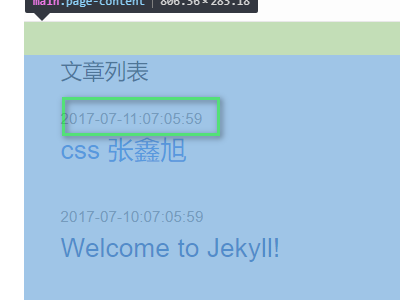
然后就可已根据需求换参数了,比如改变日期格式:
两个文件:home.html 和post.html
日期格式改为:"%Y-%m-%d:%H:%M:%S"
自己配置css
asset文件夹中新建css文件夹 引入bootstrap:

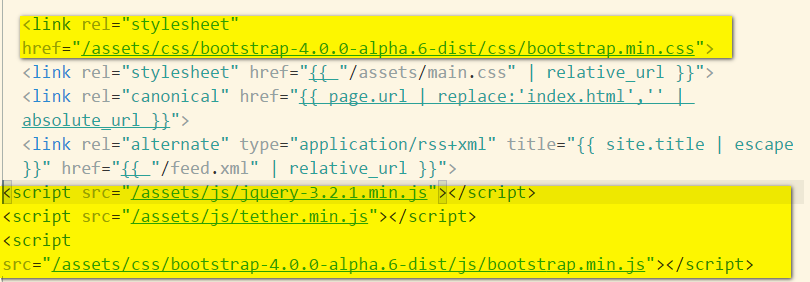
然后是文件中引入:头文件配置中,也就是
_includ的head.html注意不是header.html下边的内容拷进去
<link rel="stylesheet" href="/assets/css/bootstrap-4.0.0-alpha.6/css/bootstrap.min.css">
<script src="https://code.jquery.com/jquery-3.2.1.min.js"></script>
<script src="https://cdnjs.cloudflare.com/ajax/libs/tether/1.4.0/js/tether.min.js"></script>
<script src="/assets/css/bootstrap-4.0.0-alpha.6/js/bootstrap.min.js"></script>
打开assets/main.scss,把里面的内容改成:
@import "my.scss";
Jekyll当前的版本是用Sass来做CSS预编译的,关于Sass的基本概念语法,请点击这个中文版教程查看。简而言之,你可以把Sass看成是CSS的增强版超集,也就是说,你在.sass文件里面写基本的CSS都是没问题的。
所以写scss的步骤:
1、就是上边的assets/main.scss里边会导入my.scss所以下一步创建
2、在scss文件夹下创建my.scss文件,然后继续导入不同的scss
@import
  "my/base",
  "my/layout",
  "my/syntax-highlighting"
;
3、创建my文件夹,然后里边新建base layout scss文件
如果想用一个github的nav那就改变header.html文件,如果你导入的bootstrap是4.0的,用下列的代码替换header.html的代码:
<nav class="navbar navbar-toggleable-md navbar-inverse bg-inverse fixed-top">
  <button class="navbar-toggler" type="button" data-toggle="collapse" data-target="#navbarSupportedContent" aria-controls="navbarSupportedContent"
    aria-expanded="false" aria-label="Toggle navigation">
      <span class="navbar-toggler-icon"></span>
    </button>
  <div class="collapse navbar-collapse" id="navbarSupportedContent">
    <ul class="navbar-nav mr-auto">
      <li class="nav-item">
        <a class="nav-link" href="/">我的文章</a>
      </li>
      <li class="nav-item">
        <a class="nav-link" href="/videos/index.html">免费视频</a>
      </li>
      <li class="nav-item">
        <a class="nav-link" href="/projects/index.html">开源项目</a>
      </li>
      <li class="nav-item">
        <a class="nav-link" href="/social/index.html">在线交流</a>
      </li>
    </ul>
    <ul class="navbar-nav">
      <li class="nav-item">
        <a class="nav-link" href="/about/index.html">关于我</a>
      </li>
      <li class="nav-item">
        <a class="nav-link" href="/donate/index.html">赞助我</a>
      </li>
    </ul>
  </div>
</nav>
那你将看到:bootstrap的头部
好,难点来了,以下几个环节可能需要翻墙,请自备梯子
利用Google Analytics监控你的Jekyll站点
Google Analytics(简称GA)是一个监控和分析工具,用来观察数据来源:
Jekyll集成Disqus评论模块
Jekyll的Disqus配置项
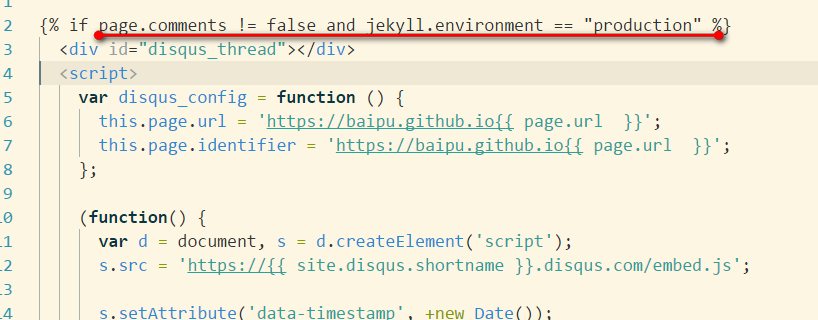
打开_layouts/post.html,你会在里面看到这样的内容:
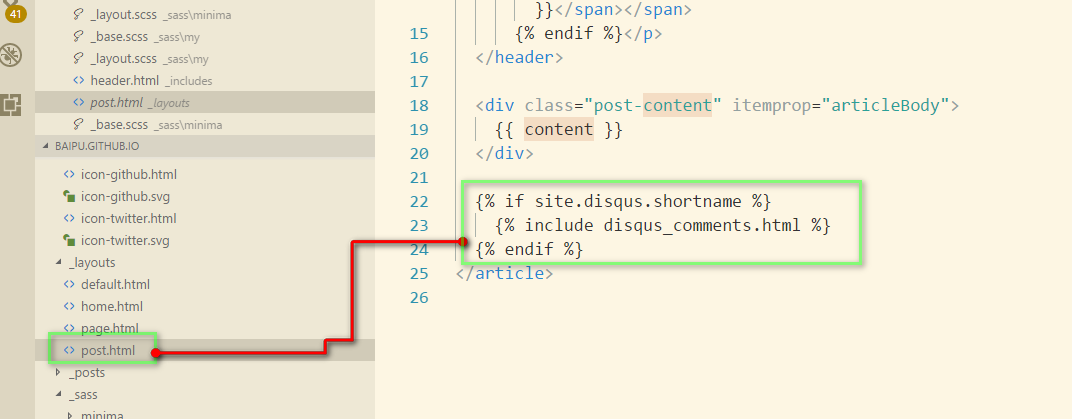
如果你的_config.yml里面出现了site.disqus.shortname这个配置项,那么就把disqus_comments.html包含进来,从文件名猜测,disqus_comments.html就是用来集成disqus的代码了。
1注册Disqus并拿到你的shortname
1.1 注册
点击这里注册disqus账号
1.2 进入

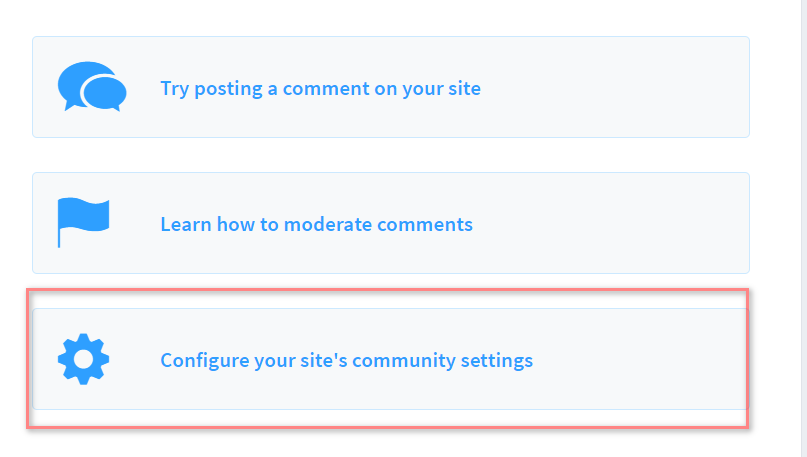
选建立自己的站点 画红线那个,然后按提示写自己的东西:
主要是website Name就是等会儿要用到的shortName
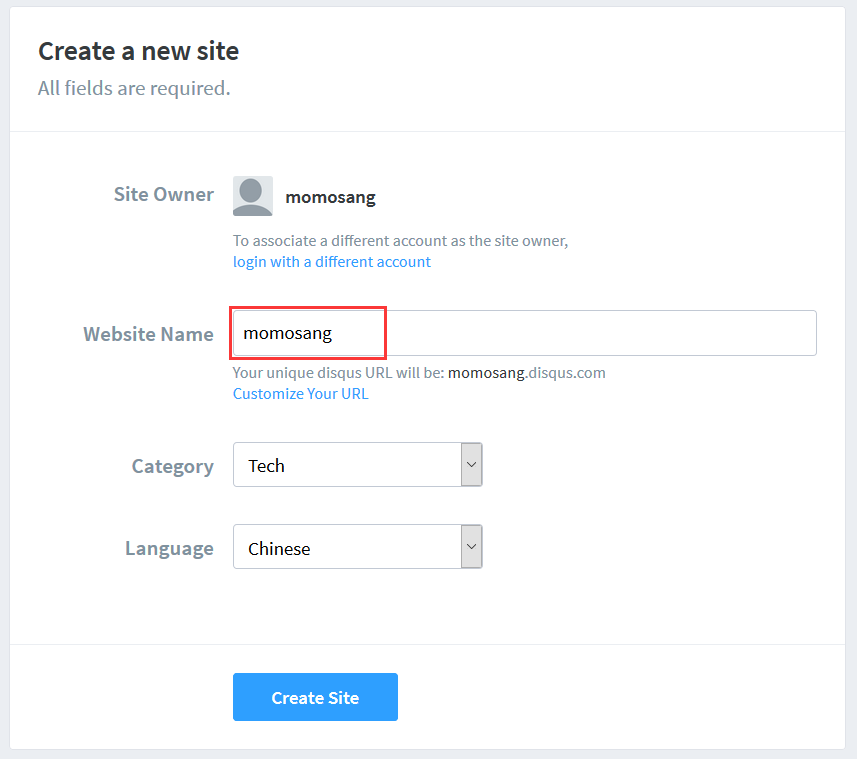
然后选择基础款,免费
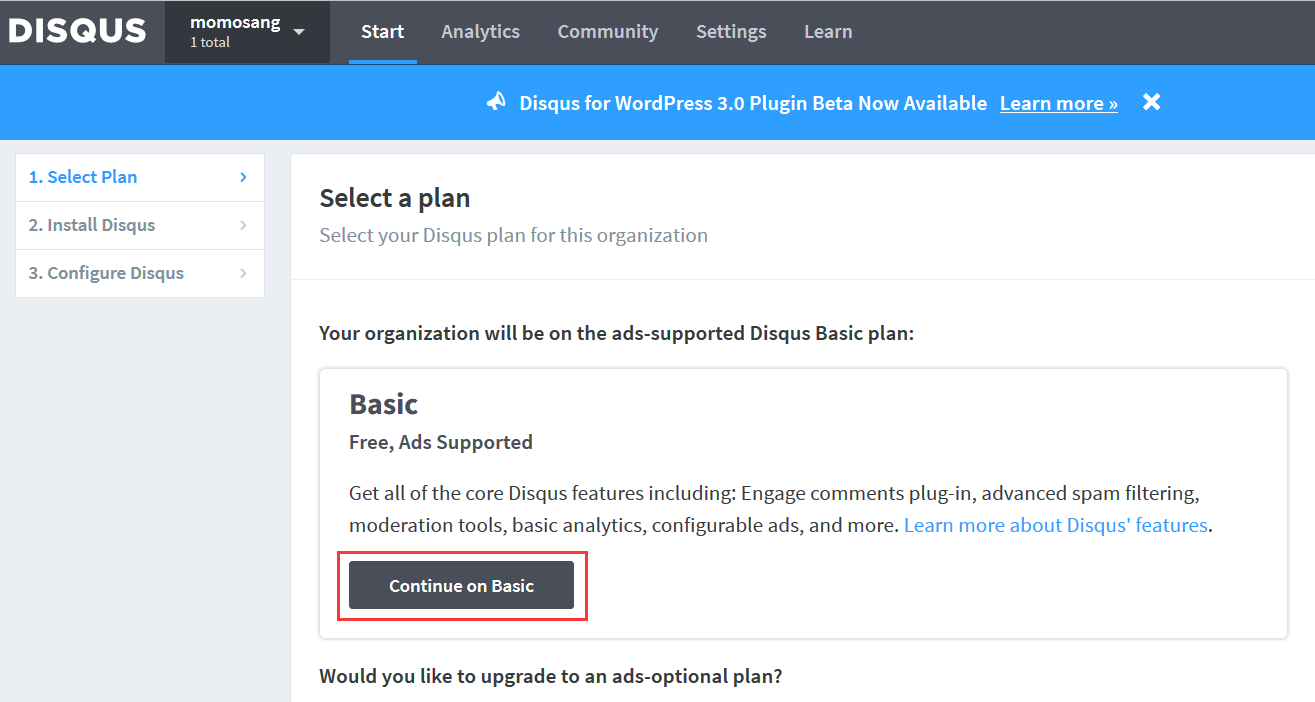
然后三排第四个:
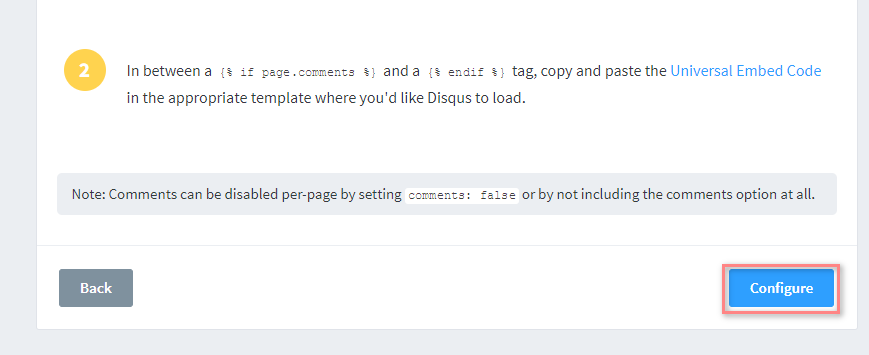
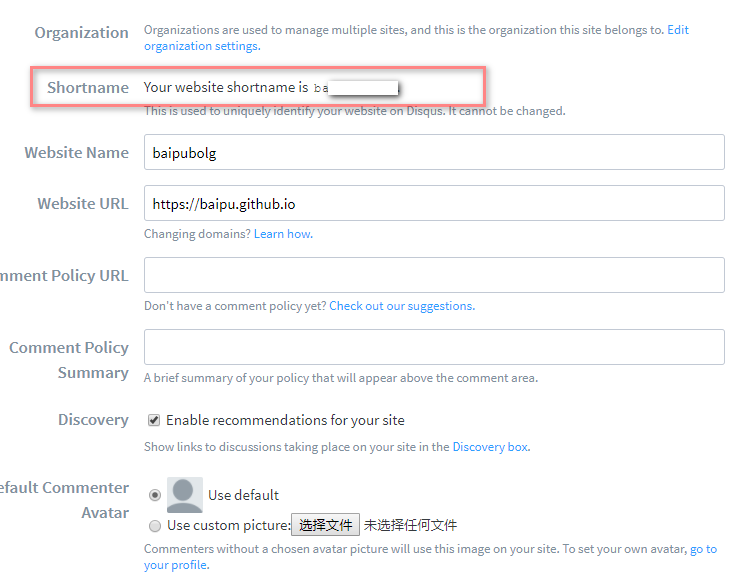
填写配置
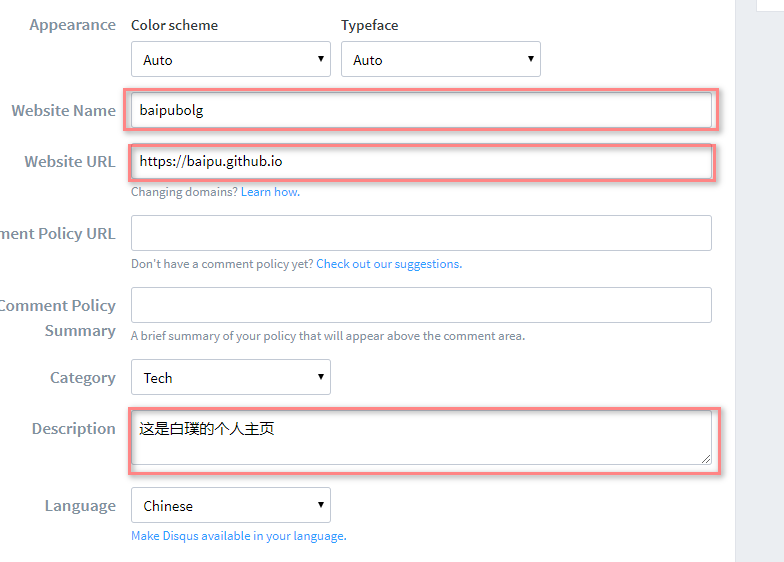
得到shortName,记住的的shortName
1.4 进行配置:
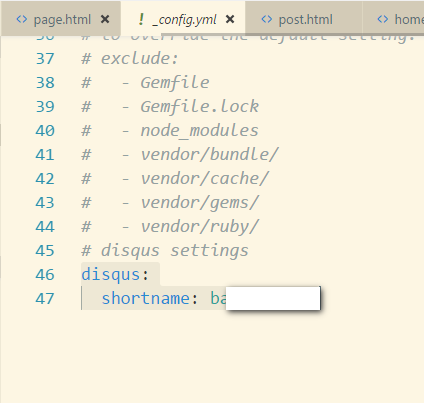
_config/yml文件里添加如下配置:
disqus:
  shortname: 你的shortName
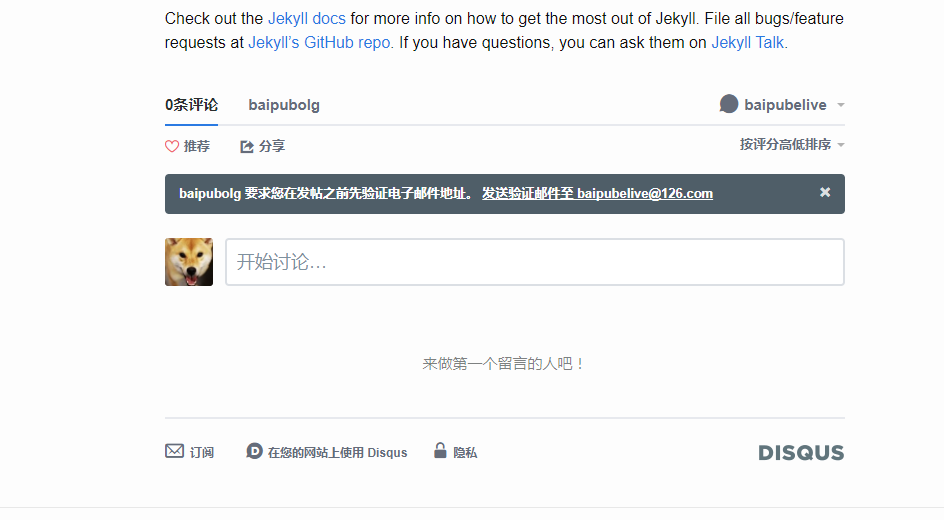
此时理论上就可出现了,提交到github上然后更新
如果没有出现,请按照如下流程检查
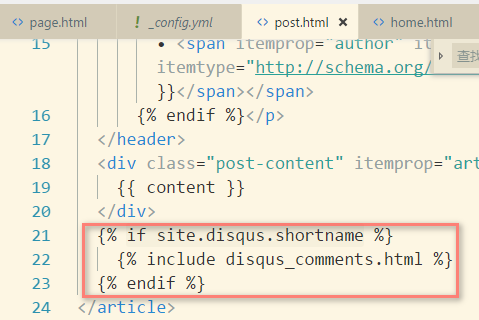
post.html里边是否有这段代码,没有请复制:
 {% if site.disqus.shortname %}
    {% include disqus_comments.html %}
  {% endif %}
要么就在文章中添加这个字段:
comments其实 我也不咋知道这个字段是干嘛的,将来找到了会改
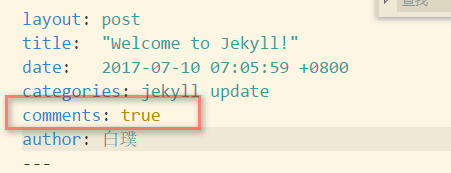
因为如下图有判断,environment在github上为生产环境,本地的话是开发环境不满足,但是这里的comment是什么意思我不懂,所以强制给了一个true
然后发布:
分类:
这个完全抄自大漠穷求:
1、_layout里边新建一个文件:category.html
2、里边的代码改为:
---
layout: default
---
{% assign rawcats = "" %}
{% for post in site.posts %}
  {% assign tcats = post.category | join:'|' | append:'|' %}
  {% assign rawcats = rawcats | append:tcats %}
{% endfor %}

{% assign rawcats = rawcats | split:'|' | sort %}
{% assign cats = "" %}
{% for cat in rawcats %}
  {% if cat != "" %}
  {% if cats == "" %}
    {% assign cats = cat | split:'|' %}
  {% endif %}
  {% unless cats contains cat %}
    {% assign cats = cats | join:'|' | append:'|' | append:cat | split:'|' %}
  {% endunless %}
  {% endif %}
{% endfor %}

<div class="row">
  <div class="col-md-9">
    <div class="list-group">
        {% assign date_format = site.minima.date_format | default: "%Y-%m-%d %H:%M:%S" %}
        {% for ct in cats %}
            <li class="list-group-item list-group-item-info" id="{{ ct | slugify }}"><strong>{{ ct }}</strong></li>
            {% for post in site.posts %}
                {% if post.category contains ct %}
                  <a href="{{ post.url | relative_url }}" class="list-group-item list-group-item-action flex-column align-items-start">
                    <div class="d-flex w-100 justify-content-between">
                      <h5 class="mb-1">{{ post.title | escape }}</h5>
                      <small>{{ post.date | date: date_format }}</small>
                    </div>
                  </a>
                {% endif %}
            {% endfor %}
        {% endfor %}
    </div>
  </div>
  <div class="col-md-3">
  </div>
</div>
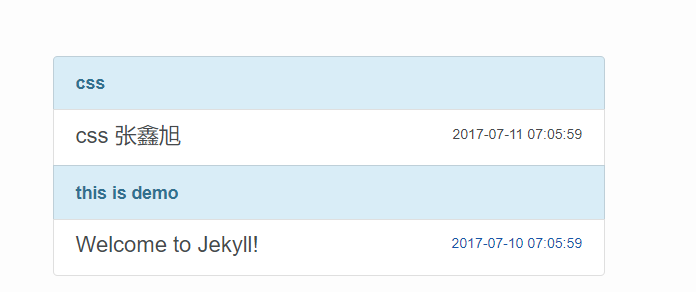
3、文章中添加分类字段:
category: this is demo
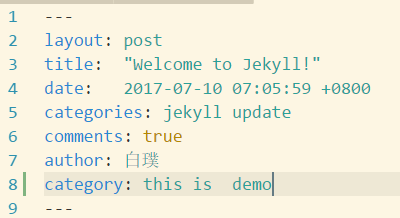
结果如图: