在这个PS教程中,迈克•斯匹若,一位来自瑞典哥德堡的图形设计师,将向你展示他如何制作一个“光彩飞溅”的创意设计。在这个来自他作品集的一个设计中,他将一个女孩的照片与飞溅的牛奶以及光效美妙地组合在一起。

Step 1
步骤 1
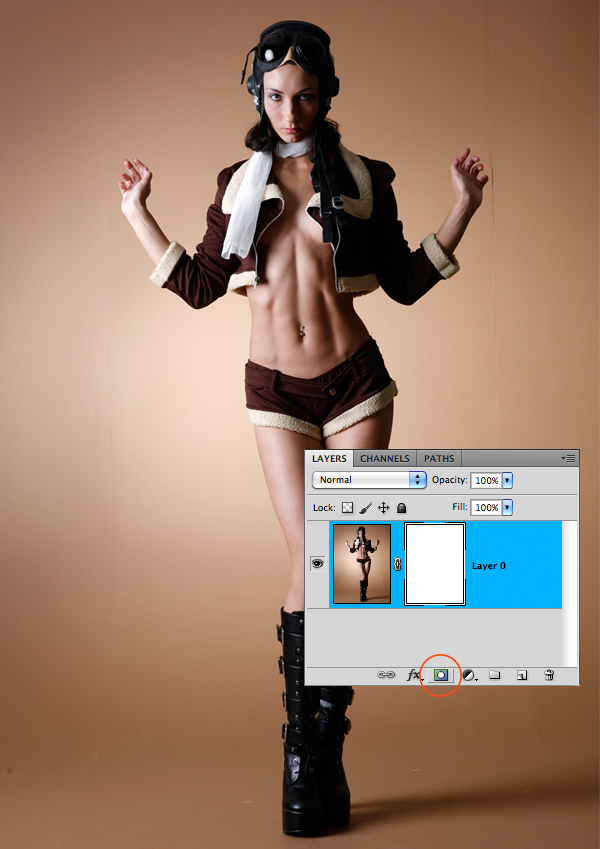
Mask out the girl. Push the button in the circle, so you get the white field in your layer next to your image. Then use pen-tool or a brush with black color to erase the background. (Make sure you draw on the white field and not the picture itself)
对女孩的照片制作蒙版。
点击圆圈中按钮,这样,你在照片层中会得到一个白色方块(即蒙版——译者注)。然后,使用黑色的钢笔工具或画笔工具擦除背景。(请确认你是在白色方块,而不是在照片本身上进行操作。)
Step 2
步骤 2
Make the model grey by going to Image>Adjustments>Hue/saturation. Drag the middle anchor to the grey field. An easier way is to hit cmd+shift+U.
执行图像>调整>色相/饱和度,将中间的锚点拖向灰色区域,以使模特变为灰度。另一种更为简单的方法是按住CMD+SHIFT+U(PC机中的CTRL键通常与苹果机中CMD键用法一直 ——译者注)。

Create a new white layer and place it in the bottom. Layer>New fill layer>Solid color.
创建新的空白层,并将其置于底部。对它执行图层>新建填充涂层>纯色(白色——译者注)。
Then size your model up or down. In this case, I shrunk her a little bit to fit the picture better. Use cmd+T to change the size. (When in use, you can always experiment by holding down shift, ctrl and cmd sometimes to get different results.)
调节模特照片的尺寸大小。
通过调整,我将照片略微缩小,以使它更适合作品。调整尺寸的快捷键为CMD+T。(在调整尺寸的状态下,你不妨偶尔尝试按住shift、ctrl或cmd键,这可以得到不同的效果。)
Step 3
步骤 3
Time to duplicate. Go to Layer>Duplicate Layer or press cmd+J. Then go to Layer>Create Clipping Mask. The top layer should now point down to the layer beneath.
复制图层。
执行图层>复制图层(模特层),或者按CMD+J。然后执行图层>创建剪切蒙版。现在,顶部图层应当有小箭头指向下面的图层。

Step 4
步骤 4
This treatment is for the top layer. Image>Adjustments>Shadow Highlights. Click in the box "show more options". Then change Shadows: Amount to 100 and Adjustments: Midtone Contrast to -100.
对顶部图层作处理。执行图像>调整>阴影/高光。点击选框“显示更多选项”,然后修改阴影数量为100,调整中间调对比度为-100。
Step 5
步骤 5
Filter>Blur>Gaussian Blur. Approx 3.0 blur. Then in Blending Mode change the status from Normal to Lighten. Next to the blending mode there's the Opacity box. Make sure it's says 70%.
滤镜>模糊>高斯模糊,半径值约为3.0。然后将混合模式从正常改为变亮。不透明度的选框紧靠在混合模式旁,确保其值为70%。
Also, in the clipping mask field, paint over the face so it's not that blurry.
另外,在这个剪切蒙版图层中,用蒙版将脸部覆盖,使脸部不那么模糊。
If you did everything right, it should look something like the picture below.
如果你的所有步骤都正确,那么它会看起来像下面这张图。

Step 6
步骤 6
Duplicate the bottom layer and place it on the top. Then place it in the clipping mask.
复制底部的模特图层,并将其置于顶部,然后将其设为剪切蒙版。
Then for the top layer Image>Adjustments>Shadow/Highlights. See below for the numbers. And last Blending Mode>Lighten.
然后,对顶部图层执行图像>调整>阴影/高光。参照下图参数,并且最后执行 混合模式>变亮。

Step 7
步骤 7
Make a new duplicate from the top layer. This time only use the right hand. Mask away the rest. Then go to Image>Adjustments>Curves. If it's not that white as you wanted it to be, go to Blending Mode and change to Lighten. Duplicate the hand. Mark both hand layers and merge them by Layers>Merge Layers.
复制顶部图层。这次只使用模特的右手,将其他部分遮蔽掉。然后执行图像>调整>曲线。如果调整后的样子没你想要的那么白,那么将混合模式改为变亮。
复制这个右手的图层。同时选中两个右手图层,并通过执行图层>合并图层将它们合并。
Keep the layer in the clipping mask.
将这个图层设为剪切蒙版。

Step 8
步骤 8
Make the background Black. Double click on the layer and go to Color Overlay>Double Click on the red rectangle and choose the color black.
将背景设为黑色。
双击图层,选择颜色叠加,双击红色方块,并选取黑色。
Time for some splashes. Open up your splash picture in a separate window. Then go to Select>Color Range. Get as much of the content you want and press OK. In many cases the selection is for the things you don't want. To fix that go to Select>Inverse. Now copy the splash into the window we work in.
现在开始制作喷溅效果。
在另一个窗口打开你的喷溅图片,然后执行选择>色彩范围。在得到你想要的选区之后,点击确定。在许多情况下,这选区会选中的是你并不想要的东西,这时执行选择>反向来修正它。现在,将喷溅图片拖入我们工作的窗口。
Make the splash grey by cmd+shift+U. Repeat Step 7 to make it more white.
通过执行 CMD+SHIFT+U 将图片转为灰度。重复步骤7,让它变得更白。

Step 9
步骤 9
I never use the eraser, only the mask. Use the mask to fix with the splash so it fits the boot. This layer should be on top and not be placed into the model mask.
放弃橡皮擦工具,坚持使用蒙版。
使用蒙版来修正喷溅,以使其与模特的靴子相协调。另外,这个图层应当置于顶部,并且不要放在模特的剪切蒙版中。
Next. Play around with a spray brush. Do however you want here. Change the opacity on some for a good mix of light. Add some special brushes as well. These should be in the mask.
接着,按照自己的意愿,用飞溅笔刷在四周涂抹。在不同地方使用不同透明度,以便混合后达到好的光感。另外,也可以添加一些其他的特殊笔刷。要注意的是,这些操作都是在蒙版中进行的。
Keep in mind: The 2 model layers in the mask should always be on the top. The things we put in there from now on, shall be placed in the bottom.
记住:两个模特层应该始终处于顶端,而到现在为止,我们置入的其他东西应当放在底部。
Step 10
步骤 10
Now we add the splashes again. Bring in new ones or just duplicate the one from before.
现在我们再来添加一些喷溅。置入一张新的喷溅图片,或者复制之前的那一张。

Step 11
步骤 11
Use the spray brush to paint in some colors. One layer for each color.
使用飞溅笔刷在不同的层上添加不同的色彩。

Step 12
步骤 12
Time to fix with the background. Create a new layer above the background layer. Use the Lasso-Tool and draw a triangle shaped form. When it's active, use a brush to paint outside the selected area to get this cool effect.
现在,我们开始修饰背景。
在背景层上方新建一个层,使用套索工具绘制一个三角形。当三角选区激活时,用笔刷在选区外涂抹,以达到这样的酷炫效果。


Step 13
步骤 13
Back to a white background again. But with a little extra grey in the middle. Double-click on the layer and follow the picture below.
再次返回白色背景层,在中间稍微添加些额外的灰色。双击图层,并设置下图参数。


Step 14
步骤 14
More splashes, but this time, put them behind the model and not in the mask.
添加更多的飞溅,不过这次绘制在模特层后面,而不是蒙版当中。
Make some Triangles and Circles. I used purple for the triangles and white for the circles. The Opacity is lowered on both symbols. You can find them in your shape-tool options palette.
制作一些三角形和圆形。我在三角形上添加了紫色,为圆形图上了白色,并且降低了它们的不透明度。你也可以在形状工具的选项板里找到这些图形。
Create a shape with Lasso-tool that is in line with the previous lines in the background and move it up a little. Then you get an extra effect. I used purple color and lowered the opacity to 5%.
用套索工具创建一条线条,让它存在于之前在背景中制作的那些线条中,然后将它向上略微移动。这样你就得到了一个额外的效果。在这个线条中,我使用了紫色,并将不透明度降低为5% 。


Step 15
步骤 15
Throw in some balls or whatever you like. I made mine in Illustrator and added some effects with the mesh tool there. Then I pasted them into photoshop and in Blending Mode changed them to Screen.
在作品中放入一些球,或者其他什么你喜欢的。我将自己的一些小东西放在Illustrator中,并用网格工具添加了一些效果。然后,我将它们粘贴到Photoshop中,并将其混合模式改为滤色。
Use the brush to paint some shadows in the back. You can also use white to mix it up.
用画笔在这些东西后面绘制一些阴影,另外,你也可以用白色调和一下这些阴影。


Step 16
步骤 16
Light effects. I'm gonna show you how to do them. This is a quick lecture. You gonna have to practice a little to master it.
光效。
我将向你演示如何制作那些光效。但是,这里也只是粗略带过,你需要自己稍加练习来掌握它。


Step 17
步骤 17
Make some bling bling stars and brush up the white parts so they really shine. Just some simple finishing stuff.
制作一些一闪一闪的星星,并且擦亮它们白色的部分,这样会让它们真的闪闪发光。最后,添加些简单的东西。
Create 2 new layers and place them on the very top and do like this:
新建两个层,并像这样将他们置于最顶层:

Step 18
步骤 18
Check over your image for weird stuff. The hand looks a little strange so far. Create a new layer and place it in the model mask. Pick a white brush to paint the edges of the hand so it looks sweet.
仔细检查你的图像,寻找那些不自然的地方。目前看来,手有些奇怪。新建一个层,并将它放在模特的剪切蒙版中。使用白色笔刷来绘制手的边缘,让它看起来很甜美。
And here's the final picture!
接下来是最终成品!

