1.导入约束布局
在app/build.gradle文件中加入以下代码
...
repositories {
    maven {
        url 'https://maven.google.com'
    }
}
...
dependencies {
    compile 'com.android.support.constraint:constraint-layout:1.1.0-beta2'
}
以下例子都基于 1.1-beta2版本
2.使用
Relative Positioning
ConstraintLayout具备相对布局的能力,这点和RelativeLayout类似,但是ConstraintLayout提供的能力更加强大一些。
layout_constraintSideA_toSideBOf
这个属性的作用主要看 SideA 和 SideB,并且这个属性除了可以用 @+id/ 指定要约束的 View 以外,还可以直接填 parent,指定当前 View 的约束对象为父容器。
| 属性名称 | 作用 |
|---|---|
| layout_constraintLeft_toLeftOf | 将当前View的左侧与指定View的左侧对齐 |
| layout_constraintLeft_toRightOf | 将当前View的左侧与指定View的右侧对齐 |
| layout_constraintRight_toLeftOf | 将当前View的右侧与指定View的左侧对齐 |
| layout_constraintRight_toRightOf | 将当前View的右侧与指定View的右侧对齐 |
| layout_constraintTop_toTopOf | 将当前View的顶部与指定View的顶部对齐 |
| layout_constraintTop_toBottomOf | 将当前View的顶部与指定View的底部对齐 |
| layout_constraintBottom_toTopOf | 将当前 View 的底部与指定 View 的顶部对齐 |
| layout_constraintBottom_toBottomOf | 将当前 View 的底部与指定 View 的底部对齐 |
| layout_constraintBaseline_toBaselineOf | 将当前 View 的基准线与指定 View 的基准线对齐,Baseline 只对 TextView 及其子类有效 |
| layout_constraintStart_toEndOf | 将当前 View 的左侧与指定 View 的右侧对齐 |
| layout_constraintStart_toStartOf | 将当前 View 的左侧与指定 View 的左侧对齐 |
| layout_constraintEnd_toStartOf | 将当前 View 的右侧与指定 View 的左侧对齐 |
| layout_constraintEnd_toEndOf | 将当前 View 的右侧与指定 View 的右侧对齐 |
Margin
在 ConstraintLayout 中,layout_margin 及其子属性的作用都被覆写了,margin 属性只对其相约束的 View 起作用。

<?xml version="1.0" encoding="utf-8"?>
<android.support.constraint.ConstraintLayout xmlns:android="http://schemas.android.com/apk/res/android"
    xmlns:app="http://schemas.android.com/apk/res-auto"
    android:id="@+id/parent"
    android:layout_width="match_parent"
    android:layout_height="match_parent">

    <TextView
        android:id="@+id/text1"
        android:layout_width="wrap_content"
        android:layout_height="wrap_content"
        android:background="#cccccc"
        android:text="TextView1" />

    <TextView
        android:id="@+id/text2"
        android:layout_width="wrap_content"
        android:layout_height="wrap_content"
        android:background="#cccccc"
        android:layout_marginLeft="20dp"
        android:text="TextView2"
        app:layout_constraintLeft_toRightOf="@+id/text1" />
</android.support.constraint.ConstraintLayout>
在布局文件中,我们设置了 TextView2 在 TextView1 的右侧,并且左间距为20dp,实现效果如下。

假如我们把
app:layout_constraintLeft_toRightOf="@+id/text1"
这句话去掉,那么 margin 属性就不会生效了。

ConstraintLayout 还提供了另外一种间距效果。
Gone Margin
- layout_goneMarginStart
- layout_goneMarginEnd
- layout_goneMarginLeft
- layout_goneMarginTop
- layout_goneMarginRight
- layout_goneMarginBottom
gone margin 只在当前 View 指定的约束目标为 GONE 时才生效。
居中操作
假如想要让一个 View 居中,那么我们可以如下操作:
<?xml version="1.0" encoding="utf-8"?>
<android.support.constraint.ConstraintLayout xmlns:android="http://schemas.android.com/apk/res/android"
    xmlns:app="http://schemas.android.com/apk/res-auto"
    android:layout_width="match_parent"
    android:layout_height="match_parent">

    <TextView
        android:layout_width="wrap_content"
        android:layout_height="wrap_content"
        android:text="TextView3"
        app:layout_constraintRight_toRightOf="parent"
        app:layout_constraintLeft_toLeftOf="parent"/>
</android.support.constraint.ConstraintLayout>
即指定当前 View 和父容器左对齐且右对齐,那么这个 View 就会居中。
Bias
- layout_constraintHorizontal_bias 浮点数,从0到1,View 必须设置了左右约束才生效
- layout_constraintVertical_bias 浮点数,从0到1,View 必须设置了上下约束才生效
当我们指定当前 View 和父容器左对齐且右对齐时,默认情况下,这个 View 会居中。约束布局提供了一个 bias 属性,默认值 0.5,所以 View 是居中的,(假设是Horizontal_bias)假如我们将 bias 设为 0,那么这个 View 将会居左,同理,如果 bias 设为 1,那么这个 View 将会居右。
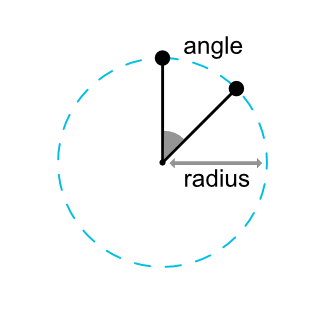
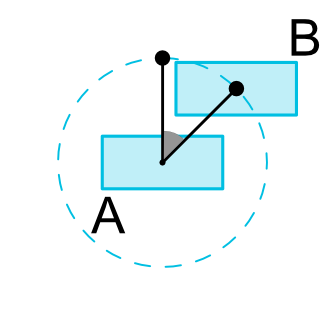
Circular positioning
约束布局提供了一个环形定位的功能,有以下三个属性:
- layout_constraintCircle @+id/xxx,设置目标 View
- layout_constraintCircleRadius 设置两个View的中心的距离
- layout_constraintCircleAngle 设置当前View的中心与目标View的中心的连线与Y轴方向的夹角,从0-360
Dimensions constraints
约束布局中的子View有三种设置尺寸的方式
- wrap_content
- xdp,x为具体的数值
- 0dp,0dp代表 MATCH_CONSTRAINT
这里的 wrap_content 和 xdp 跟其他布局的表现效果是一样的,至于 0dp 的效果,按其 MATCH_CONSTRAINT 的字面意思理解,匹配约束,这里举个例子。
例子1
<?xml version="1.0" encoding="utf-8"?>
<android.support.constraint.ConstraintLayout xmlns:android="http://schemas.android.com/apk/res/android"
    xmlns:app="http://schemas.android.com/apk/res-auto"
    android:layout_width="match_parent"
    android:layout_height="match_parent">

    <TextView
        android:id="@+id/text2"
        android:layout_width="wrap_content"
        android:layout_height="wrap_content"
        android:background="@color/colorPrimary"
        android:textColor="#ffffff"
        android:text="TextView2"
        app:layout_constraintLeft_toLeftOf="parent"
        app:layout_constraintRight_toRightOf="parent" />
</android.support.constraint.ConstraintLayout>
这里 TextView 的宽度为 wrap_content,根据之前讲过的 RelativePositioning,这个 View 会居中显示,如果这里我们把宽度设为 0dp,即 MATCH_CONSTRAINT,那么实现效果如下:

可以看到,View 的宽度是整个父容器的宽度。
例子2
<?xml version="1.0" encoding="utf-8"?>
<android.support.constraint.ConstraintLayout xmlns:android="http://schemas.android.com/apk/res/android"
    xmlns:app="http://schemas.android.com/apk/res-auto"
    android:layout_width="match_parent"
    android:layout_height="match_parent">

    <TextView
        android:id="@+id/text1"
        android:layout_width="wrap_content"
        android:layout_height="100dp"
        android:background="@color/colorPrimary"
        android:text="TextView1"
        android:textColor="#ffffff"
        app:layout_constraintBottom_toBottomOf="parent"
        app:layout_constraintLeft_toLeftOf="parent"
        app:layout_constraintRight_toRightOf="parent"
        app:layout_constraintTop_toTopOf="parent" />

    <TextView
        android:id="@+id/text2"
        android:layout_width="wrap_content"
        android:layout_height="0dp"
        android:background="@color/colorAccent"
        android:text="TextView2"
        android:textColor="#ffffff"
        app:layout_constraintBottom_toBottomOf="@+id/text1"
        app:layout_constraintTop_toTopOf="parent" />
</android.support.constraint.ConstraintLayout>
效果图如下:

TextView2 的底部和 TextView1 的底部对齐,顶部和父容器的顶部对齐,如果 layout_height 是 wrap_content 的话,此时TextView2 高度是文字的高度,然后位置是居中的(在父容器顶部到 TextView1 底部之间居中),但是这里设置了0dp(MATCH_CONSTRAINT),所以TextView2 的高度被拉伸,填满了整个约束的范围。
WRAP_CONTENT : enforcing constraints
如果一个 View 的尺寸被设置为wrap_content,那么当 View 的内容太多时,可能会超出约束规定的范围,约束布局提供了两种属性给我们限制 View 的尺寸:
- app:layout_constrainedWidth="true|false",默认为false
- app:layout_constraintedHeight="true|false",默认为false
例子
<?xml version="1.0" encoding="utf-8"?>
<android.support.constraint.ConstraintLayout xmlns:android="http://schemas.android.com/apk/res/android"
    xmlns:app="http://schemas.android.com/apk/res-auto"
    android:layout_width="match_parent"
    android:layout_height="match_parent">

    <TextView
        android:id="@+id/text1"
        android:layout_width="wrap_content"
        android:layout_height="100dp"
        android:background="@color/colorPrimary"
        android:text="TextView1"
        android:textColor="#ffffff"
        app:layout_constraintLeft_toLeftOf="parent"
        android:layout_marginTop="50dp"
        app:layout_constraintTop_toTopOf="parent"
        app:layout_constraintRight_toRightOf="parent" />

    <TextView
        android:id="@+id/text2"
        android:layout_width="wrap_content"
        android:layout_height="wrap_content"
        android:background="@color/colorAccent"
        android:text="TextView2\nTextView2\nTextView2\nTextView2\nTextView2\nTextView2"
        android:textColor="#ffffff"
        app:layout_constraintVertical_bias="0"
        app:layout_constrainedHeight="false"
        app:layout_constraintBottom_toTopOf="@+id/text1"
        app:layout_constraintTop_toTopOf="parent" />
</android.support.constraint.ConstraintLayout>
在本例中,TextView2 高度为 WRAP_CONTENT 底部与 TextView1 的顶部对齐,顶部和父容器顶部对齐,并且贴紧顶部(bias=0)。由于内容较多,高度超出了约束规定的范围,即 TextView2 的底部超出了 TextView1 的顶部的位置,如下图。

如果我们设置 app:layout_constrainedHeight="true",那么 TextView2 的底部的将会被限制在 TextView1 顶部的位置,如下图:

layout_constrainedWidth 的作用也是类似的,这里不再赘述。
MATCH_CONSTRAINT dimensions
当 View 的宽或者高设置了 MATCH_CONSTRAINT 之后,View 的尺寸会填充满整个约束范围内的可用空间。约束布局提供了一些属性来决定 View 的尺寸:
| 属性名称 | 作用 |
|---|---|
| layout_constraintWidth_min | View的最小宽度 |
| layout_constraintHeight_min | View的最小高度 |
| layout_constraintWidth_max | View的最大宽度 |
| layout_constraintHeight_max | View的最大高度 |
| layout_constraintWidth_percent | View的宽度占父容器的百分比,浮点数 |
| layout_constraintHeight_percent | View的高度占父容器的百分比,浮点数 |
| layout_constraintWidth_default | View的宽度模式,共有三种 percent/wrap/spread,默认为spread |
| layout_constraintHeight_default | View的高度模式,共有三种 percent/wrap/spread,默认为spread |
接下来具体说明一下属性的使用
属性介绍
前文说过,View的尺寸有三种模式
- 具体数值
- wrap_content
- MATCH_CONSTRAINT
这三种模式需要配合 layout_constraintWidth_default(这里只介绍宽度,高度是相同的运作方式)属性使用,具体数值和 wrap_content 优先级最高,不管 default 属性是什么都生效;MATCH_CONSTRAINT 只在 percent 或者 spread 模式下生效。
如果要使用 layout_constraintWidth_percent 属性,那么 default 需要设置为 percent,并且宽度需要设置为 MATCH_CONSTRAINT。
Ratio
约束布局提供了一个 ratio 属性,顾名思义,宽高的比例。通过这个属性,我们可以限制 View 的宽高之间的比例,比如设置成 1:1,那么 View 的尺寸就是个正方形了。ratio 的值可以是浮点数,也可以是一个比例关系,比如 1:1,前者为宽,后者为高。
使用 Ratio 属性,宽高两个尺寸中至少要有一个是 MATCH_CONSTRAINT。如果宽高都设置为MATCH_CONSTRAINT,那么约束布局会计算出一个满足约束条件和比例的最大的尺寸。
当宽高都是 MATCH_CONSTRAINT 时,ratio 还提供了另外一个功能,我们可以在比例之前加上W或者H,即 W,1:2(宽为2,高为1,即 H:W = 1:2) 或者 H,1:2(高为2,宽为1,即 W:H=1:2)。使用这个功能,我们可以主动限制宽或者高。
<?xml version="1.0" encoding="utf-8"?>
<android.support.constraint.ConstraintLayout xmlns:android="http://schemas.android.com/apk/res/android"
    xmlns:app="http://schemas.android.com/apk/res-auto"
    android:layout_width="match_parent"
    android:layout_height="match_parent">

    <Button
        android:id="@+id/button"
        android:layout_width="0dp"
        android:layout_height="0dp"
        android:background="@color/colorAccent"
        android:text="button"
        android:textColor="#ffffff"
        app:layout_constraintDimensionRatio="2:1"
        app:layout_constraintLeft_toLeftOf="parent"
        app:layout_constraintRight_toRightOf="parent"
        app:layout_constraintWidth_max="100dp" />
</android.support.constraint.ConstraintLayout>
这里我们宽高都是 0dp,并且 ratio 为 2:1,宽度最大为 100dp,那么约束布局会计算出一个符合比例并且最大的尺寸,这里我们可以预见,宽是 100dp,高度是宽度的一半。

假如我们将ratio设置为
app:layout_constraintDimensionRatio="W,2:1"
此时 ratio 的意思是,宽为1,高为2,那么高度就是宽度的两倍。

Chains
约束布局提供了一个链条的功能,当一组View在某个方向上接连的互相存在约束关系时,这组View就形成了一条链条。
下面举个例子
示例
<?xml version="1.0" encoding="utf-8"?>
<android.support.constraint.ConstraintLayout xmlns:android="http://schemas.android.com/apk/res/android"
    xmlns:app="http://schemas.android.com/apk/res-auto"
    android:layout_width="match_parent"
    android:layout_height="match_parent"
    android:orientation="vertical">

    <TextView
        android:id="@+id/text1"
        android:layout_width="wrap_content"
        android:layout_height="wrap_content"
        android:background="@color/colorAccent"
        android:text="Chain Head"
        android:textColor="#ffffff"
        app:layout_constraintHorizontal_chainStyle="spread_inside"
        app:layout_constraintLeft_toLeftOf="parent"
        app:layout_constraintRight_toLeftOf="@+id/text2" />

    <TextView
        android:id="@+id/text2"
        android:layout_width="wrap_content"
        android:layout_height="wrap_content"
        android:background="@color/colorPrimary"
        android:text="Chain Child1"
        android:textColor="#ffffff"
        app:layout_constraintLeft_toRightOf="@+id/text1"
        app:layout_constraintRight_toLeftOf="@+id/text3" />

    <TextView
        android:id="@+id/text3"
        android:layout_width="wrap_content"
        android:layout_height="wrap_content"
        android:background="@color/colorAccent"
        android:text="Chain Child2"
        android:textColor="#ffffff"
        app:layout_constraintLeft_toRightOf="@+id/text2"
        app:layout_constraintRight_toRightOf="parent"/>
</android.support.constraint.ConstraintLayout>
布局预览如下:

这个例子中,第一个View的左侧与父容器的左侧对齐,并且设置了右边与第二个View的左边对齐;第二个View设置左侧与第一个View的右侧对齐;第三个View先设置了左侧与第二个View的右侧对齐,然后设置了右侧与父容器的右侧对齐。这三个View和父容器相互之前存在约束关系,形成了一条链条。
Chain 的样式属性只需要写在第一个 View 上,如本例的布局文件所示,只有第一个 View 设置了 chainStyle 属性
Chain style
链条的空间分配方式由两个属性决定:
- layout_constraintHorizontal_chainStyle 水平链条的样式
- layout_constraintVertical_chainStyle 竖直链条的样式
链条共有五种样式,需要配合
- layout_constraintHorizontal_weight
- layout_constraintVertical_weight
- layout_constraintVertical_bias
- layout_constraintHorizontal_bias
这四个属性使用。五个样式的效果如下图所示:
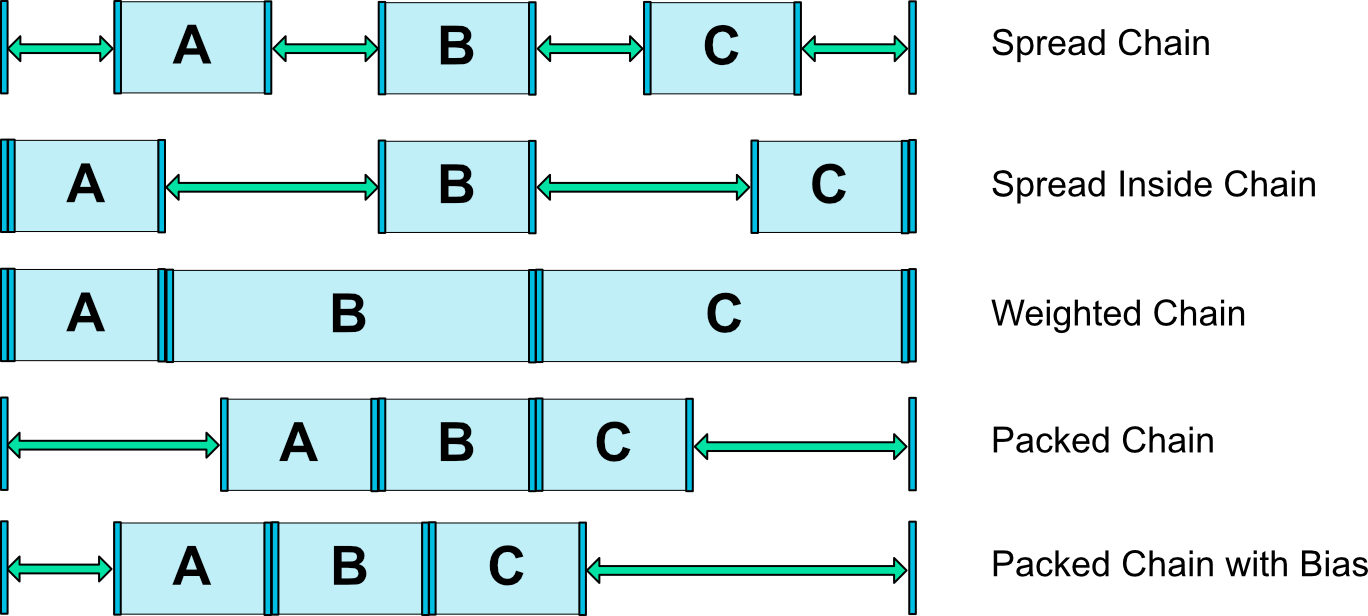
实际效果:
- spread

- spread_inside

- packed

-
weighted chain
这个模式需要将 View 的宽度设为 MATCH_CONSTRAINT,然后设置layout_constraintHorizontal_weight 的值,这里分别设置1-2-2;只要链中有一个 View 设置了weighted 模式,那么整个可用空间都会被这些 View 占满,这点和线性布局是一致的。

-
packed chain with bias
这个模式下,chainStyle 设置为 packed,然后设置 bias 偏移来调整 View 的位置,本例中 bias 为0.1

Barrier Added in 1.1
A Barrier references multiple widgets as input, and creates a virtual guideline based on the most extreme widget on the specified side. For example, a left barrier will align to the left of all the referenced views.
Barrier,翻译过来就是屏障。它是一个虚拟的辅助控件,可以防止它引用的View的位置超过自己。
Barrier主要涉及到的属性有两个:
- app:barrierDirection="left | top | right | bottom | start | end"
- app:constraint_referenced_ids="id1,id2,...,idn"
barrierDirection 属性作用
| 枚举值 | 作用 |
|---|---|
| left | 保证被引用的View的左侧不超过屏障,此时屏障类似一条竖直的线 |
| top | 保证被引用的View的顶部不超过屏障,此时屏障类似一条横向的线 |
| right | 保证被引用的View的右侧不超过屏障,此时屏障类似一条竖直的线 |
| bottom | 保证被引用的View的底部不超过屏障,此时屏障类似一条竖直的线 |
| start | 同left |
| end | 同right |
示例
<?xml version="1.0" encoding="utf-8"?>
<android.support.constraint.ConstraintLayout xmlns:android="http://schemas.android.com/apk/res/android"
    xmlns:app="http://schemas.android.com/apk/res-auto"
    android:layout_width="match_parent"
    android:layout_height="match_parent"
    android:orientation="vertical">

    <android.support.constraint.Barrier
        android:id="@+id/barrier"
        android:layout_width="wrap_content"
        android:layout_height="wrap_content"
        app:barrierDirection="right"
        app:constraint_referenced_ids="text1,text2,button1" />

    <TextView
        android:id="@+id/text1"
        android:layout_width="wrap_content"
        android:layout_height="wrap_content"
        android:background="@color/colorAccent"
        android:text="TextView1"
        android:textColor="#ffffff" />

    <TextView
        android:id="@+id/text2"
        android:layout_width="wrap_content"
        android:layout_height="wrap_content"
        android:layout_marginTop="10dp"
        android:background="@color/colorPrimary"
        android:text="TextView2"
        android:textColor="#ffffff"
        app:layout_constraintTop_toBottomOf="@+id/text1" />

    <View
        android:layout_width="1px"
        android:layout_height="0dp"
        android:background="#000000"
        app:layout_constraintBottom_toBottomOf="parent"
        app:layout_constraintLeft_toRightOf="@+id/barrier"
        app:layout_constraintTop_toTopOf="parent" />

    <Button
        android:id="@+id/button1"
        android:layout_width="wrap_content"
        android:layout_height="wrap_content"
        android:layout_marginTop="10dp"
        android:text="增加TextView2的长度"
        app:layout_constraintTop_toBottomOf="@+id/text2" />
</android.support.constraint.ConstraintLayout>
本例中 Barrier 的 barrierDirection 的值为 right,那么它保证所有被引用的View的右侧不会超过它的位置。
实现效果如下:

如图所示,黑色的线为 Barrier 示意图,当 TextView2 的文字增加时,Barrier 的位置也会跟着改变,保证 Barrier 始终跟这三个 View 的最右端对齐。
Group Added in 1.1
This class controls the visibility of a set of referenced widgets. Widgets are referenced by being added to a comma separated list of ids.
Group可以统一管理多个View的显示和隐藏
例子
<?xml version="1.0" encoding="utf-8"?>
<android.support.constraint.ConstraintLayout xmlns:android="http://schemas.android.com/apk/res/android"
    xmlns:app="http://schemas.android.com/apk/res-auto"
    android:layout_width="match_parent"
    android:layout_height="match_parent">

    <android.support.constraint.Group
        android:layout_width="wrap_content"
        android:layout_height="wrap_content"
        android:visibility="gone"
        app:constraint_referenced_ids="text1,text2"/>

    <TextView
        android:id="@+id/text1"
        android:layout_width="wrap_content"
        android:layout_height="100dp"
        android:background="@color/colorPrimary"
        android:text="TextView1"
        android:textColor="#ffffff"
        app:layout_constraintLeft_toLeftOf="parent"
        android:layout_marginTop="50dp"
        app:layout_constraintTop_toTopOf="parent"
        app:layout_constraintRight_toRightOf="parent" />

    <TextView
        android:id="@+id/text2"
        android:layout_width="0dp"
        android:layout_height="0dp"
        android:background="@color/colorAccent"
        android:text="TextView2\nTextView2\nTextView2\nTextView2\nTextView2\nTextView2"
        android:textColor="#ffffff"
        app:layout_constraintVertical_bias="0"
        app:layout_constrainedHeight="false"
        app:layout_constraintBottom_toTopOf="@+id/text1"
        app:layout_constraintTop_toTopOf="parent"
        app:layout_constraintDimensionRatio="1:1"/>
</android.support.constraint.ConstraintLayout>
在本例中,我们把 constraint_referenced_ids 设为 text1,text2,那么当我们改变Group 的可见性时,会同时改变 TextView1 和 TextView2 的可见性。


Group支持同时有多个存在,假如有两个Group引用了相同的View,那么在xml中,后一个Group将覆盖前一个Group的可见性。
Guideline
约束布局库提供了一个Guideline类,可见性为Gone,主要作用是充当一个锚点。
- Horizontal Guideline 高度为0dp,宽度与父容器等宽
- Vertical Guideline 宽度为0dp,高度与父容器等高
Guideline提供了三个属性来设置它的位置
- app:layout_constraintGuide_begin —— Guideline距离父容器左边或者顶部的距离
- app:layout_constraintGuide_end —— Guideline距离父容器右边或者底部的距离
- app:layout_constraintGuide_percent —— Guideline距离父容器左边或者顶部的距离占父容器的宽或者高的百分比
当三个属性都设置时,优先级: percent > end > begin
示例
<?xml version="1.0" encoding="utf-8"?>
<android.support.constraint.ConstraintLayout xmlns:android="http://schemas.android.com/apk/res/android"
    xmlns:app="http://schemas.android.com/apk/res-auto"
    android:layout_width="match_parent"
    android:layout_height="match_parent"
    android:orientation="vertical">

    <android.support.constraint.Guideline
        android:id="@+id/guideline"
        android:layout_width="wrap_content"
        android:layout_height="wrap_content"
        android:orientation="vertical"
        app:layout_constraintGuide_percent="0.5" />

    <android.support.constraint.Guideline
        android:id="@+id/guideline1"
        android:layout_width="wrap_content"
        android:layout_height="wrap_content"
        android:orientation="horizontal"
        app:layout_constraintGuide_percent="0.5" />

    <TextView
        android:id="@+id/text1"
        android:layout_width="wrap_content"
        android:layout_height="wrap_content"
        android:background="@color/colorPrimary"
        android:text="TextView1"
        android:textColor="#ffffff"
        app:layout_constraintBottom_toTopOf="@+id/guideline1"
        app:layout_constraintRight_toLeftOf="@+id/guideline" />

    <TextView
        android:id="@+id/text2"
        android:layout_width="wrap_content"
        android:layout_height="wrap_content"
        android:background="@color/colorAccent"
        android:text="TextView2"
        android:textColor="#ffffff"
        app:layout_constraintLeft_toRightOf="@+id/guideline"
        app:layout_constraintTop_toBottomOf="@+id/guideline1" />

    <View
        android:layout_width="1px"
        android:layout_height="0dp"
        android:background="#000000"
        app:layout_constraintBottom_toBottomOf="parent"
        app:layout_constraintLeft_toLeftOf="@+id/guideline"
        app:layout_constraintTop_toTopOf="parent" />

    <View
        android:layout_width="0dp"
        android:layout_height="1px"
        android:background="#000000"
        app:layout_constraintLeft_toLeftOf="parent"
        app:layout_constraintRight_toRightOf="parent"
        app:layout_constraintTop_toTopOf="@+id/guideline1" />
</android.support.constraint.ConstraintLayout>
效果如下:

布局中,两个View用来绘制Guideline
PlaceHolder Added in 1.1
A Placeholder provides a virtual object which can position an existing object.
PlaceHolder,顾名思义,占位符,它可以用来放置其他的View。有了这个类,我们可以写一些布局模板。
举个例子
模板布局文件
<?xml version="1.0" encoding="utf-8"?>
<merge xmlns:android="http://schemas.android.com/apk/res/android"
    xmlns:app="http://schemas.android.com/apk/res-auto"
    xmlns:tools="http://schemas.android.com/tools"
    android:layout_width="match_parent"
    android:layout_height="match_parent"
    tools:parentTag="android.support.constraint.ConstraintLayout">

    <android.support.constraint.Placeholder
        android:id="@+id/holder1"
        android:layout_width="60dp"
        android:layout_height="60dp"
        app:content="@+id/left"
        app:layout_constraintHorizontal_chainStyle="spread"
        app:layout_constraintLeft_toLeftOf="parent"
        app:layout_constraintRight_toLeftOf="@+id/holder2" />

    <android.support.constraint.Placeholder
        android:id="@+id/holder2"
        android:layout_width="60dp"
        android:layout_height="60dp"
        app:content="@+id/middle"
        app:layout_constraintLeft_toRightOf="@+id/holder1"
        app:layout_constraintRight_toLeftOf="@+id/holder3" />

    <android.support.constraint.Placeholder
        android:id="@+id/holder3"
        android:layout_width="60dp"
        android:layout_height="60dp"
        app:content="@+id/right"
        app:layout_constraintLeft_toRightOf="@+id/holder2"
        app:layout_constraintRight_toRightOf="parent" />
</merge>
这里我们使用 tools:parentTag 标签,将其设为约束布局,使得编辑器将当前 merge 标签当做约束布局来预览。
PlaceHolder 的属性我们只需要关心一个 content 即可,这个属性表示的是要填入这个占位符的 View 的 id。当 View 的 id 和 PlaceHolder 的 content 对应时,View 会被移动到 PlaceHolder 的位置。
预览图如下:

主布局文件
<?xml version="1.0" encoding="utf-8"?>
<android.support.constraint.ConstraintLayout xmlns:android="http://schemas.android.com/apk/res/android"
    android:layout_width="match_parent"
    android:layout_height="match_parent"
    android:orientation="vertical">

    <include layout="@layout/template" />

    <ImageView
        android:id="@+id/left"
        android:layout_width="wrap_content"
        android:layout_height="wrap_content"
        android:src="@mipmap/ic_launcher" />

    <ImageView
        android:id="@+id/middle"
        android:layout_width="wrap_content"
        android:layout_height="wrap_content"
        android:src="@mipmap/ic_launcher" />

    <ImageView
        android:id="@+id/right"
        android:layout_width="wrap_content"
        android:layout_height="wrap_content"
        android:src="@mipmap/ic_launcher" />
</android.support.constraint.ConstraintLayout>
实际运行效果:

