原文: Android Widgets, 作者: Yusuf Eren UTKU
Android Widgets
什么是app widgets?
Widgets是自定义首页的基本元素. 你可以把它当做app的预览, 使得用户在首页就可以访问app的数据和功能.
这篇文章包含的内容有:
- 创建Widget的简单例子('Simple Widget' - 实现点击Widget打开网页)
- Widget组合广播的例子('Broadcast Widget' - 累积Widget的点击数)
- 配置Widget的例子('Configurable Widget' - 在创建Widget前获取数据然后在Widget被点击时使用这些数据)
- Service更新Widget的例子('Update Widget' - 每隔1分钟更新一个随机数显示到Widget)
Widget的创建步骤:
- 为Widget创建布局
- 创建XML文件用于设置Widget属性
- 创建class文件定义Widget行为
- 将以上内容加入到AndroidManifest.xml中
根据这些步骤, 第一个例子中, Widget将会累积点击事件, 并把累积的数字展示给用户.
**Step 1: ** 为Widget创建一个非常简单的布局.
simple_app_widget.xml
<LinearLayout xmlns:android="http://schemas.android.com/apk/res/android"
              android:layout_width="match_parent"
              android:layout_height="match_parent">

    <TextView
        android:id="@+id/tvWidget"
        android:layout_width="match_parent"
        android:layout_height="match_parent"
        android:layout_margin="@dimen/widget_margin"
        android:background="#ff6200"
        android:contentDescription="@string/appwidget_text"
        android:gravity="center"
        android:text="@string/appwidget_text"
        android:textColor="#ffffff"
        android:textSize="24sp"
        android:textStyle="bold|italic"/>

</LinearLayout>
这个布局将会成为Widget显示在用户的首页.
**Step 2: **创建一个XML文件用于定义Widget属性.

在res目录下新增xml文件夹.
simple_app_widget_info.xml
<?xml version="1.0" encoding="utf-8"?>
<appwidget-provider
    xmlns:android="http://schemas.android.com/apk/res/android"
    android:initialKeyguardLayout="@layout/simple_app_widget"
    android:initialLayout="@layout/simple_app_widget"
    android:minHeight="60dp"
    android:minWidth="60dp"
    android:previewImage="@android:drawable/ic_menu_add"
    android:resizeMode="horizontal|vertical"
    android:updatePeriodMillis="0"
    android:widgetCategory="home_screen">
</appwidget-provider>
简单看看其中的属性
- initialLayout: 指向Widget的布局文件(上面创建的那个).
- minHeight和minWidth: 在首页中每60dp为1格. 在这个例子中, 这个Widget至少占用1X1格
- previewImage: 这张图片会显示在Widget选择界面. 我们不能使用布局文件用于选择预览. 必须设置一张图片.
- resizeMose: 重新设置Widget大小的配置.
- updatePeriodMillis: 执行Widget更新方法的时间间隔.
- widgetCategory:
home_screen或者keyguard
Android Studio提供界面工具用于创建Widgets.

**Step 3: **创建Widget类文件
public class SimpleAppWidget extends AppWidgetProvider {
    @Override
    public void onUpdate(Content content, AppWidgetManager appWidgetManager, int[] appWidgetIds)
}
AppWidgetProvider继承自BroadcastReceiver. 所以SimpleAppWidget是BroadcastReceiver的简洁子类. 所以Widget实质上是一个广播接收器.
**Step 4: **把Widget当做广播接收器加入AndroidManifest中
AndroidManifest
<?xml version="1.0" encoding="utf-8"?>
<manifest package="com.erenutku.simplewidgetexample"
          xmlns:android="http://schemas.android.com/apk/res/android">

    <application...>
        ...
        <receiver android:name=".SimpleAppWidget">
            <intent-filter>
                <action android:name="android.appwidget.action.APPWIDGET_UPDATE"/>
            </intent-filter>

            <meta-data
                android:name="android.appwidget.provider"
                android:resource="@xml/simple_app_widget_info"/>
        </receiver>
    </application>

</manifest>
到这里你已经为你的app实现了一个Widget : )
让我们了解更多.
RemoteView
继续学习RemoteView.
RemoteView是可以在另一个进程中展示的控件. 这个控件通过布局文件创建, 另外控件还提供修改展示内容的基本操作.(意译)
RemoteView仅支持以下布局:
RemoteView仅支持以下控件:
- AnalogClock
- Button
- Chronometer
- ImageButton
- ImageView
- ProgressBar
- TextView
- ViewFlipper
- ListView
- GridView
- StackView
- AdapterViewFlipper
如果你使用了其他控件, RemoteView就不能操作这些控件.
接着让我们给SimpleAppWidget增加一些功能.
SimpleAppWidget.java
public class SimpleAppWidget extends AppWidgetProvider {

    @Override
    public void onUpdate(Context context, AppWidgetManager appWidgetManager, int[] appWidgetIds) {
        // There may be multiple widgets active, so update all of them
        for (int appWidgetId : appWidgetIds) {
            updateAppWidget(context, appWidgetManager, appWidgetId);
        }
    }

    private void updateAppWidget(Context context, AppWidgetManager appWidgetManager,
                                 int appWidgetId) {

        // Construct the RemoteViews object
        RemoteViews views = new RemoteViews(context.getPackageName(), R.layout.simple_app_widget);
        // Construct an Intent object includes web adresss.
        Intent intent = new Intent(Intent.ACTION_VIEW, Uri.parse("http://erenutku.com"));
        // In widget we are not allowing to use intents as usually. We have to use PendingIntent instead of 'startActivity'
        PendingIntent pendingIntent = PendingIntent.getActivity(context, 0, intent, 0);
        // Here the basic operations the remote view can do.
        views.setOnClickPendingIntent(R.id.tvWidget, pendingIntent);
        // Instruct the widget manager to update the widget
        appWidgetManager.updateAppWidget(appWidgetId, views);
    }

}
上面重写的方法onUpdate, 在updatePeriodMillis的时间到了之后就会被调用.
看看效果:

这个例子非常简单, 可以快速了解Widget的创建过程.
全部源码: https://github.com/yerenutku/WidgetExamples/tree/master/SimpleWidgetExample
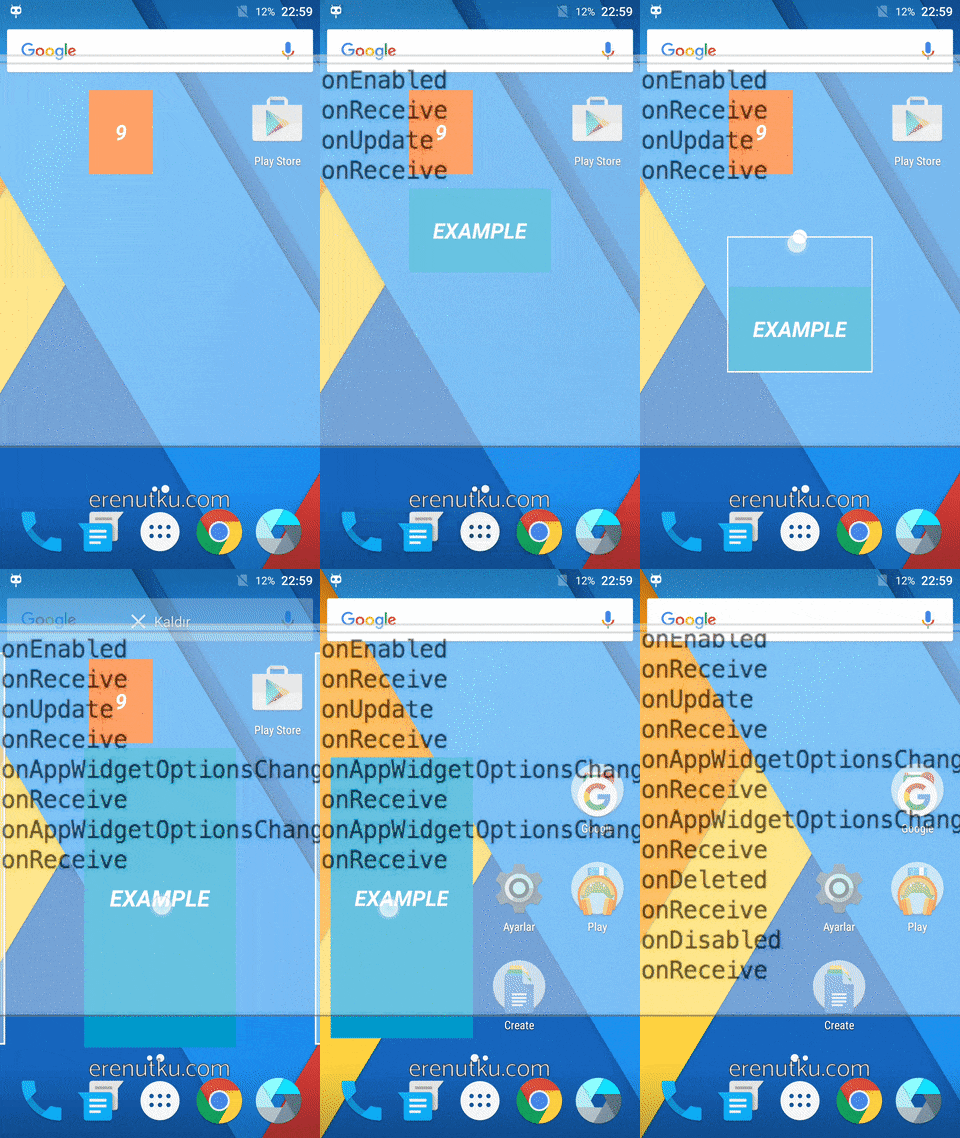
在看下一个例子之前, 我们先看看在Widget类中的方法.
-
onUpdate(): 这个方法每间隔一段时间就会被调用, 间隔的时间由
updatePeriodMillis设置. - onAppWidgetOptionsChanged(): 当Widget第一次被放置或者大小被改变时会被调用.
- onDeleted(Context, int[]): 当Widget被移除的时候被调用.
- onEnabled(Context): 当第一个Widget实例被创建时被调用.
- onDisabled(Context): 当最后一个Widget实例被移除时被调用.
- onReceive(Context, Intent): 在上述每一个方法被调用前都会调用这个方法.
看不懂? 没关系, 直接实操看效果.

Broadcast Widget
我们已经过了一遍基本步骤, 在后面的例子中, 我们不会再重复说明这些步骤了.
在接下来的例子中, 每一次点击Widget都会发送一个广播, 然后在onReceive中累积点击数量.
在前面的例子中我们使用了PendingIntent#getActivity(), 这次我们将会用PendingIntent#getBroadcast().
public class BroadcastWidget extends AppWidgetProvider {
    private static final String ACTION_SIMPLEAPPWIDGET = "ACTION_BROADCASTWIDGETSAMPLE";
    private static int mCounter = 0;

    static void updateAppWidget(Context context, AppWidgetManager appWidgetManager,
                                int appWidgetId) {

        // Construct the RemoteViews object
        RemoteViews views = new RemoteViews(context.getPackageName(), R.layout.broadcast_widget);
        // Construct an Intent which is pointing this class.
        Intent intent = new Intent(context, BroadcastWidget.class);
        intent.setAction(ACTION_SIMPLEAPPWIDGET);
        // And this time we are sending a broadcast with getBroadcast
        PendingIntent pendingIntent = PendingIntent.getBroadcast(context, 0, intent,
                PendingIntent.FLAG_UPDATE_CURRENT);

        views.setOnClickPendingIntent(R.id.tvWidget, pendingIntent);
        // Instruct the widget manager to update the widget
        appWidgetManager.updateAppWidget(appWidgetId, views);
    }

    @Override
    public void onUpdate(Context context, AppWidgetManager appWidgetManager, int[] appWidgetIds) {
        // There may be multiple widgets active, so update all of them
        for (int appWidgetId : appWidgetIds) {
            updateAppWidget(context, appWidgetManager, appWidgetId);
        }
    }

    @Override
    public void onReceive(Context context, Intent intent) {
        super.onReceive(context, intent);
        if (ACTION_SIMPLEAPPWIDGET.equals(intent.getAction())) {
            mCounter++;
            // Construct the RemoteViews object
            RemoteViews views = new RemoteViews(context.getPackageName(), R.layout.broadcast_widget);
            views.setTextViewText(R.id.tvWidget, Integer.toString(mCounter));
            // This time we dont have widgetId. Reaching our widget with that way.
            ComponentName appWidget = new ComponentName(context, BroadcastWidget.class);
            AppWidgetManager appWidgetManager = AppWidgetManager.getInstance(context);
            // Instruct the widget manager to update the widget
            appWidgetManager.updateAppWidget(appWidget, views);
        }
    }

}
注意, 实践中不推荐在Widget中使用静态变量. 这里我尝试让例子更加简单所以才使用静态变量. 实际中你可以使用SharedPreferences.
看看效果.

全部源码: https://github.com/yerenutku/WidgetExamples/tree/master/BroadcastWidgetExample
Configurable Widget
Widget可以在创建的时候进行配置. 在这个例子中, 我们会在创建Widget时要求用户输入一个链接, 然后在点击Widget的时候访问这个链接.
创建ConfigureActivity用作输入链接.
基本布局: activity_widget_configure.xml
<?xml version="1.0" encoding="utf-8"?>
<LinearLayout xmlns:android="http://schemas.android.com/apk/res/android"
              android:layout_width="match_parent"
              android:layout_height="wrap_content"
              android:orientation="vertical"
              android:padding="16dp">

    <TextView
        android:layout_width="match_parent"
        android:layout_height="wrap_content"
        android:layout_marginBottom="8dp"
        android:text="Configure your url"/>

    <EditText
        android:id="@+id/etUrl"
        android:layout_width="match_parent"
        android:layout_height="wrap_content"
        android:hint="URL"
        android:inputType="text"/>

    <Button
        android:id="@+id/btAdd"
        android:layout_width="wrap_content"
        android:layout_height="wrap_content"
        android:layout_marginTop="8dp"
        android:text="@string/add_widget"/>

</LinearLayout>
在Activity#onCreate方法中, 我们做的第一件事就是设置setResult(RESULT_CANCELED). 为什么? 因为Android启动Widget的配置Activity后会等待结果返回, 如果用户没有按照预期进行设置, 例如不输入链接直接离开页面, 那么我们就不需要创建Widget.
ConfigurableWidgetConfigureActivity
public class ConfigurableWidgetConfigureActivity extends Activity {
    int mAppWidgetId = AppWidgetManager.INVALID_APPWIDGET_ID;
    private EditText etUrl;
    private Button btAdd;
    private AppWidgetManager widgetManager;
    private RemoteViews views;

    @Override
    public void onCreate(Bundle icicle) {
        super.onCreate(icicle);
        setResult(RESULT_CANCELED);
        // activity stuffs
        setContentView(R.layout.activity_widget_configure);
        etUrl = (EditText) findViewById(R.id.etUrl);
        // These steps are seen in the previous examples
        widgetManager = AppWidgetManager.getInstance(this);
        views = new RemoteViews(this.getPackageName(), R.layout.configurable_widget);
        // Find the widget id from the intent.
        Intent intent = getIntent();
        Bundle extras = intent.getExtras();
        if (extras != null) {
            mAppWidgetId = extras.getInt(AppWidgetManager.EXTRA_APPWIDGET_ID, AppWidgetManager.INVALID_APPWIDGET_ID);
        }
        if (mAppWidgetId == AppWidgetManager.INVALID_APPWIDGET_ID) {
            finish();
            return;
        }
        btAdd.setOnClickListener(new View.OnClickListener() {
            @Override
            public void onClick(View view) {
                // Gets user input
                Intent intent = new Intent(Intent.ACTION_VIEW, Uri.parse(etUrl.getText().toString()));
                PendingIntent pending = PendingIntent.getActivity(ConfigurableWidgetConfigureActivity.this, 0, intent, 0);
                views.setOnClickPendingIntent(R.id.ivWidget, pending);
                widgetManager.updateAppWidget(mAppWidgetId, views);
                Intent resultValue = new Intent();
                // Set the results as expected from a 'configure activity'.
                resultValue.putExtra(AppWidgetManager.EXTRA_APPWIDGET_ID, mAppWidgetId);
                setResult(RESULT_OK, resultValue);
                finish();
            }
        });
    }
}
好了, 最后一步就是修改Widget的XML配置文件. 修改之后, 系统就会知道这个Widget有相应的配置页面, 因此在创建Widget之前, 它会先启动这个配置页面.

如你所见, 我们到这里都没有谈及Widget的类文件. 实际上我们不用在Widget类文件添加任何代码, 因为所有的操作都在ConfigurableWidgetConfigureActivity中完成. 但是我们仍然虽然创建一个类文件.
public class ConfigurableWidget extends AppWidgetProvider {
    @Override
    public void onUpdate(Context context, AppWidgetManager appWidgetManager, int[] appWidgetIds) {
        // do nothing
    }
}
看看效果

全部源码: https://github.com/yerenutku/WidgetExamples/tree/master/ConfigurableWidgetExample
通过Service更新Widget的例子
在这个例子里面, 每分钟都会生成一个随机数, 然后在Widget上显示这个随机数. 首先我们需要一个service来生成随机数.
UpdateService.java
public class UpdateService extends Service {
    @Nullable
    @Override
    public IBinder onBind(Intent intent) {
        return null;
    }

    @Override
    public int onStartCommand(Intent intent, int flags, int startId) {
        // generates random number
        Random random = new Random();
        int randomInt = random.nextInt(100);
        String lastUpdate = "R: "+randomInt;
        // Reaches the view on widget and displays the number
        RemoteViews view = new RemoteViews(getPackageName(), R.layout.updating_widget);
        view.setTextViewText(R.id.tvWidget, lastUpdate);
        ComponentName theWidget = new ComponentName(this, UpdatingWidget.class);
        AppWidgetManager manager = AppWidgetManager.getInstance(this);
        manager.updateAppWidget(theWidget, view);

        return super.onStartCommand(intent, flags, startId);
    }
}
然后把这个service添加到AndroidManifest.

Service不会自己启动, 因此我们需要手动启动这个service(在这个例子中每分钟启动一次).
那么我们为什么不直接使用updatePeriodMillis来实现间隔效果?
如果间隔时间(由
updatePeriodMillis定义)到了, 而设备处于休眠状态, 那么设备就会被唤醒然后执行更新操作. 如果你一小时才更新一次, 这样可能不会对电池造成很大问题. 但是, 如果你需要频繁进行更新, 或者你并不需要在设备休眠时更新, 那么你最好通过alarm来进行更新, 这样设备就不会被唤醒. 你可以通过AlarmManager来设置一个能启动你的AppWidgetProvider的alarm来做到这一点. 把alarm的类型设置为ELAPSED_REALTIME或者RTC, 那么只有当设备处于唤醒状态时alarm才会被传递. 然后把updatePeriodMillis设置为0
在前面的例子中我们使用了PendingIntent#getActivity()和PendingIntent#getBroadcast(), 这次我们将使用PendingIntent#getService().
public class UpdatingWidget extends AppWidgetProvider {
    private PendingIntent service;

    @Override
    public void onUpdate(Context context, AppWidgetManager appWidgetManager, int[] appWidgetIds) {
        final AlarmManager manager = (AlarmManager) context.getSystemService(Context.ALARM_SERVICE);
        final Intent i = new Intent(context, UpdateService.class);

        if (service == null) {
            service = PendingIntent.getService(context, 0, i, PendingIntent.FLAG_CANCEL_CURRENT);
        }
        manager.setRepeating(AlarmManager.ELAPSED_REALTIME, SystemClock.elapsedRealtime(), 60000, service);
    }
}
AlarmManager的最小时间间隔是60000毫秒, 如果你需要小于这个时间间隔来调起service, 你可以试试这种办法. 但我必须提醒你, 这个方法会极大消耗电量, 或者会令到用户删除你的app.
看看效果. 我剪辑了一下视频让你不用等2分钟才能看到效果.

全部源码: https://github.com/yerenutku/WidgetExamples/tree/master/UpdatingWidgetExample
想更深入的学习? 可以看看下面这些链接
- https://developer.android.com/guide/topics/appwidgets/index.html
- https://developer.android.com/reference/android/app/Service.html
- http://www.vogella.com/tutorials/AndroidWidgets/article.html
真的非常感谢你能读到这里. 这里有一个文章中提及的项目的GitHub链接. 你可以随时pull requests.
译者:
通过这篇文章能够基本了解Widgets的实现方式, 所以翻译过来分享给大家, 英语水平有限, 大多按照自己理解意译, 欢迎指出翻译有误的地方, 感谢 : P